|
|
Post by humpyboy on Apr 4, 2010 21:32:06 GMT 10
Well it's happening, today a mate came over and together we man handle the tear on to her side,  I then proceeded to remove,axle springs and drawbar,  It was then I found the first of the rotten timber that I didn't know about,    the first two pics are the front mounting point for the left side spring hanger and then the rear mounting point, the third pic is the mounting area for the right side spring,never having restored a van of any sort I'm open to suggestions, I'm thinking along the lines of replacing both timbers the full length  Now it gets a little wierd, I couldn't work out why the wheels sat differently in the gaurds, that was untill I had it on it's side, check out the following pics. Rear hanger Left side  Rear hanger Rigt side  Front hanger Left side  Front hanger Right side  You will notice by looking at the cross members that niether Spring is mounted at the same point, so I looked a little closer and found this, Left spring  Right spring  WHAT THE!!!!  you can see the centre bolt in the first pic but in the second pic they have cut off the head of the bolt and with a piece of plate and a bit of round section they have moved the mounting point for the axle. I also noticed that the bearers that the springs were mounted to had a difference in thickness of 30mm plus the springs only had a difference in hight of 20mm, me thinks maybe a new set of springs also So to all you long time restorers out there, you can now come forth with all your wisdom ;D |
|
|
|
Post by DC3Td on Apr 4, 2010 22:32:49 GMT 10
Hi Humpy. Well you certainly grabbed the bull by the horns so to speak & flipped it on her side. Amazing what one finds when they aren`t looking! So,where to begin? Well i guess you`re going to replace the steel work - springs,shackles,hangers,axle etc ? So onto the woodwork. Nothing bolted/screwed internally to the floor other than the floor to the cross members? Not being there to see it in full then, i`m of the mind as you`ve got clear access, to remove all cross members & perimeter frame. I`d have a couple or so sticks of wood at the ready to place temporary from wall to wall bottoms if you remove the under frame to stop sagging! Measure diagonals before & after. New timber perimeter frame/cross members cut & joined as one. Slide into position from top, then slip the bottom of frame in. Check diagonals & if happy with squareness,screw/bolt into place.Then its the refitting of the steel ware. When i replaced the timber chassis/tow rails on my Td, i had an old water trough about 14 or 15 feet in length,half filled it with old engine oil & soaked them in it for a few weeks or more. Protects the timber but also gives it an aged look! Anyways,my two bobs worth of ideas. Hope it all goes well. cheers gordon
|
|
|
|
Post by humpyboy on Apr 9, 2010 19:30:23 GMT 10
Well here we are, Friday night and straight to the shed when I got home, began by removing a couple of dozen screws that were holding the ally sheets in place at the front and then peeled it back some to discover that she was originally Bondwood with canvas over the top, so at least now I know the ally sheets were added later oh yeah and found more rot  DC3Td, in answer to your question as to how it is attached, this I am not 100% sure but it looks as though they have made the chassis then fitted the floor then bolted through the lot then fitted the wall frame over the top of the bolts, I think I'm going to have to cut the bolts off with the grinder to be able to dismantle the under frame then replace them after I roll it back over on it's wheels. Will get out there tomorrow and dismantle some more and see where I go from there. |
|
|
|
Post by humpyboy on Apr 10, 2010 15:17:03 GMT 10
3.00 pm and just me had me some lunch after a 10.00 am start, Just a quick update I have really got stuck into the van today, have got it back up the right way and have removed all the ally sheets and have found that the upper frame work is just nailed to the base so the plan now is to lift the frame away far enough to get a hacksaw blade in to cut all the nails through and then lift and separate, remove the base completely and start from there, after repairs and such to the base it will be placed back under the frame and reattached, more photos to follow showing today's progress. Okay then photo time, have done as planed with everything going smoothly as you can see from the pics. Back the right way up. 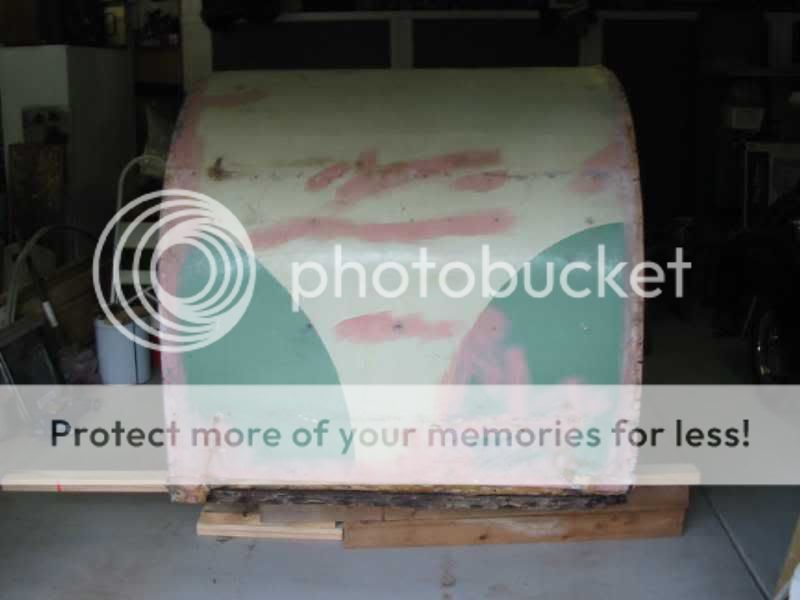 Naked sides. 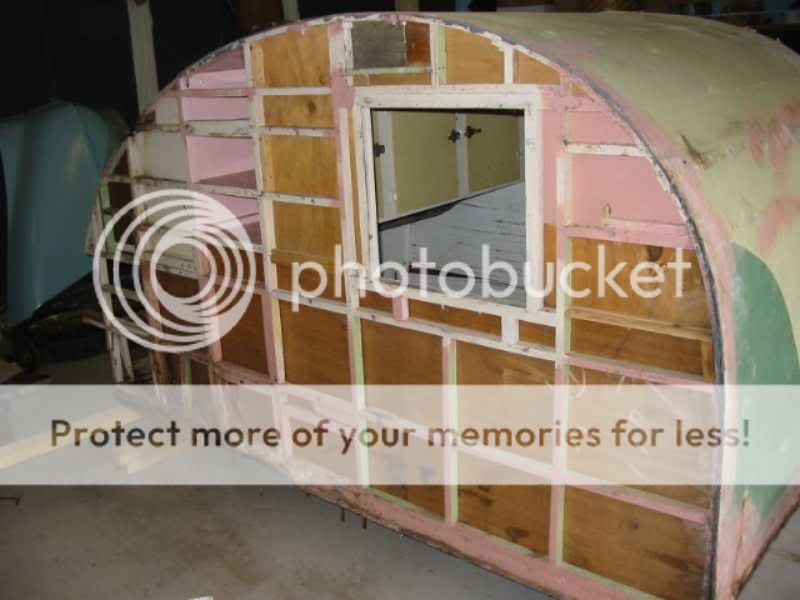 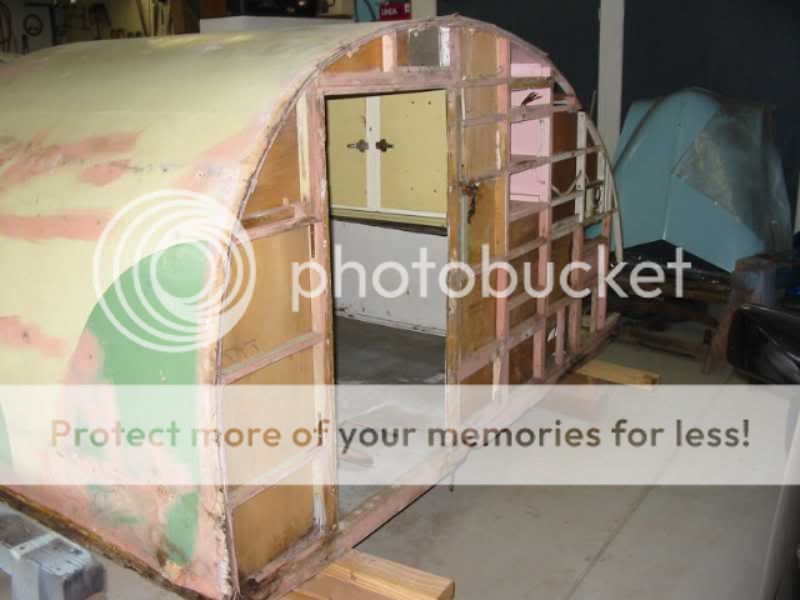 We have lift off.   OH where he go?  OH there he is. 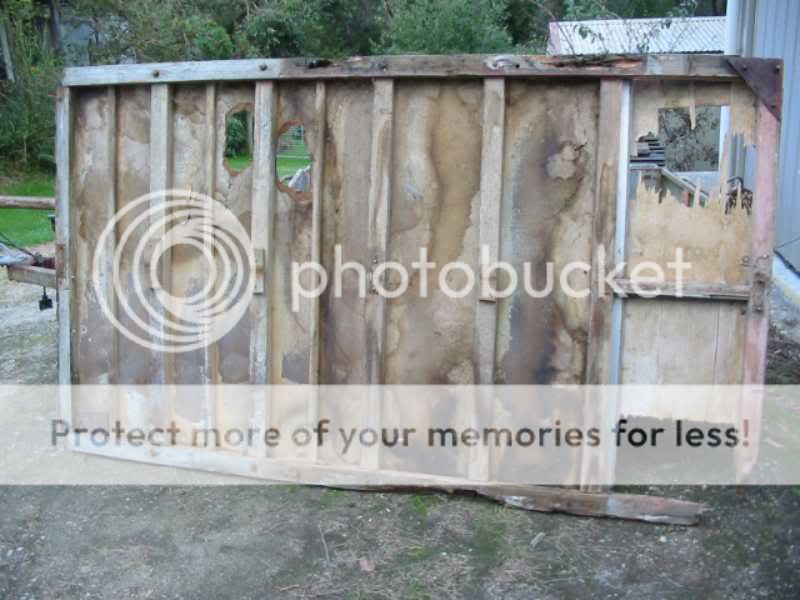 So the plan of attack now is to rebuild the base from scratch reattach springs and axle along with the draw bar after refurbishment and then roll it back under the frame, then all the repairs to the frame will be undertaken and returned to it's rightfull resting place, after this is done I'll remove the old ply skin over the top and reclad it all inside and out. |
|
John
Full Member

Posts: 267
|
Post by John on Apr 10, 2010 22:10:48 GMT 10
COOL!!!  Been looking forward to this Humpyboy! Saw this van the day that Winterwood purchased it and fell in love with it. Already enjoying watching the resto and getting stacks of inspiration to get out in the shed. Great to see it getting what it deserves.  Cheers, John |
|
|
|
Post by DC3Td on Apr 10, 2010 23:59:49 GMT 10
Hi Humpy. Didn`t think you were allowed to put naked pics here! Doing real well so far especially as the floor & frame removed together. At least now you have a blank canvas to work off & can see all the wood rot that needs replacing. cheers gordon
|
|
|
|
Post by humpyboy on Apr 11, 2010 8:47:59 GMT 10
Tasteful nude shots are okay  , am just about to head outside now and begin dismantling the base to see if there is anything that I can reuse in the new one. Nothing!!! it was all to badly rotted to worry about so it will be off to the timber yard for some new stuff, big question is what is best to use, the original was Oregon but I'm wondering if KD hardwood would be better or maybe Treated pine what do the EXPERTS think ;)I will try to see if I can reuse parts of the old timber when I get to the cabinet work, I also pulled apart the old springs to see how they come up after a good clean, I think they may be okay to reuse once I've finished with them, the axle is good it just needs a good clean also as does the draw bar, not a lot gunna happen now till I gets me some new timber. |
|
|
|
Post by humpyboy on Apr 18, 2010 21:00:25 GMT 10
Went down to local recycle yard yesterday and bought some very nice looking Oregon, I need to rip it down the guts to get it to the right size but that wont take to long, what will take time is the fact that I have also started to play with my Ute again so I need to divide my time between the two, will slow things down a bit but I can jump between them to keep me from getting stale on just one project.
|
|
|
|
Post by sportsman 1 on Apr 20, 2010 17:49:38 GMT 10
Hi Humpyboy,
great to see the progress on the SM. I hope you are still talking to me after I introduced you two a while back.
Some people would say it is easier to just make a new one but to me restoring an original, even if you end up replacing a percentage of it, is much better than cobbling up a repro.
You are doing it right and will have a van to be envied at the end.
Cheers, Leigh.
|
|
|
|
Post by humpyboy on Apr 20, 2010 18:50:55 GMT 10
Nah your okay Leigh, I'll still talk to ya, I had always hoped to come across something original with a bit of history to it but one day I may still embark on my quest to build one from scratch with the ideas that I have in mind but for now I'm happy with wot I got even if it does need work, that to me is all part of the fun anyhow Just as a side note, winterwood seems awfully quiet,maybe he is upset with me for the way I am treating her  |
|
|
|
Post by winterwood on Apr 20, 2010 22:56:59 GMT 10
Hi humpyboy,
Winterwood is as happy as a pig in the proverbial, and I'm delighted to see what you are doing with the Safetee Minor.
I've only just came across this thread and I'm so pleased she has gone to a good home so that she can be restored to her former glory. I knew she had been a bit neglected over her 54 years but didn't realise the extent of her "condition". I knew she was well beyond my level of expertise and again, I'm glad you got her.
I missed your thread because I've got into the habit over the past few months of mainly looking at the "30 most recent posts" and as we have been away a bit, I missed your update on the 4th April.
Keep us all posted with your progress and include plenty of photos.
I'm assuming she won't be quite ready for Mildura?
Best wishes
Max
|
|
|
|
Post by humpyboy on Apr 21, 2010 22:24:04 GMT 10
Mildura , be lucky if the new base is ready by then, I really need to be getting my Ute finished but since I finished the new shed and rearranged a few things giving me the empty bay in the BIG shed I just couldn't resist getting started , a little bit every so often and she will be done before I know it or at least I hope it will the base I think is going to be the biggest thing (no pun intended) once that is out of the way I will have reached the summit I feel, the rest should be quite straight forward  |
|
|
|
Post by humpyboy on Apr 25, 2010 21:15:50 GMT 10
Well I spent a few hours today out in the shed and have now got two new side rails along with a bunch of new cross members, also started cleaning up the springs and will do drawbar and axle tomorrow ready for painting, I will need to go out and see what is available in the way of ply for the floor and decide how best to put all the pieces together, will do the picture thing when I have something worth taking a picture of.
Derk.
|
|
|
|
Post by DC3Td on Apr 25, 2010 22:14:43 GMT 10
Hi Humpy.Now you`ve got the flooring almost sorted,don`t forget to seal and or paint the top of the bearers/rails before fixing the floor to them. Saves a lot of heartbreak further down the line.(moisture sitting between them & the floor).Sounds like its all coming together really well for you. cheers gordon
|
|
|
|
Post by humpyboy on May 1, 2010 22:14:52 GMT 10
Well I'm still at it, have been busy getting all my bits and pieces organized, going to Bunnings tomorrow to get some bolts and paint, check out ply for the floor ect and then back home to finish painting draw bar,axle and springs plus numerous pieces of wood in readiness for reassembly so with luck on my side I may have it ready for floor next week end, till then.
Happy vaning
Derk.
|
|
|
|
Post by humpyboy on May 2, 2010 19:55:56 GMT 10
Well went off and did my shopping today but only got as far as the Miter10 mega store, as they say up north "SAME SAME but different" only cos it was closer and they still had everything I wanted, so got home with it drizzling, not so good for painting but managed to push a few things round in the shed and made some room, most of the running gear is ready but only managed one coat on my timber but will do more in the evenings during the week before I start putting things back together, still no pics but we all know what painted wood looks like ;D.
Derk.
|
|
|
|
Post by humpyboy on May 8, 2010 19:25:31 GMT 10
Well here we are with another update, first some pictures from last week when I got my new sticks organized. New and old, can you pick which is which? 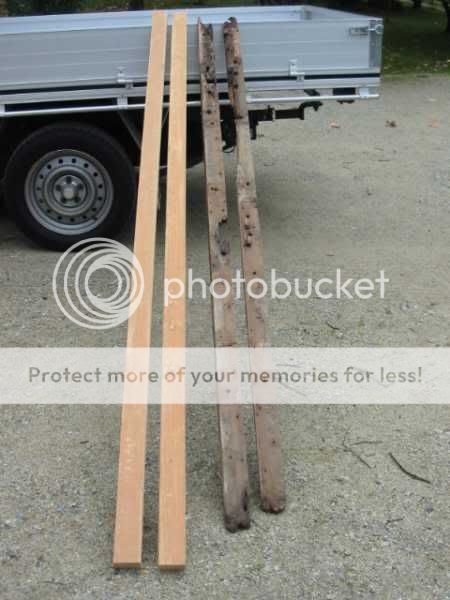 The bits wot go across. 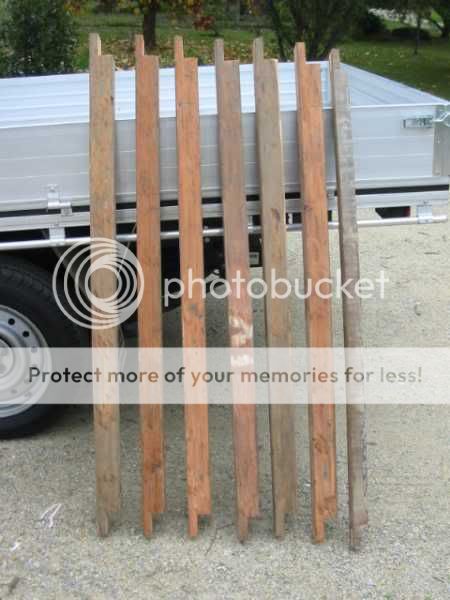 And today when the bits come together, what do you all think of my new mobile workbench? 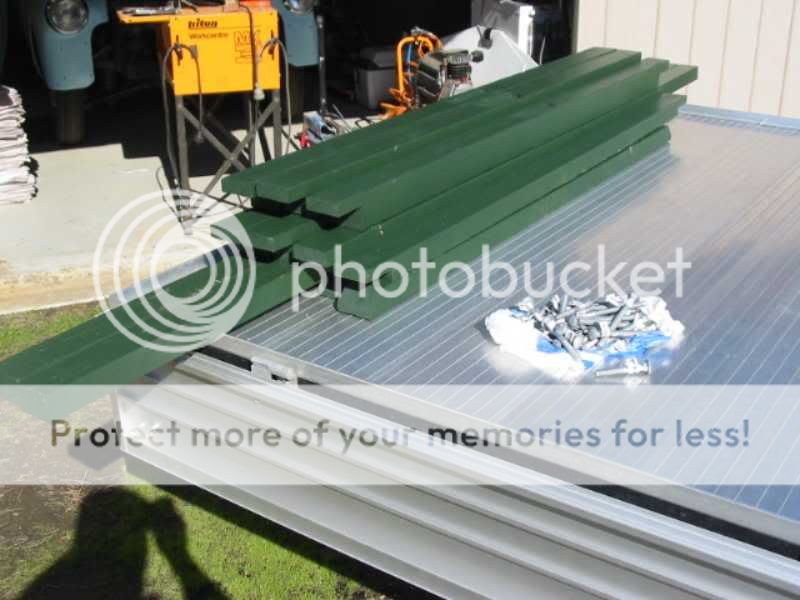 Taking shape. 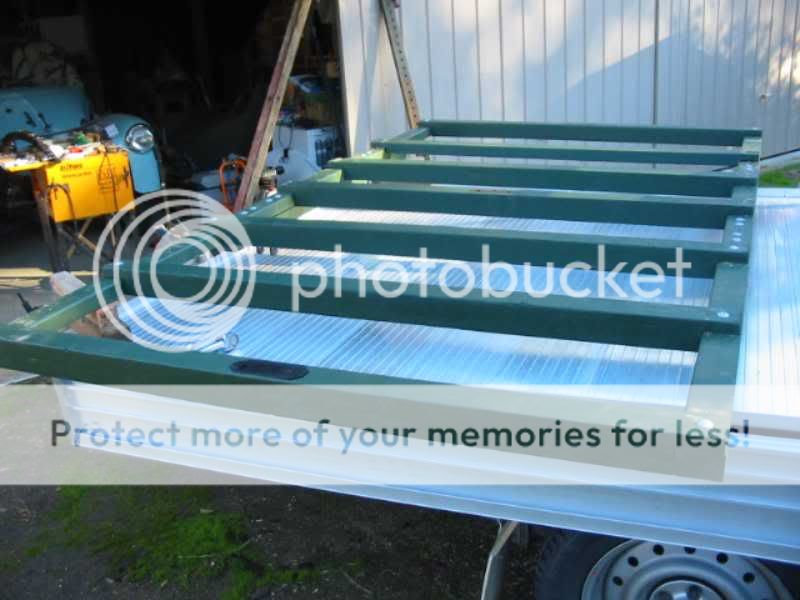 And at days end as the sun sets.  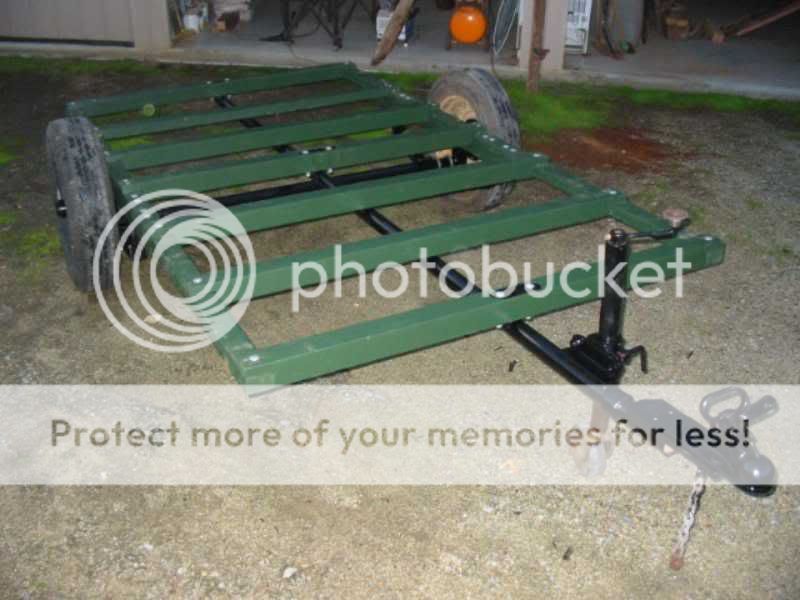 And going back into storage, where else did you think I'd put it ;D ;D 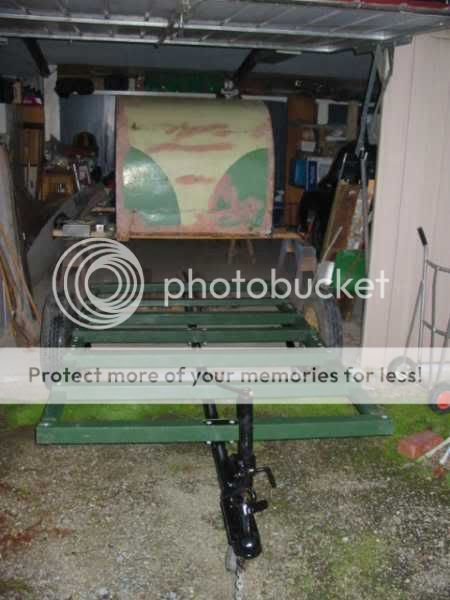 Still a bit to do but I've broken it's back so to speak and can do those little bits in the evening after work while I look into new flooring. |
|
John
Full Member
Posts: 267
|
Post by John on May 12, 2010 20:49:44 GMT 10
Jeez mate, you're hooking into this one!! I've only been away for a couple of nights (Mildura) and look at what you've achieved. Looks great! Cheers, John |
|
|
|
Post by humpyboy on May 12, 2010 21:17:25 GMT 10
Thanks John, I'm busy at the moment trying to source some ply sheeting for floor ect and may have just found me a supply today either for nix or very cheap so looking good for the next round of work.
|
|
|
|
Post by littleblackbird on May 15, 2010 0:08:30 GMT 10
Wow, talk about a fast worker. You made it all look so easy. PS: do u have some internal pics of the van? Would be great to see the old cupboards, sink, layout etc??  )))) |
|
|
|
Post by humpyboy on May 15, 2010 7:10:24 GMT 10
Hi littleblackbird, thanks for your comments, I'm not really a fast worker, I just tend to start and keep going till I've had enough for the day, one doesn't need to be fast or a hard worker if you just keep a steady pace going you will always get to where you are going as for pictures you can go to DHL and then search for Safetee, you will find some info and pictures there of my TD, I'm off now to get some ply for my floor. I should however mention that I intend to redo the kitchen area from the original. |
|
|
|
Post by humpyboy on May 22, 2010 21:03:58 GMT 10
Well here we are again with yet another update, not a great deal of change but will be ready very soon to drop the frame back on, spent most of the day painting the chassis and underneath of the floor with a waterproofing paint. 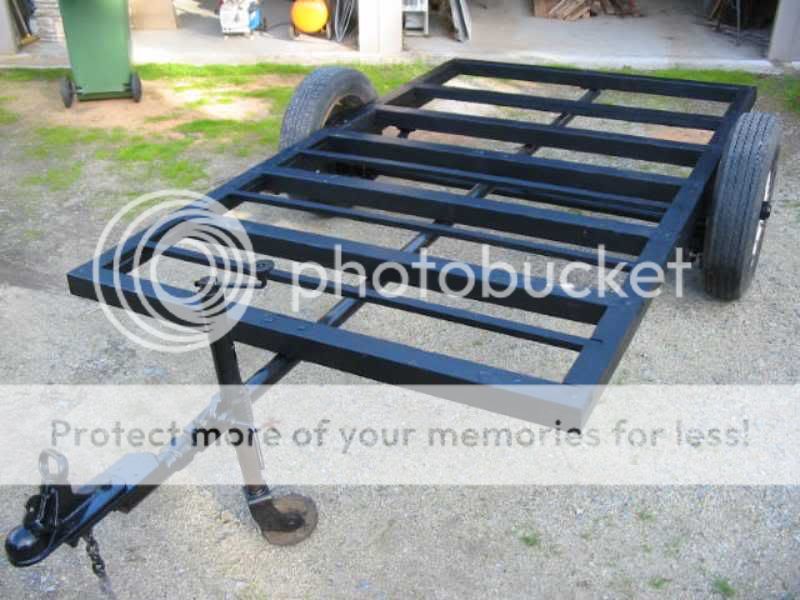  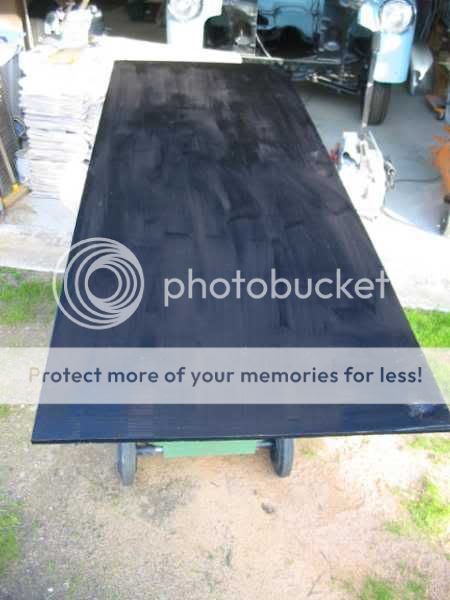  My waterproofing paint of choice. 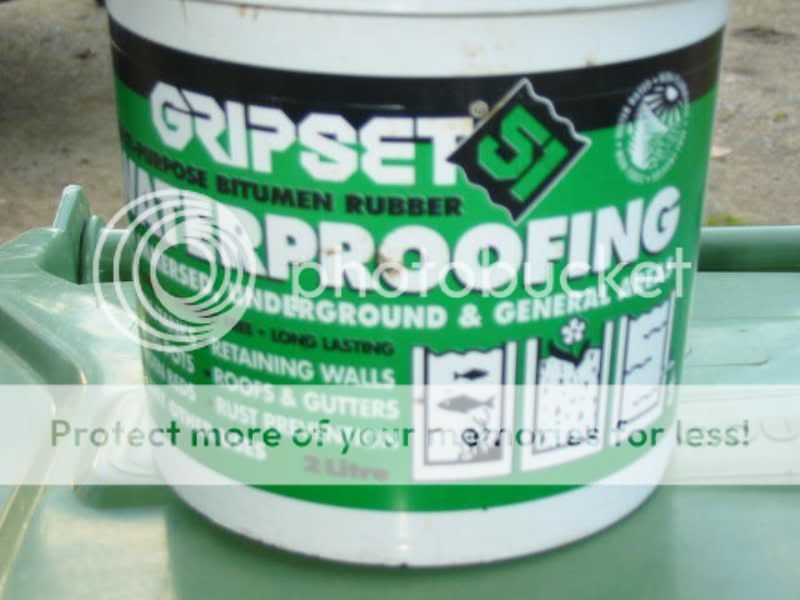 This stuff dries but remains soft and flexible so should move with the timber nicely. Floor sheets down. 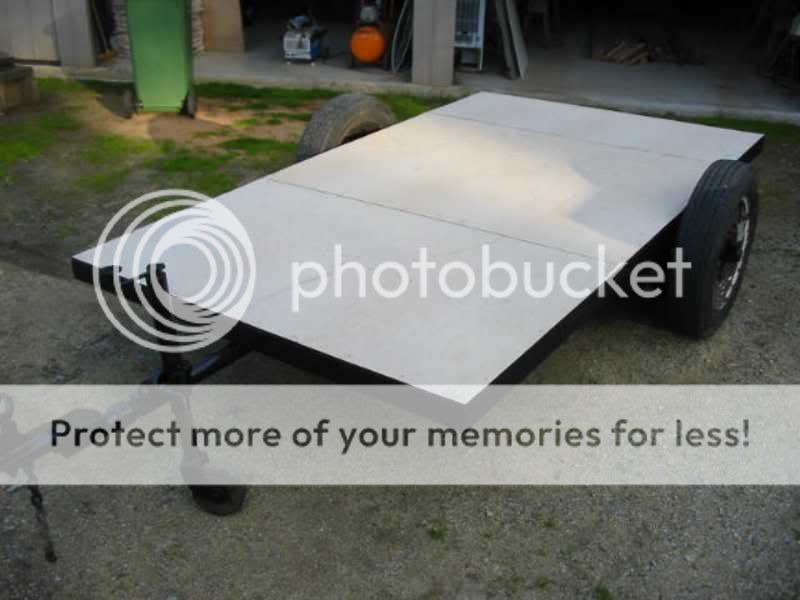 Next stage is to paint the floor and then lower the frame back on in readiness for repairs to it. Now a bit of fun for those watching this thread. "WHO AM I ?" I live in NSW. I build old caravans. I like old cars. And I have a shed were I invent things. Scroll down for answer. Keep going Nearly there 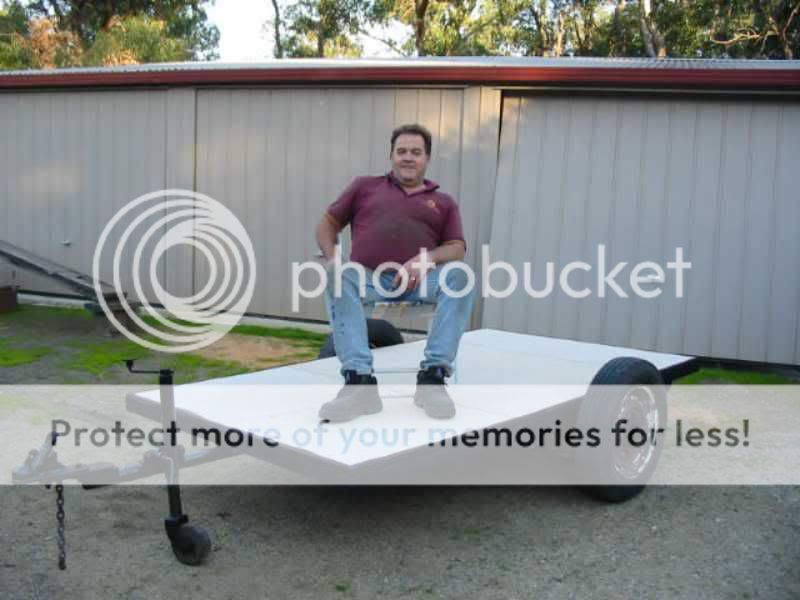 Sorry reddo but I had to do it, |
|
|
|
Post by Don Ricardo on May 22, 2010 21:22:07 GMT 10
G'day Humpyboy, A very nice piece of work happening there!  Looks like it'll be one of those restorations where the restored van is better and stronger than when it rolled out of the factory. Can't complain about that! And as for the last photo... ;D ;D ;D ;D ;D ;D ;D ;D ;D ;D ;D ;D ;D ;D ;D ;D ;D ;D ;D ;D ;D ;D ;D ;D ;D ;D ;D ;D Don Ricardo |
|
|
|
Post by DC3Td on May 22, 2010 21:24:48 GMT 10
Where`s yer beer Humpy? Project of yours coming along very nicely indeed. You ought to be very proud of how it`s all coming together. good on you. cheers gordon
|
|
|
|
Post by humpyboy on May 23, 2010 19:11:47 GMT 10
|
|


 you can see the centre bolt in the first pic but in the second pic they have cut off the head of the bolt and with a piece of plate and a bit of round section they have moved the mounting point for the axle.


 , am just about to head outside now and begin dismantling the base to see if there is anything that I can reuse in the new one.


 ))))
))))


