alprov
Junior Member

Posts: 84 
|
Post by alprov on Aug 29, 2016 19:45:44 GMT 10
Hi , i have a 1963 Viscount built 14/6/1963 , this van travelled 270 kilometres where the owner put 4 x wooden piers a metre deep into the ground then had the van placed on these where it has stayed for its entire life, i'm not sure how to post photos as yet , and would appreciate any help along the way .
Al.
|
|
|
|
Post by Mustang on Aug 29, 2016 19:53:55 GMT 10
WoW can't wait to see your photos, Don will be along soon with a "how to".
|
|
|
|
Post by shesgotthelook on Aug 29, 2016 21:45:00 GMT 10
|
|
alprov
Junior Member
Posts: 84
|
Post by alprov on Aug 29, 2016 22:39:06 GMT 10
I really appreciate your time and help. Testing to see if this works. 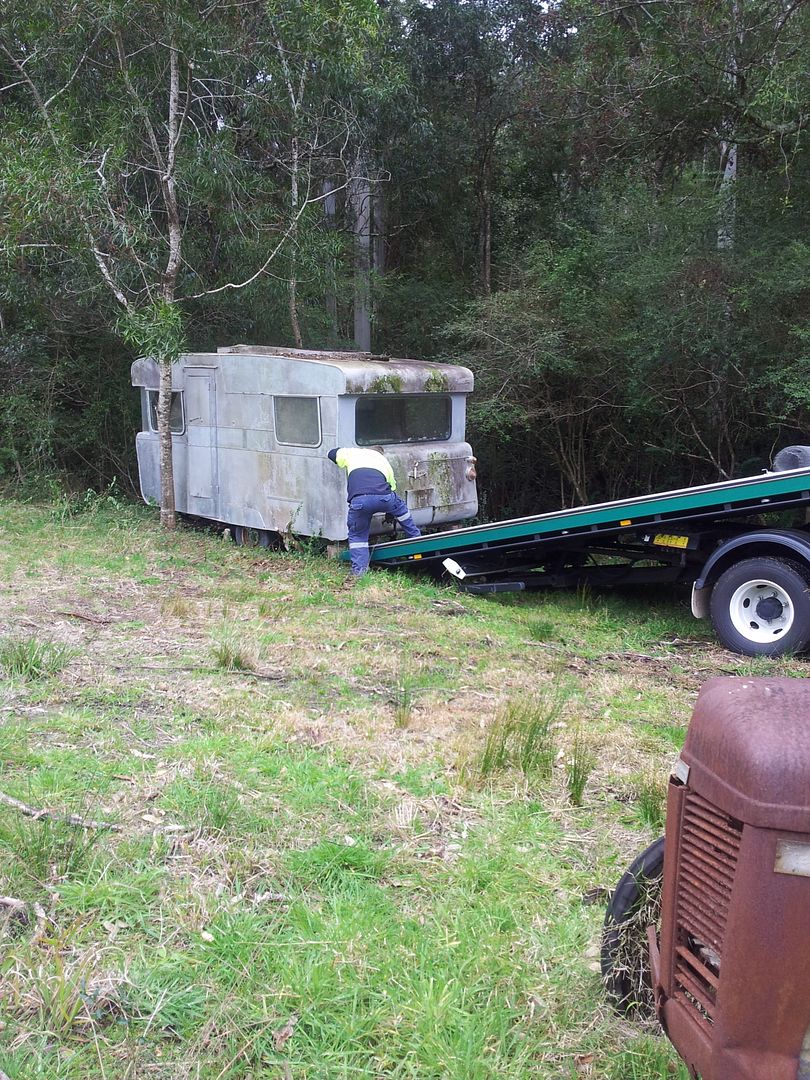 |
|
alprov
Junior Member
Posts: 84
|
Post by alprov on Aug 29, 2016 23:10:27 GMT 10
|
|
|
|
Post by willies on Aug 30, 2016 7:52:05 GMT 10
Amazing how a wash can make such a difference. Your VV now looks far happier in it's new home. Makes the future resto less daunting.
|
|
alprov
Junior Member
Posts: 84
|
Post by alprov on Aug 30, 2016 10:24:03 GMT 10
Thank you Mustang & thanks SGTL , your previous N1257 Viscount sure is a lovely caravan, it must have been hard to part with it , be nice to get this van to a similar standard . Also thank you Willies i was amazed at how a good wash made a difference , i plugged the extension lead in went into the shed & switched the power on & when i came out it was lit up like a xmas tree , the resto has begun with a passion although i know troubled times lay ahead ie wood rot etc , i will endeavour to post some more photos this arvo of the tyres as new & a tile i save with VC it in red/yellow.
|
|
alprov
Junior Member
Posts: 84
|
Post by alprov on Aug 30, 2016 19:51:45 GMT 10
|
|
|
|
Post by shesgotthelook on Aug 30, 2016 22:12:01 GMT 10
|
|
alprov
Junior Member
Posts: 84
|
Post by alprov on Aug 31, 2016 19:11:32 GMT 10
Thank you SGTL , i really didn't think a tile like this would be still available after all these years, appreciate the tip & your time for letting me know , i will keep a look out from now on .
|
|
|
|
Post by Rattles on Aug 31, 2016 21:45:01 GMT 10
 I think this could be possible with patience, and a sharp razor knife to copy using tile/sheet of the the similar colours or with the background the same as the new tile/sheet. Just a thought Rattles |
|
alprov
Junior Member
Posts: 84
|
Post by alprov on Sept 1, 2016 10:55:40 GMT 10
Hi Rattles , that was my initial thought
s as it was a pleasant surprise when i lifted the old carpet & found this ... thinking i could trace one & cut it out however as SGTL has mentioned they are about so i might go that way first & trace & cut if desperate later on...thanks for your post regards al.
|
|
alprov
Junior Member
Posts: 84
|
Post by alprov on Sept 1, 2016 15:09:55 GMT 10
|
|
alprov
Junior Member
Posts: 84
|
Post by alprov on Sept 1, 2016 15:28:27 GMT 10
Have removed all the doors / draws , lounge / bed recliner from the inside to make it easier for later on . I have also been around to the steel works & ordered enough material to fill in the gap between the carport & shed roof so as to move the van forward , bit crowded at present . That's when the fun will begin by lifting up the van & removing the chassis ..really want to do this build well & do justice to it & its era , heading out to Forster tomorrow to chat with Steve who happens to be a vintage caravan restorer .
|
|
alprov
Junior Member
Posts: 84
|
Post by alprov on Oct 7, 2016 10:54:56 GMT 10
Posting this from the local library as my not very old laptop has lost its screen it's a bit like a rainbow , so looking for a replacement. As reported last post i went out to Forster & had a chat with Steve who restores & builds caravans & learnt a lot in a short space of time , so far i have extended my carport 4 metres to give me more room with the help of Warren who lives across the road , he is caring for his 95 years young dad & he also worked at Viscount caravans in 1972 at Orangegrove road Liverpool with his 5 cousins , & lots of stories i've been told. From there i proceeded to take of the bottom panels all round & drill out the rivets , its a pretty sad site with the timber at the rear door side corner all rotted away and a very large hole in the floor , so at present i am doing a lot of patch work temporarily and bracing everything to get the van eventually up & away from the chassis , thats priority number 1.Another priority is the powder build up through electrolisis or oxidation thats creating a point of no return , experimenting with Eco-lube which is a Lanolin based grease that is used to control it , Lanox from Supercheap is another product i might try , i've noticed it will '' creep '' like a root system and then eventually turn into powder , so thats where i am at this present time & will post photos when i get my replacement Laptop .regards al.
|
|
alprov
Junior Member
Posts: 84
|
Post by alprov on Oct 21, 2016 5:43:36 GMT 10
I have all the lower panels free of corrosion white powder build up , really went to town with electric drill & wire brush then treated with heavy duty Lanotec $95 for 5 litres , i thought better to address that first... from there made temporary frame in rear corner & reinforced both rear corners with ply, then off to bunnings & bought 95 x 19 mm treated pine decking 4.8 & 2.4 lengths ... clamped a 4.8 length along the bottom plate just above the ply floor got the nail gun then nailed it @ 150 mm intervals ...from there i then pre drilled and screwed in bugle head gal screws all the way along through the pine into the timber frame, curved bits on the end included , did this both sides. after that i did the same on the inside , cut a length of pine put it at the side of the cupboard then two bugle screws through the outside rails into this piece of timber & with the air gun nailed it to the cupboard & the side of the sink cabinet on the other side from there i put a piece through the door & under the sink put two bugle screws from the outside into this piece each side nailed to the side of cupboard on the door end , two more pieces were nailed & braced in front of the cupboard & in front of the sink frame making the outside & inside all joined to the framework sink & cupboard secured , braced complete , then lifted the van away from the chassis ,a bonus is the floor is ready to be removed when the chassis is finished as i will have a new floor attached to the chassis , at present the floor is already seperated in places from the rear to the sink with only a few screws holding it down ,basically 6 screws only holding floor to the framework, thats the plan, i'm trying to upload photos to a different laptop but keep getting unable to send message , its annoying , think i might go down to the library & try their computer regards al.
|
|
alprov
Junior Member
Posts: 84
|
Post by alprov on Oct 21, 2016 11:29:03 GMT 10
crikey , a bloke cant take a trick , walked 2 k's to the library , find they don't have the goods to upload photos from my mobile , so now 2 k's walk home again , oh well a nice walk along the riverbank , go home and work on the van , i'll win with photo bucket eventually regards al.
|
|
alprov
Junior Member
Posts: 84
|
Post by alprov on Oct 21, 2016 12:44:57 GMT 10
|
|
alprov
Junior Member
Posts: 84
|
Post by alprov on Oct 21, 2016 13:06:40 GMT 10
Next move is to take the chassis for a sandblast , rebuild , protective paint ie dulux industrial grade ( damn good stuff ) new 10mm marine ply from gunnersons , attach to chassis , place chassis back under van ; note i glued timber to the front & side of wheels directly to the pavers for correct placement along with some marker points at rear , then get rid of the old flooring ( gently does it ) & start building from the new floor upwards , thats my immediate goal ,,, because of the way i braced everything the floor is just sagging with only a few screws under the seats & sink area holding it plus the support boards underneath , with a great big hole at the rear plus the wear & tear & neglect i put a heck of a lot of thought into doing it this way , even waking up 3, 4 oclock in the morning & start building in my mind , so thats where i'm at this present time , al.
|
|
alprov
Junior Member
Posts: 84
|
Post by alprov on Oct 23, 2016 13:41:36 GMT 10
|
|
alprov
Junior Member
Posts: 84
|
Post by alprov on Oct 23, 2016 13:43:51 GMT 10
|
|
alprov
Junior Member
Posts: 84
|
Post by alprov on Oct 23, 2016 13:44:57 GMT 10
|
|
alprov
Junior Member
Posts: 84
|
Post by alprov on Oct 23, 2016 13:47:20 GMT 10
bit of playing around however floor removal complete.
|
|
|
|
Post by shesgotthelook on Oct 23, 2016 17:22:57 GMT 10
Oh my, you are brave! Doing a stellar job, definitely no backing down now  Will be well worth all the hard work in the long run. |
|
alprov
Junior Member
Posts: 84
|
Post by alprov on Oct 24, 2016 11:45:26 GMT 10
Thank you sgtl , you know i went to the local library ages ago looking for info on vintage vans & came away empty handed, nothing, then found this site & its people like yourself and a lot of others that i have taken inspiration from with the rebuilding , repairing , of the vintage caravans , thats why i thought why not do it starting from the floor up, when you consider the bottom frame plate is only 25x19 mil ,smaller than a tomato stake i was horrified , but where theres a will theres a way , thank you for your encouragement it means a lot, regards al.
|
|


