|
|
Post by Don Ricardo on Mar 5, 2015 22:33:58 GMT 10
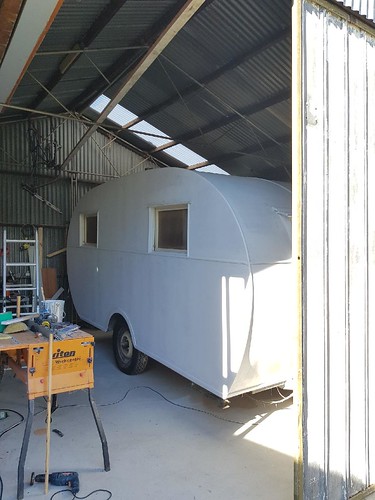
Hi all, Last Thursday I had the opportunity to see the 14 ft Don 140 owned by forum member Chenzo's parents, which is now for sale. Chenzo's original posts about the van can be found here. Some further photos are posted below: 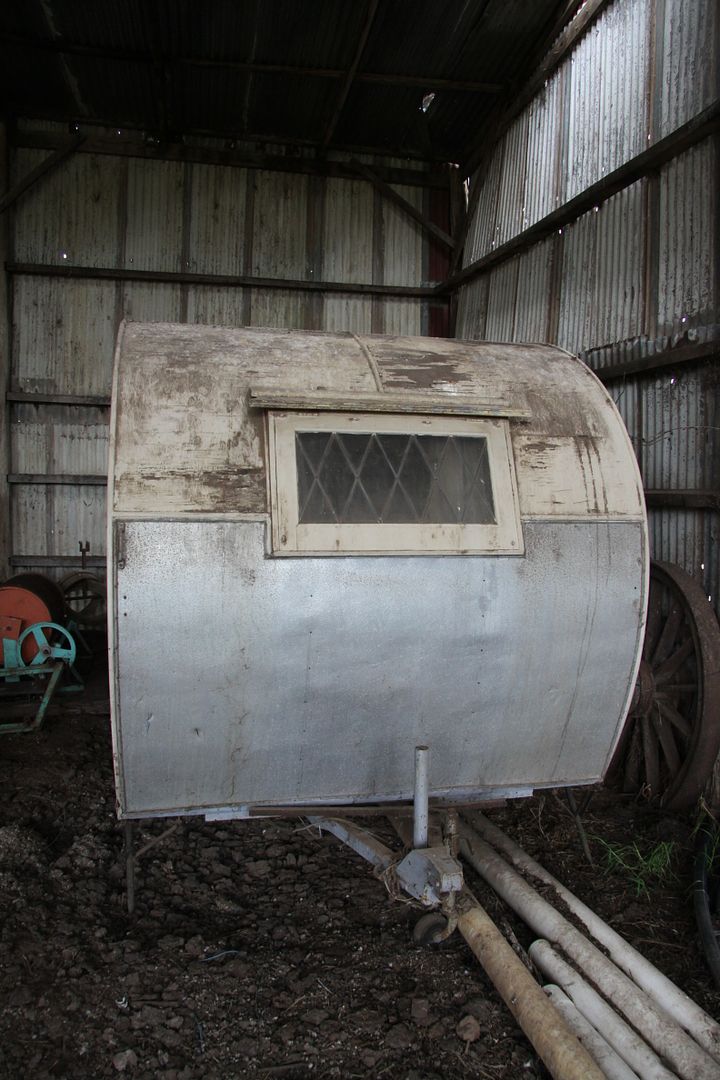  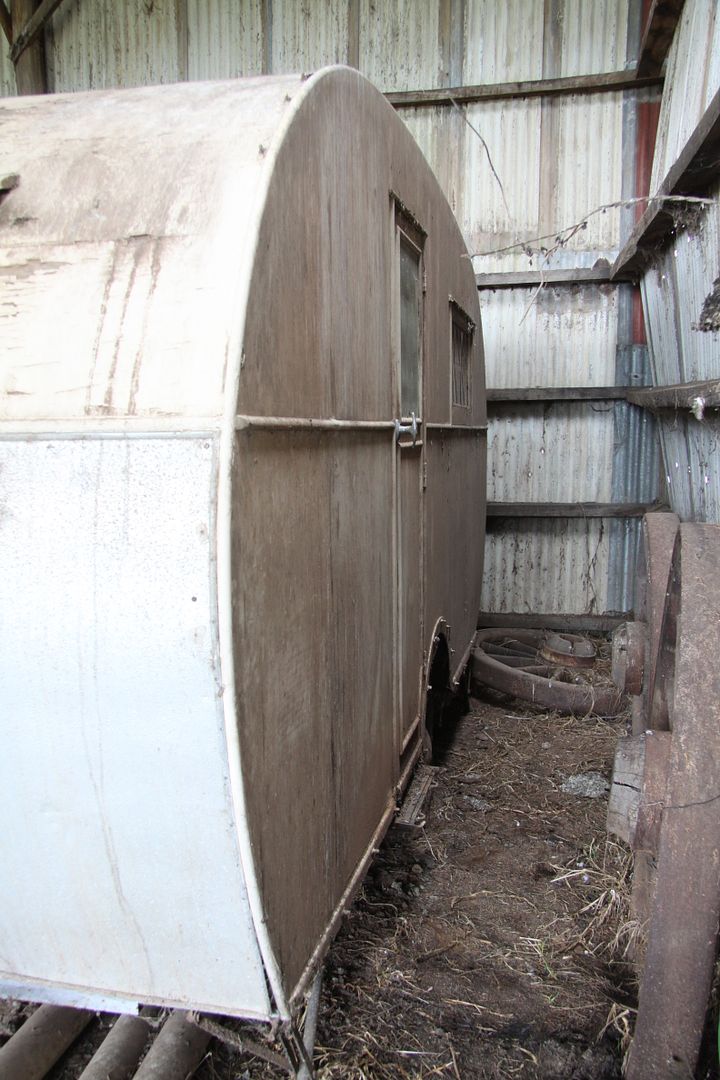 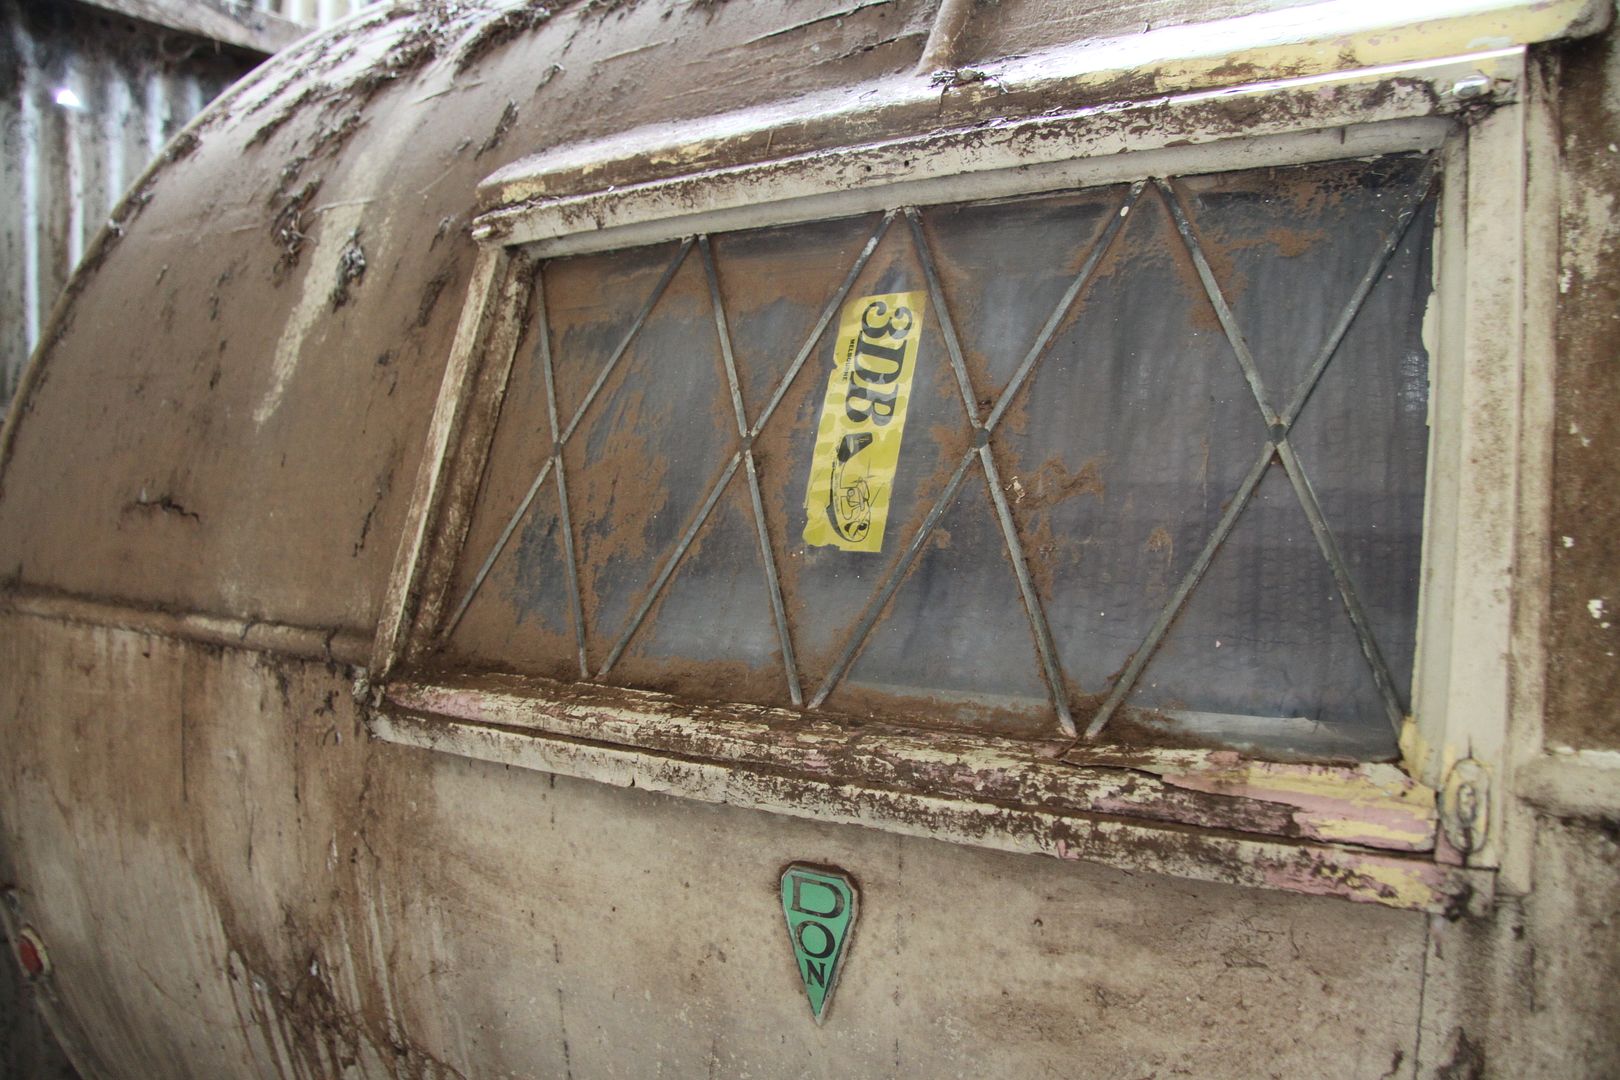 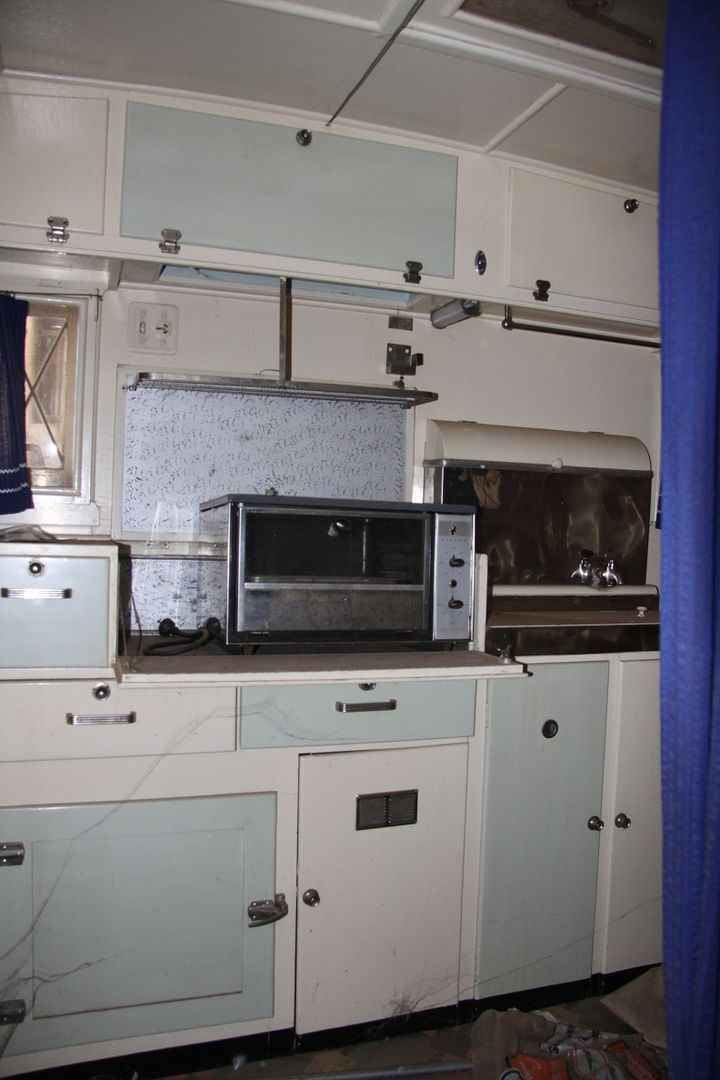 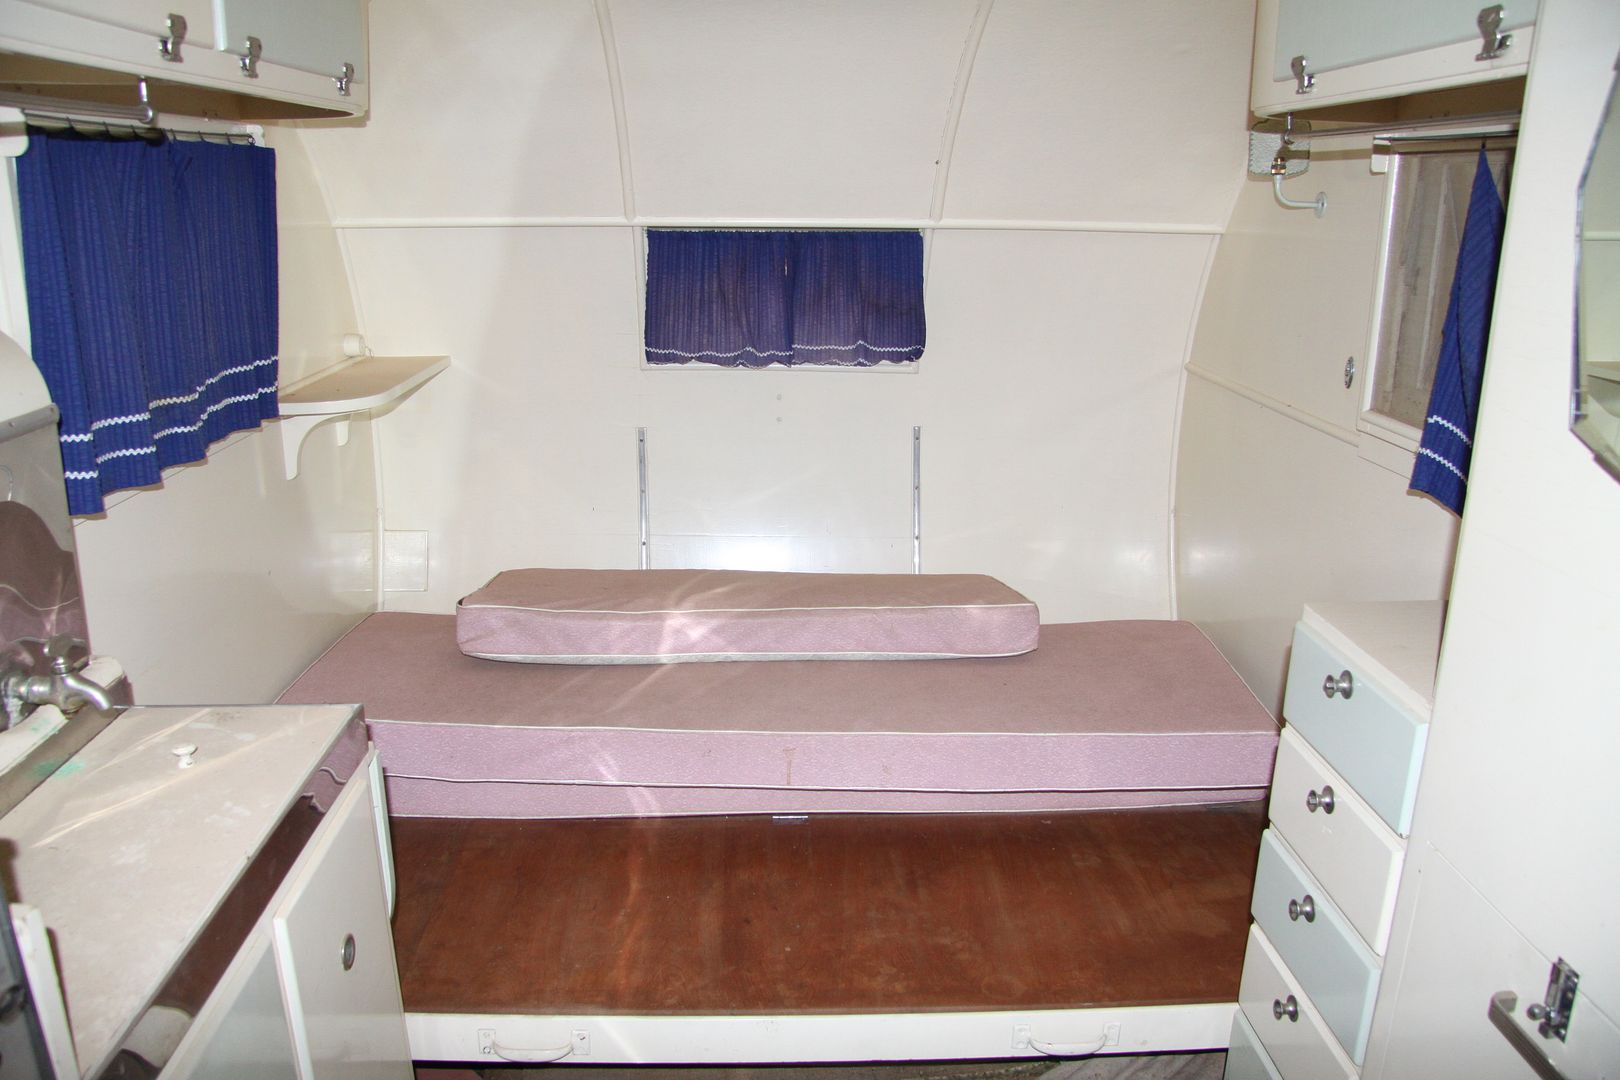  As shown, the serial number is 381 (not 29 or 281 as referred to by Chenzo in his posts). The serial number equates to a build date of 1948. The van is very solid and in good condition under some pretty tired old paint and dust, and I could not find any obvious signs of rot. The caravan has lots of original features (icebox, 12v lights and shades, etc), but has also had some modifications and/or updates (jockey wheel, front aluminium panel, main water tank removed and over sink tank replaced, lino, seat cushions etc). Some of the mods could be easily reversed if a new owner desired. If you are interested in the van phone David (Chenzo) on 0417 581 287 to discuss further, including price, etc (NOT me).But...I have quite a few more photos and can provide a more detailed report. PM me if you want further details. Don Ricardo |
|
|
|
Post by 2sneezles on Mar 10, 2015 10:34:24 GMT 10
Hello. Just wondering if we could have the any extra info on the don 48 please. Thanks
|
|
|
|
Post by 2sneezles on Nov 16, 2017 7:10:46 GMT 10
hello every one
we have got the info about the colors for the don exterior thanks very much. was the paint a low sheen ?
thanks for any advice
|
|
|
|
Post by Don Ricardo on Nov 17, 2017 17:38:46 GMT 10
Hi 2sneezles, If you're aiming for originality, high gloss is the way to go. This is a photo of our van on the day (or within a few days) of it being picked up by my parents: 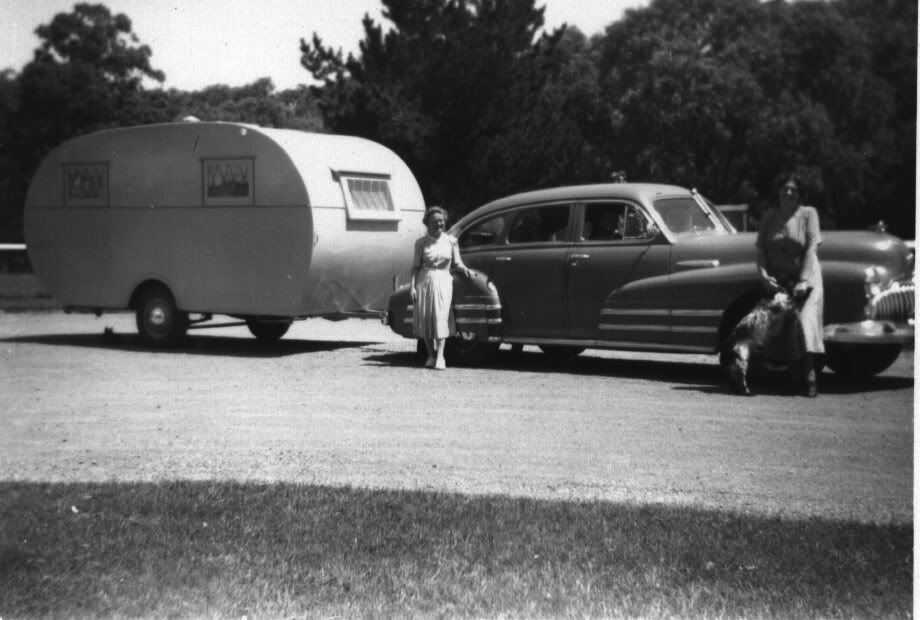 As you can see, the A-frame is reflected in the paint on the front wall, indicating the high sheen. I've kept our van as original as I can, with a couple of deviations in the early 80's  , and have always used high gloss paint. Hope that helps, Don Ricardo |
|
|
|
Post by 2sneezles on Nov 18, 2017 6:45:34 GMT 10
Thank you Don. It must be nice to have something that has been in your family so long. I was think of using an acrylic gloss .? What do you think. Do you have inside pics of your caravan. I’m thinking of curtains now in particular.
Kind regards
2sneezles 😄
|
|
|
|
Post by Don Ricardo on Nov 18, 2017 12:21:44 GMT 10
Hi 2sneezles, Some members of the forum swear by arcylic paint because apparently it stretches and doesn't crack as much as oil-based paint when the wood underneath expands and contracts. Cobber has been a strong advocate of acrylic paint for a long time. But whether it's suitable for your van depends on what is underneath, as I understand it. If you have gone right back to the wood when preparing for repainting, then I think acrylic is the way to go. However, if you are repainting over existing oil-based enamel paint - like I always have been - then I don't think acrylic works, or maybe there's some special preparation you need to do to prepare the surface first. If you have look in the Technical section of the forum, you should be able to find some threads about the pros and cons of acrylic vs oil-based. There are some photos of the inside of our van in the thread about it in the 'Members Photo Album' section - click here. If you work your way through the story of the van, you'll see some photos of the original curtains and upholstery, as well as what has replaced the originals. The van has had three sets of curtains, two sets of upholstery on the seats, and one piece of lino on the floor - not too bad for something that's 68 years old and has been pretty constantly used for all that time. She looks a little bit tired in some areas, but I just call that patina!  Don Ricardo |
|
|
|
Post by mysunfinder on Nov 19, 2017 15:00:58 GMT 10
Hello Don Ricardo,
I clicked the above link and since joining the forum I have had great respect for you however, this has skyrocketed as I read the full history of the Don, your family stories and the tow vehicles. It took a few hours to go through the full thread but what a great read it was. It must be a fairly unique story for the caravan to stay with the one family, especially to have taken such great photos. Although the first two cars were jaw droppers, I'm so glad your parents didn't upgrade the to a new caravan. Thank you also for the mammoth task of restoring the DHL photos.
Regards
Sunfinder
|
|
|
|
Post by griffin on Nov 20, 2017 7:58:15 GMT 10
Hi Don R
Wholeheartedly agree with the high gloss finish. Original photos of my bondwood show it positively gleaming and reflecting everything around it.
The one side that I've managed to preserve with an original coat of paint is still nice and shiny. I'm inclined to paint the newly painted flat sides with a clear gloss but have other things on my plate for the moment.
George
|
|
|
|
Post by 2sneezles on Nov 20, 2017 9:34:03 GMT 10
Attachment DeletedHello Don. We just took off the metal cover on front of the don and found this unusual colour. Any one know if this could have been original. Doesn’t seem to be to me IMG_7350.jpg IMG_7350.jpg
|
|
|
|
Post by Don Ricardo on Nov 20, 2017 20:33:28 GMT 10
G'day 2sneezles,
Very interesting to see what you've uncovered under the aluminium sheet. Somebody has obviously applied a bit of creativity, with a touch of late 50's styling perhaps?
However, I can be quite definite that those colours aren't original. All the leadlight window Don caravans built after the end of the war - apart from the commercial vans - were painted cream with green trim. You have no doubt heard the story of Henry Ford, and the T-model Ford - you could have it any colour you wanted providing it was black. I've been told the same was true of Don Robinson - you could have your caravan in any colour you wanted providing it was cream with green trim. He was apparently quite strong in his views. Having said that, it is interesting to realise that the pre-war Dons were painted in a greater range of colours.
Don Ricardo
|
|
|
|
Post by 2sneezles on Nov 20, 2017 20:52:53 GMT 10
thats what we thought! but when you look at the paint there is no other color under it no layers of any kind and thats what is strange its not painted over anything
we want to paint it in the original color it came out with
the trim appears to have been the same blue as the front and so were the windows, and the roof silver
not sure were to go from here
the cushions are pink and the cupboard doors blue it seems they are co-ordinated
|
|
|
|
Post by Don Ricardo on Nov 21, 2017 9:35:36 GMT 10
Hi 2sneezles,
I think that your Don has had quite a serious aesthetic update at some point in its life - the exterior and interior painted, and new cushions and upholstery installed. The aluminium was then placed over the front as a stone guard at a later point beyond that. If there's nothing under the blue and pink paint, then that's an indication that when it was repainted, all the old paint was removed back to the timber. Dons out of the factory were given a very thorough paint job - about six coats I think, including an orange oxide undercoat and several coats of regular undercoat. The paint ended up being a good millimetre or more thick, which gave them excellent protection from the weather and I think is part of the reason why there are so many leadlight Dons still around. If you haven't found any signs of orange oxide (which was quite a vivid orange), that tells you that all the original paint was removed at some point.
From memory, your Don has the serial number 381? If so, then it was covered in white or off white paint when you got it, including the roof. So it's been repainted several times at least.
Don Ricardo
|
|
|
|
Post by 2sneezles on Nov 21, 2017 14:34:26 GMT 10
Attachment Deletedthanks that makes sense the roof was silver with an orange color undercoating of some kind i think we will go with the colors you have on line the creme and green the lino is pink black and grey i may put the pictures up some others may find it interesting regards 2 sneezles
|
|
|
|
Post by mysunfinder on Nov 21, 2017 16:15:11 GMT 10
Yes please I 'm sure there are plenty that would be interested to see more photos. Lino is just gorgeous and not showing much wear and tear for the age. Sunfinder |
|
|
|
Post by 2sneezles on Nov 23, 2017 6:53:42 GMT 10
hello again Don just checking the electrical any suggestions on rewiring ? it seems to have a wire running on the outside of the van with what looks like a power fitting was that the same with yours? is it ok to rewire the same way? any suggestion as to how you did yours will be helpful
regards 2sneezels
|
|
|
|
Post by Don Ricardo on Nov 23, 2017 19:57:46 GMT 10
Hi 2sneezles, I've just had a look at some photos of your van that I took in 2015 just to remind myself how the wiring was set up. It's the same as in our Don before we made a few changes in 1983. The original set up for the Don 140's the age of yours is that there was a 6/12 volt system and a 240 volt system which were independent of each other. - The 6/12 volt system operated the three wall lights and galley light, and the tail lights and clearance light (just one on the offside). The 6/12 volt system wiring connected to the 6/12 volt battery in the battery cupboard in the cupboards to the right of the door way when entering, and in turn the battery was connected to the car when towing. This charged the battery when travelling, providing lights in the van when stationary, or of course the car battery would also provide power for the lights when the car and caravan were hitched up. There is a tail light/clearance light switch inside the high cupboard above the galley beside the chimney flue which needed to be turned on at dusk when travelling.
- The 240 volt system (if you could call it a system) consisted of a single power point above the stove alcove, which was connected to a power cord that ran down inside the wall and exited through the floor. The cord was attached to a domestic three-pin plug which of course was then connected to an extension cord for 240 volt power. Where the cord down the wall exited through the floor, there was a little block of wood attached underneath the floor with three holes drilled in it. That's so that you could plug the three pin plug into it when you were travelling to keep the plug clean and ensure you didn't rip it off on the undergrowth.
Below are a couple of photos of a Don which belonged to Cobber, but was restored and is now owned by Colinandsue. The photos show the offside with the cladding off, and you can see the 240 volt cord running down the wall, and the three-pin plug on the bottom:
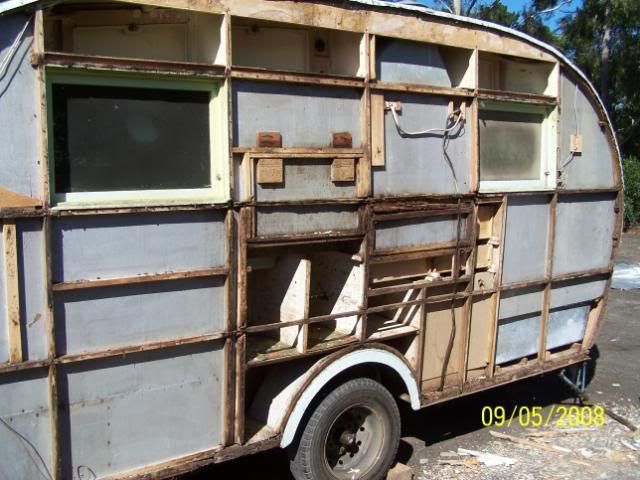 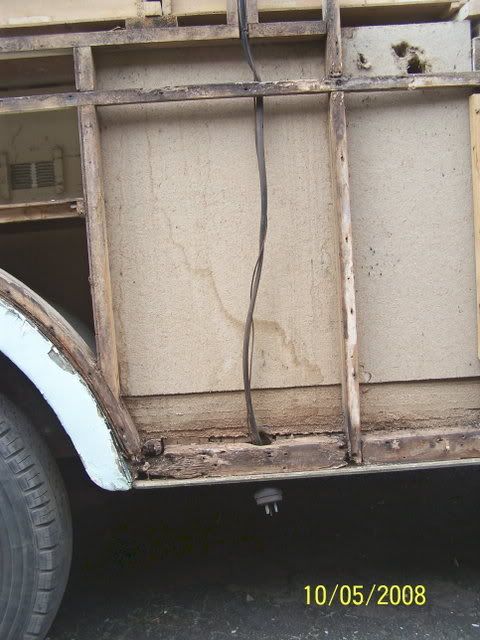 I have a photo of the three-pin plug for your van, so I know the arrangement was the same. When Dona Ricardo and I began to use our van for regular holidays with our boys, we got some changes made to the wiring. The changes were made by a professional auto electrician. I wouldn't attempt anything like that myself - believe me, I know my limits!  However, I can tell you what we had done... - We replaced the power cord and three-pin plug with a regular Clipsal caravan external socket located on the offside wall adjacent to the internal power point above the stove alcove.
- We replaced the original internal socket with a double power point in the same location, and added another double power point on the wall at the right hand end of the high cupboards where it is reasonably hidden.
- We ran the 240 volt wiring down the wall and under the floor and added an external Clipsal power point on the wall just to the rear of the nearside wheel arch.
- We ran the 240 volt wiring up into the battery cupboard and replaced the battery with a 240/12 volt transformer which was then connected to the 6/12 volt system to power the 12 volt lights.
- We changed the 6 volt globes in the wall and galley lights over for 12 volt globes.
- At the same time we replaced the ice box with an Electrolux fridge (which I sort of regret
 , but the ice box just wasn't practical for a family of five spending four weeks away at a time when block ice was no longer available). So 240 volt wiring was run up into the pantry cupboard to connect to a power point for the fridge. , but the ice box just wasn't practical for a family of five spending four weeks away at a time when block ice was no longer available). So 240 volt wiring was run up into the pantry cupboard to connect to a power point for the fridge.
- The 6/12 volt system continues to be connected to the car when travelling so that the internal lights and tail lights, etc, still work. The fridge also works on 12 volts when connected to the car.
There are some things that I would do differently now - for example I would somehow hide the external Clipsal power inlet and power point, and these days you can get portable fridges so we could keep the ice box - but overall I am pretty happy with what we achieved. The auto electrician did a great job of hiding the new 240 volt wiring in the cupboards. Even if people look in the cupboards most of them can't see the new wiring. We left the wiring for the 6/12 volt lighting as it was - it was, and still is in great condition, and we were advised that it didn't need to be moved or changed. And most importantly we were able to retain the original galley light and the wall lights with their original parchment/plastic shades (the same as yours), which are a real feature of the van. The only downside with what we did is, that with the transformer replacing the battery, we are tied to a powered camping site. But being the type of caravanners we are, that's not a big deal for us. The 6/12 volt system has in-line fuses, but these days you should probably consider a good fuse box and circuit breaker as Mustang has suggested in your other thread on this topic - in fact you are probably required to have them - and if I was changing things now I would look at having a deep cycle battery to power the 12 volt system rather than the transformer. Having said that, the transformer has worked well for us. We haven't installed any more modern equipment such as TV's, sound systems or airconditioning, etc. Hope that helps and/or gives you some ideas. I'm happy to provide further information if you would like it, or to post some photos of whatever you may be interested in, if that would be helpful to you. Don Ricardo |
|
|
|
Post by 2sneezles on Nov 24, 2017 7:19:26 GMT 10
thank you so much for the information i will print it out and use it when i talk to the electrician
we will be keeping the ice box and returning it to as close to original as possible,the next big job will be the floor it has had borer so the boards in some areas are soft. it would be nice to keep the floor boards in view from underneath but it might not be possible, any suggestions would be helpful. we also are trying to save the lino its not glued down so that's a bonus.
any pictures of the original lino and curtains would help as when were ready to make them it would give an idea of style
this one had purple searsucker with zigzag trim on wire cord.
thanks again for all your time
i will post pictures as we go along
regards 2 sneezles
|
|
|
|
Post by Don Ricardo on Nov 26, 2017 22:32:25 GMT 10
Hi again 2sneezles, Great to hear that you are keeping the ice box in your van. I certainly wish we had (or had been able) to keep ours. I think the message to be taken out of our experience with the electrical work is that it should be quite possible to keep your original 6/12v lights, etc, while upgrading the safety of the van to a more modern standard, as well as allowing for some modern convenience, eg a couple of additional 240v power points. When your Don and ours were built, Don Robinson wouldn't have ever imagined that one day we would not only want to boil a jug or have a little heater or radio in our vans, but also have chargers for a couple of mobile phones and a tablet, plus other contraptions! Not sure what he would have made of all that.  Regarding your floorboards, we actually had the same problem. Sometime, possibly the middle 60's, a troop of borers worked their way through the floor of our van. It lasted pretty well despite that, but a couple of years ago the floor was feeling distinctly soft. I talked through the options with my carpenter sons, and the option we chose was to reinforce the floorboards by placing panels of marine ply under the floor between the bearers. You can see the photographic record of what we did, and how we did it, here. In the post I just provided a link to, I mentioned having two options. There was one other, and that would have been to take up the lino and then lay some ply over the top of the floor boards. We used 12mm ply under the floor, but I think if we'd laid ply over the floorboards we could have used thinner ply, and of course we wouldn't have had to reinforce the bearers, so that would have added less weight to the van. However, the lino in our van is original and I think that if we had tried to lift it, it would have cracked and broken - it is 65+ years old. So for that reason I didn't want to follow that option. It may also have caused issues with cupboard doors sticking on the lino, etc. However, it may be an option you want to consider if you are intending to change the lino, or think you can lift the current lino without it breaking up. Speaking of lino, this is what is in our van: 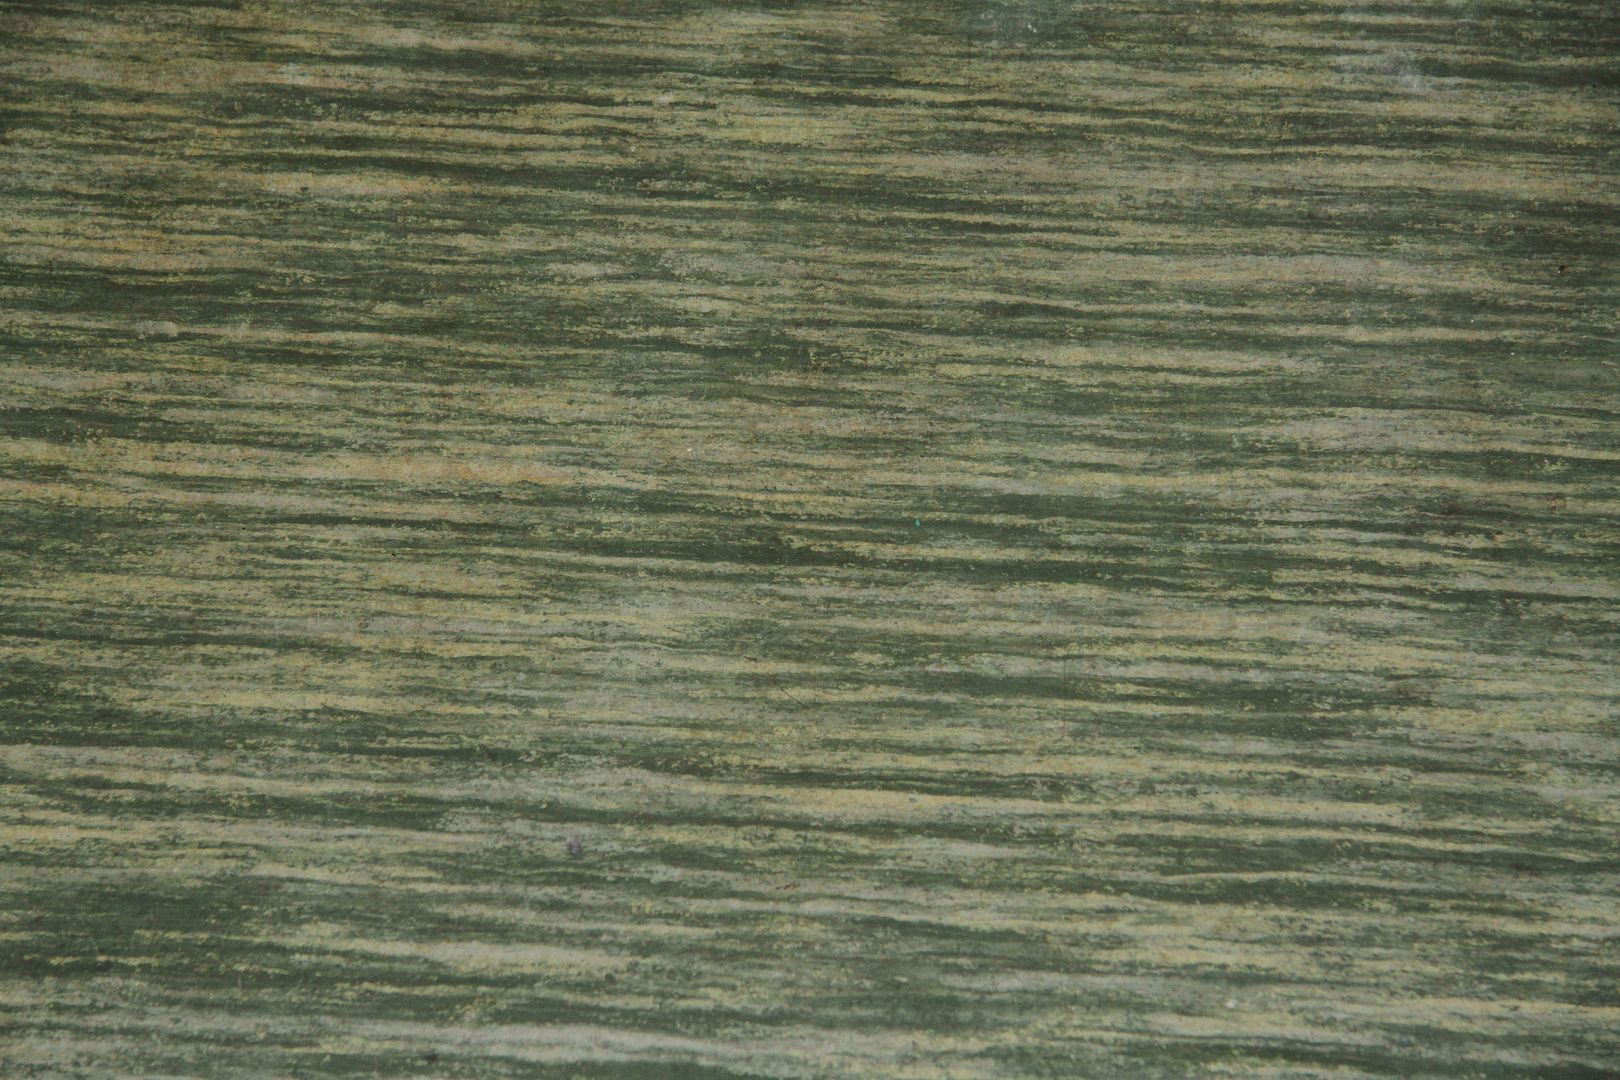 All the post-War Dons that I've seen with their original lino have had lino in a shade of green with flecks in it. For example this is the lino that is/was in Mark T's Don serial number 1023:  So that gives you an idea of the lino that Don used. You also asked about curtains. This photo shows the original curtains in our van: 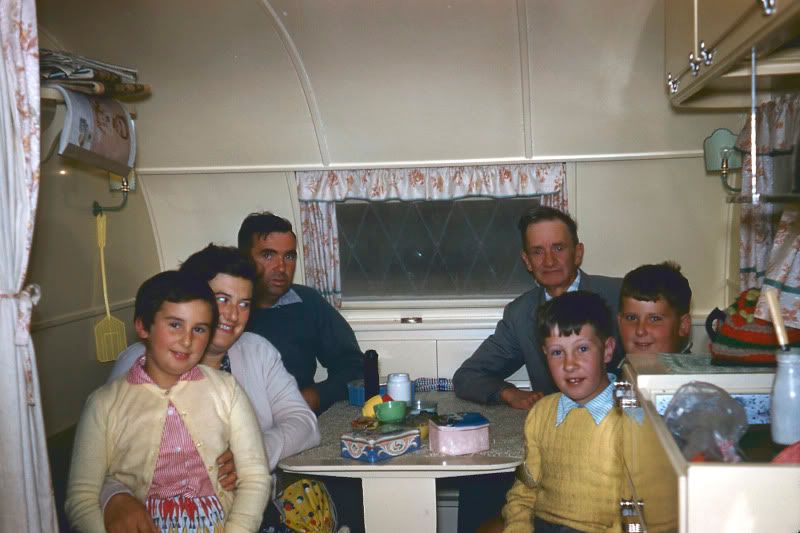 As you can see, the curtains had an off-white background with a cinnamon coloured floral print. The curtains were decorated with green bias binding, and the valance above the window was also edged with the green bias binding. The modesty curtain was made out of the same material as the curtains, but I don't remember any of the green bias binding on them. However, they may have been decorated with the binding in the same way as the curtains. (The kid in the yellow jumper is me  , and the man at the back on the right is my father. The other people in the photos are my cousins.) The curtains shown in the photo were in the van until the mid or late 60's after which my mother replaced them with the curtains in this next photo - a paisley print in green, aqua and yellow: 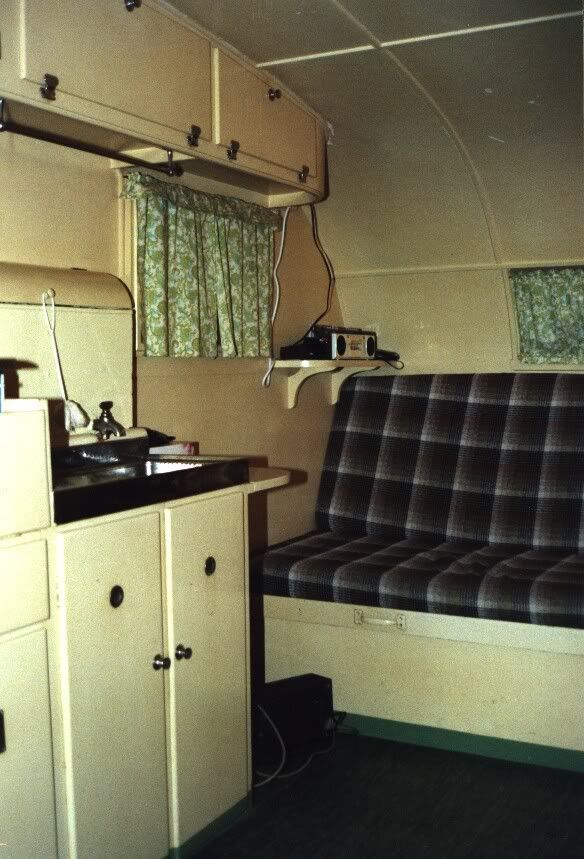 At that point the original modesty curtain was replaced by a greeny blue shantung curtain material. I think my mother used a different material because the material she used for the window curtains wasn't heavy enough to allow much 'modesty'. About two years ago, the paisley curtains were beginning to look a bit faded (after 40+ years!), so my wife made some new curtains which you can see behind this photo of our Son No 1 and his family. The material is a floral print with tiny yellow flowers with sage green leaves:  This material was similar to what I remembered the original curtains to be!! I only found the photo with the original curtains after buying the new material and was quite shocked to see how different they were. Just goes to show how reliable our memory is sometimes (not!), but I am happy with the new curtains - I think they match the colours of the van quite well, and it took literally years of visiting haberdashery shops in numerous country towns, etc, before we (meaning I!) found something we were happy with. Finally a few comments about the upholstery for the cushions. The original cushions in our van were covered in this material: 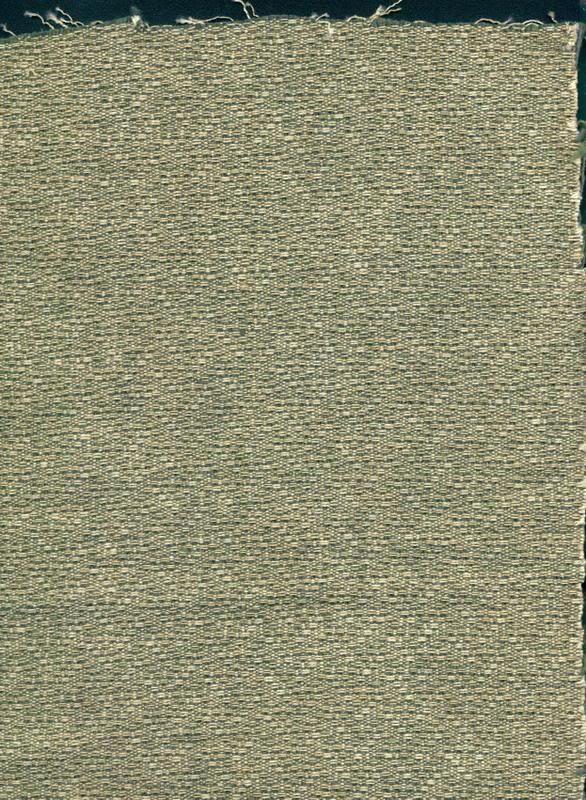 The material appears to be cotton, and is a fairly coarse weave out of green and white threads. However, it isn't nearly as distinctly patterned as the seat cushion material pictured in the Don sales brochure of the era, which looks as if it had a diamond pattern. Again Don used a variety of fabrics in their post-War vans, but all in similar sage green tones. For example, this is the upholstery in Mark T's Don serial number 1023: 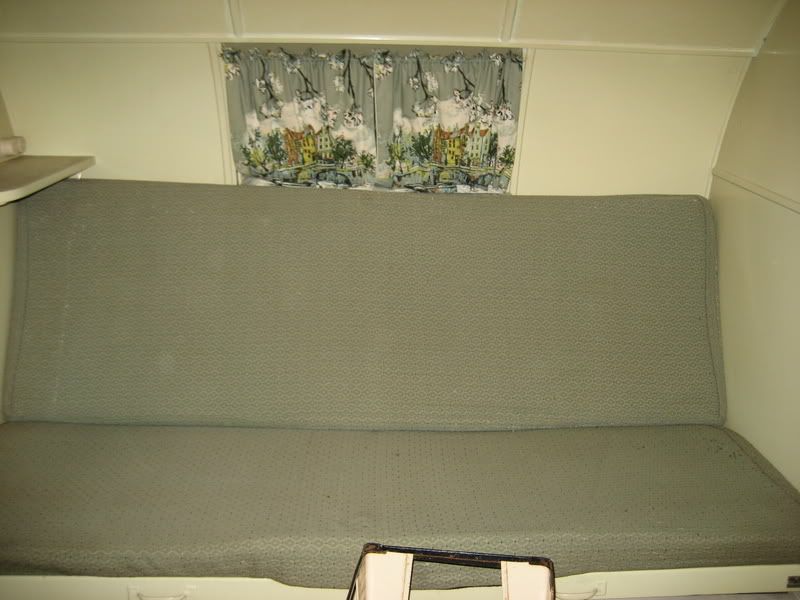 This seems to show the diamond pattern I was referred to. We had to replace our cushions in the early 80's, and the best we could find was the brown and green check material you can see in one of the photos above. Very 80's caravan, but there wasn't much other choice at that point. I hope all this is of assistance to you. Feel free to ask any questions you like. I am quite enjoying wandering back through some of our photos and memories. Don Ricardo |
|
|
|
Post by 2sneezles on Jan 12, 2018 19:50:08 GMT 10
hi don, the van is almost totally sanded and almost ready for undercoat we decided on enamel paint, any suggestion on what undercoat we could use, we have an account with dulux so thought its as good as any. what did you use?
also what kind of brakes did they come out with?
regards 2 sneezles
|
|
|
|
Post by Don Ricardo on Jan 12, 2018 20:30:42 GMT 10
Hi 2sneezles, Sounds as if you're making great progress. I'm looking forward to seeing some photos at some stage. The Dons were originally painted with Dulux enamel, and that's what I've stuck with, except for the roof where the original Dulux Silvansheen paint is no longer available. I have also used Dulux oil based undercoat for outside use. Don offered vacuum operated brakes as an optional extra on their vans. But our van didn't have any brakes until the early 80's when we began to tow it with a VC Commodore. That meant we had to fit brakes, and we chose electric brakes because they meant the least changes to the van. They have been very satisfactory. Hope that helps. Don Ricardo |
|
|
|
Post by 2sneezles on Jan 15, 2018 9:44:23 GMT 10
Hello Don we just bought the paint, its a dark creme i was expecting something lighter but we want it as original as possible, the guy at the paint shop said the silver paint wasn't meant for wood did you have any problem with using it? wasn't sure?
we will post pics soon having electric brakes fitted were quoted 1200
thanks for all your help were compiling a folder with all the relevant info from the forum.
regards 2sneezles
|
|
|
|
Post by Don Ricardo on Jan 15, 2018 14:28:31 GMT 10
Hi 2sneezles,
Great to hear you've got the paint.
Yes, the paint is quite a dark cream, assuming the tint is the same as what I've used. However, it's as close to the original I have been able to get, matching it with the paint on the internal panels from our van that are still as they came out of the factory. I was looking at our sink board, which I have painted, the other day and comparing it to the original paint, and it is an exact match.
You could compare the new paint with the internal paint in your van, and then add some white to the new if you feel that's it not a good enough match, and needs to be lighter. But thinking about your van, I think it has been fully repainted inside and out at some stage, so that's probably not possible. (Maybe there is some original paint inside a cupboard?)
Regarding the aluminium paint for the roof, your salesman is quite correct. It was developed for painting grain silos in Queensland, which are metal. However, the guy who recommended it to me did so on the basis that it had been developed to be very heat resistant, which was the purpose of the original Silvasheen paint used on the Dons. So he figured that the Industrial Metalshield would be a good substitute for the Silvasheen. (The other issue of course, is that there aren't many other alternatives. Silver frost paint, which some people have used, looks terrible - in my opinion - and the Industrial Metalshield is an aluminium suspension paint which looks very authentic and original from a Don perspective.)
I've now had the Industrial Metalshield on the van for almost two years, and am really happy with it. It still looks really good, with a nice sheen, and seems to have good lasting quality. Over the last couple of weeks, we've had two hail storms (one quite severe with big hailstones) while we've been caravanning and so far I can't see any impact on the paint. I expected it to be chipped, etc, but it doesn't seem to be. (I haven't been right up on top of the van yet.) So I reckon the Industrial Metalshield is worth using, even if it wasn't developed for wood.
Don Ricardo
|
|
|
|
Post by 2sneezles on Jan 15, 2018 18:32:45 GMT 10
Thanks for your quick reply. The first coat of undercoat went on today. Looks really good. I will try and post some picks. I’m not really good at it. We’re is the best place to post them.?
😄
|
|
|
|
Post by 2sneezles on Jan 15, 2018 19:50:20 GMT 10
|
|
|
|
Post by 2sneezles on Jan 15, 2018 21:09:25 GMT 10
|
|