|
|
Post by JBJ on Feb 20, 2015 20:19:23 GMT 10
Hio All,
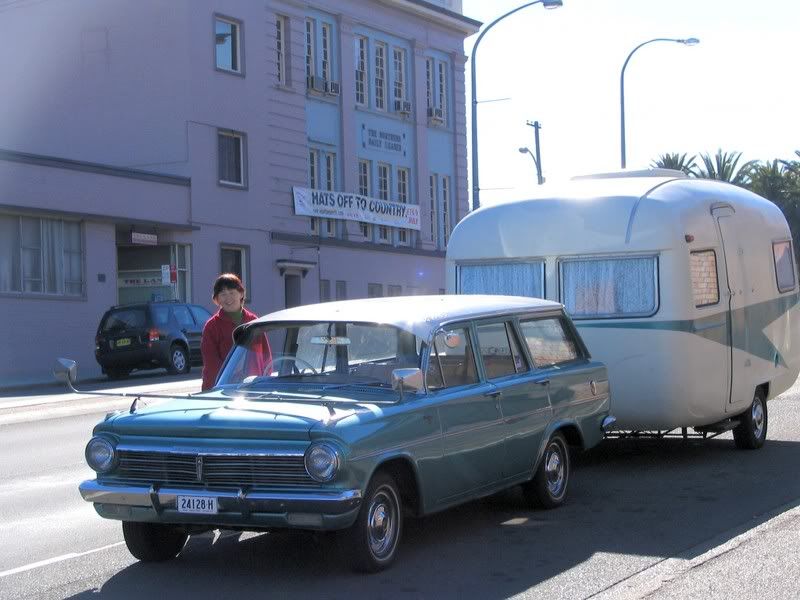
Well a week ago Boots & I were having our morning walk, & one of us said, " why aren't we out on the road in our van?". So the other replied something to the extent of " I thought we were trying to sell Deejay & get a van with single beds, but bigger than our Olympic which is just a tad too small for long time travelling in our eyes.
So when we got home from our walk, I posted Deejay on Ebay again (3rd time). Unlike previous times, this time someone wanted her.
After a couple of emails & phone calls, they paid up front & we delivered Deejay to Victoria.
This gave us the holiday we wanted.
After we sold Deejay, we looked on Gumtree in Melbourne, & found a late 60's fibreglass Quest, with 12 months rego, single beds, 15 foot, annex, & pretty good looking. So I rang my friend Firefighter, who went & looked at it for me. He gave it a 90% reference, so I paid a deposit on it & we set off for a weeks trip down to Victoria & back.
New owner of Deejay loved her, so we proceeded to go buy the Quest. She is now known as "Queenie". Its a pretty good van , in need of the usual repairs , but it tows as if its not there.
So a week later we are home to near cyclonic winds & rain. Thats why we didn't stop in Newcastle on way back. I drove from Shellharbour to Alstonville today, the last half in rain from moderate to very heavy.
So I go out to the van a few minutes ago to get my camera to post some pix, & like an idiot lock the door keys in the van. $50 tomorrow gets the locksmith to let us in the van.
But at least we got back in the wild weather.
I'll post pix as we clean it & tidy a few bits up.
I think its still all fun
JBJ (with Boots helping)
|
|
|
|
Post by Geoff & Jude on Feb 20, 2015 20:40:02 GMT 10
hi boots and dennis congrats on the new purchase, i saw that one on gumtree and thought it looked pretty good. looks like another project on the table but don't forget we're all waiting to see the dodge on the road. maybe we'll see them both at stockton beach in july. (  ) geoff 'n jude |
|
|
|
Post by humpyboy on Feb 20, 2015 21:13:11 GMT 10
Good to hear you both got home safe, I trust the weather isn't to bad up there and that it passes with out doing damage, a little hint from me Dennis, I have multiple keys on different key rings, that way there is always a key somewhere |
|
|
|
Post by JBJ on Feb 20, 2015 21:19:14 GMT 10
Hi Derk,
It was good to catch up with you & a couple of others, if only for a few minutes.
I was about to get the spare keys cut tomorrow,but I guess Sh** happens.
The wind & rain up here aren't real nice. We would have loved to have stayed a few more days on the coast, but have memories of the Highway being closed up here during weather like this. So we decided to push thru & get home.
JBJ
|
|
|
|
Post by firefighter on Feb 20, 2015 22:21:29 GMT 10
G'day Dennis
Good to see your self , Sue and Queenie made it home before the storm hit your area All ways a problem when you look at a van for some one else and you have to give them a report and get it right
Only took you 9 years to find a quest like Queenie after you seen one and liked it at the 2006 Nationals at Morgan looking forward to seeing queenie behind the Dodge
cheers f/f
|
|
|
|
Post by sutcac on Feb 21, 2015 13:23:29 GMT 10
Hi Dennis and Sue. Congrats on the new Quest!!  I've always liked them. A very practical all round van imo. Can't believe that one of Bob and Jackies took so long to sell.  No doubt you'll do a great job on it and it will give you good service for your extended travels.  Won't look out of place behind the Dodge either!  Well done. Enjoy! It will all be fun!!!! |
|
|
|
Post by JBJ on Feb 21, 2015 14:52:52 GMT 10
Hi All, Well some pix from our trip Deejay at Bluff Rock near Tenterfield on her last trip 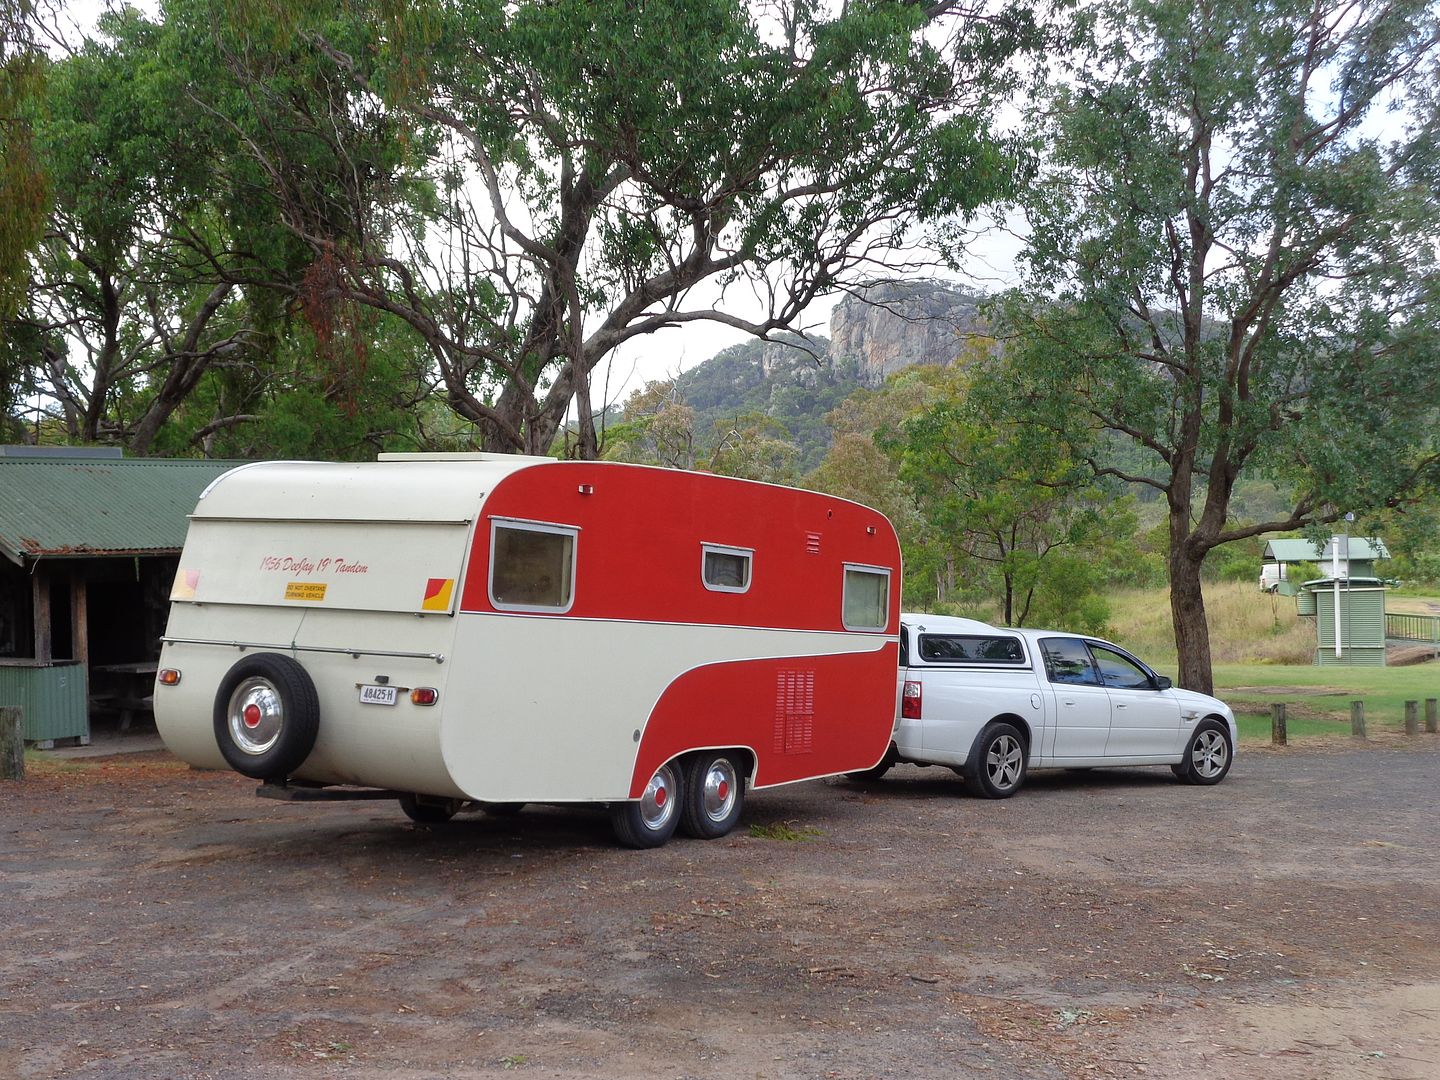 Handing over to Peter at Bacchus Marsh 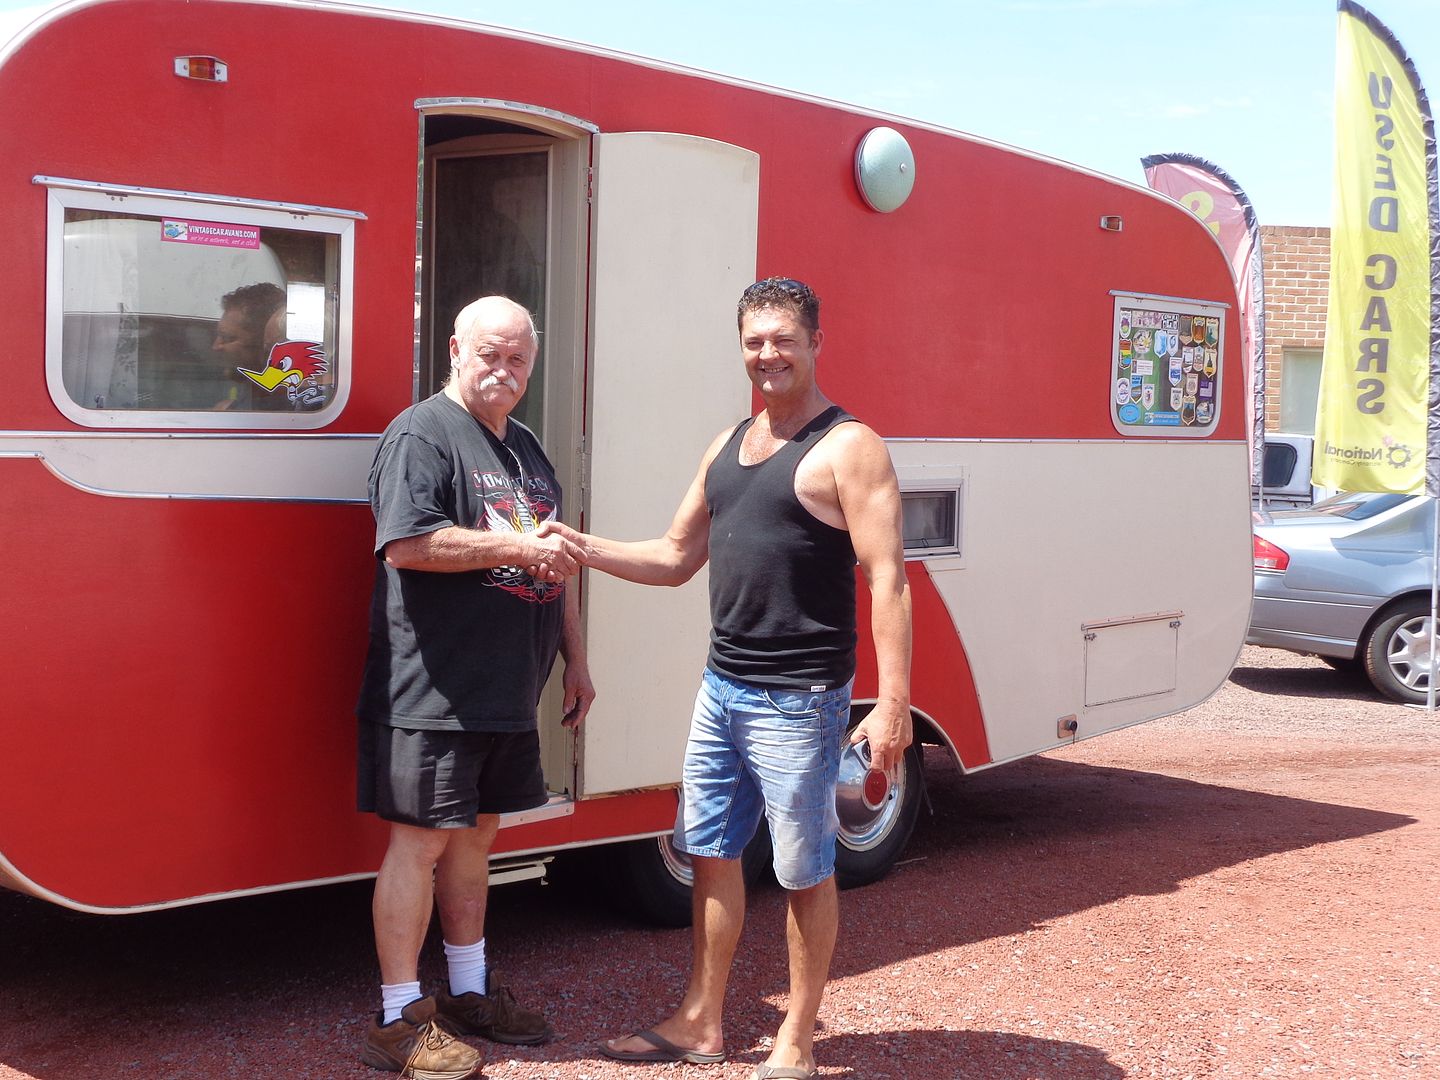 Queenie hooked up & rolling home. 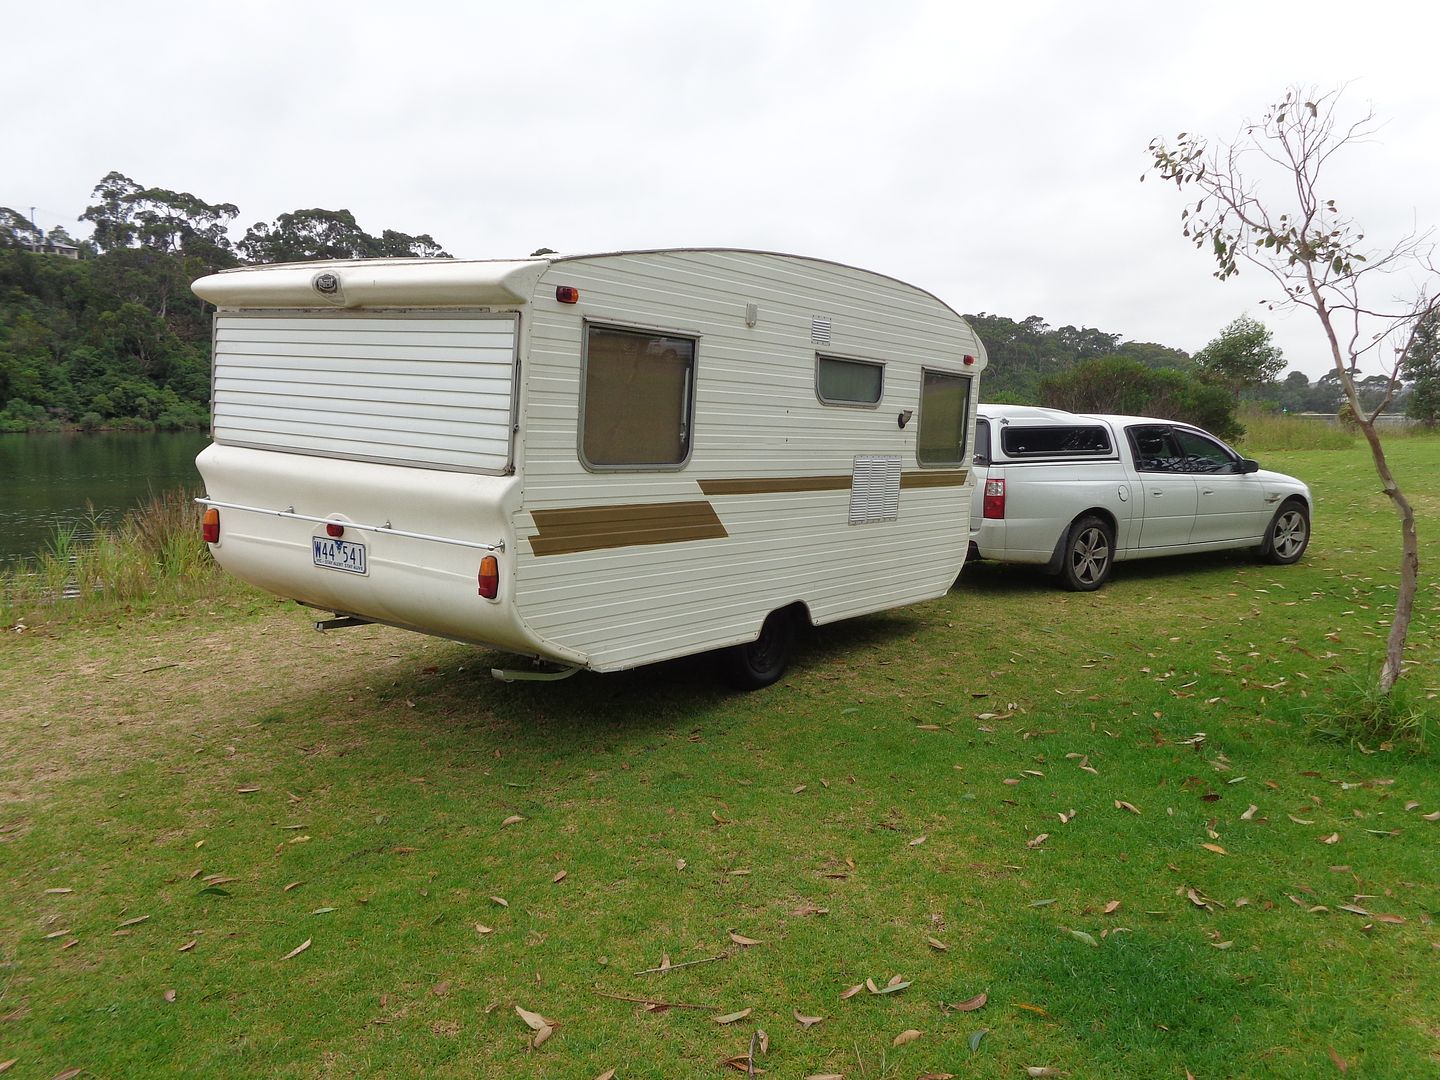 Boots checking Humpty's progress on his Road Cruiser 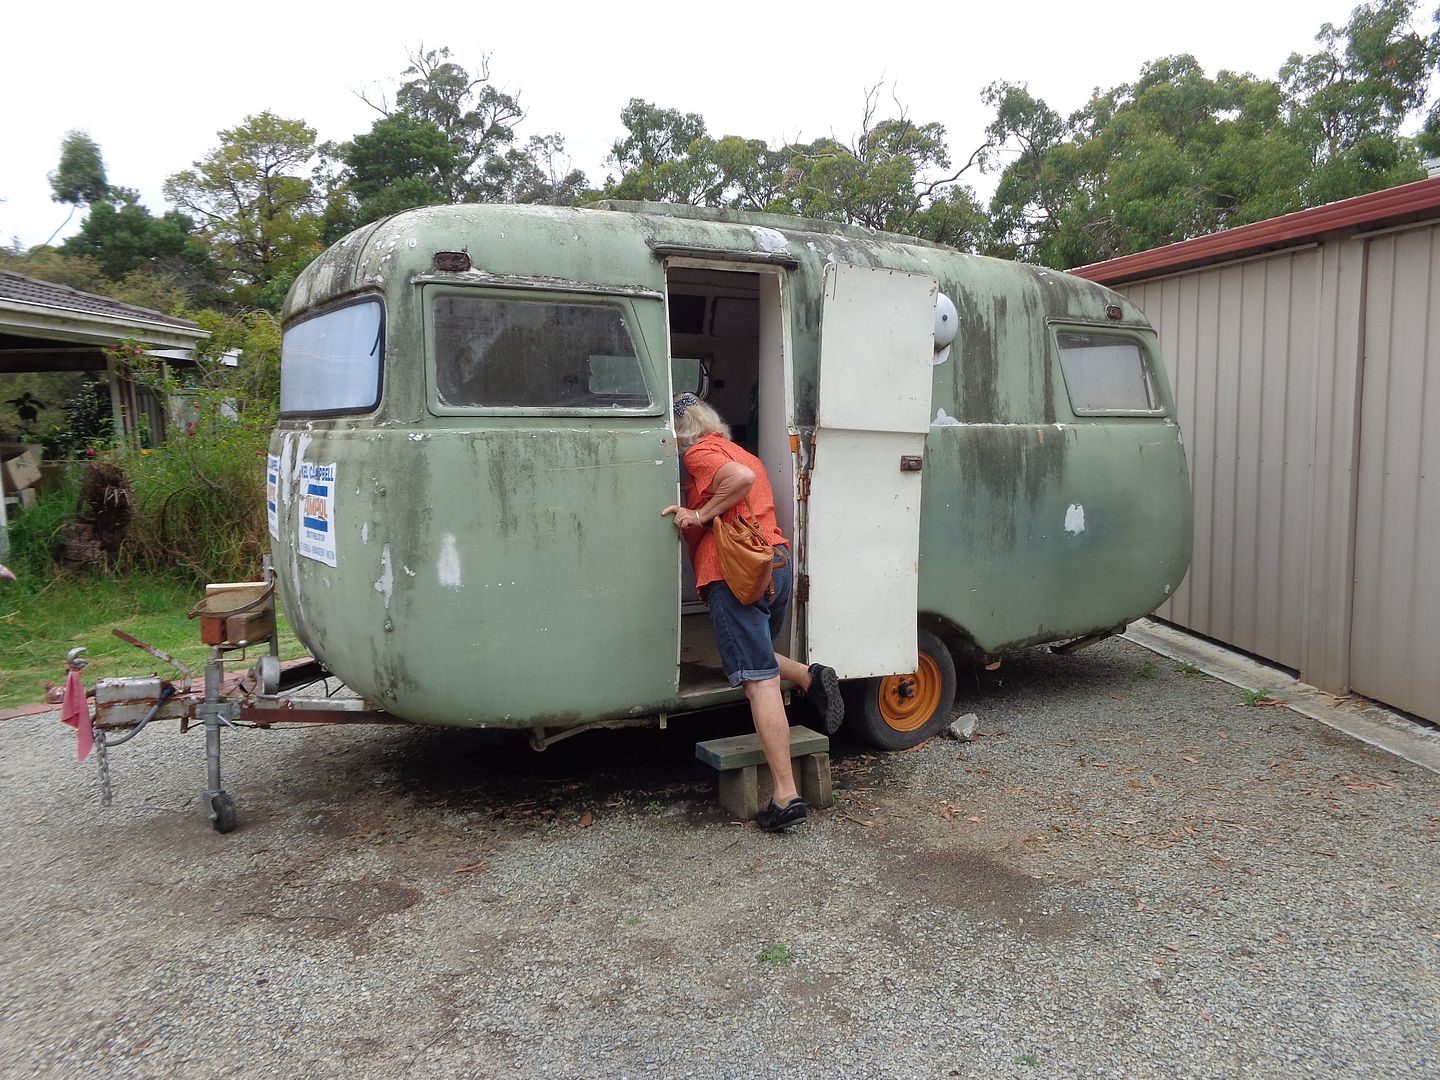 Stopped for lunch at Cann River pub. These monstrosities parked next to us. I cannot understand the need for everything they contain while travelling, but to each his own. 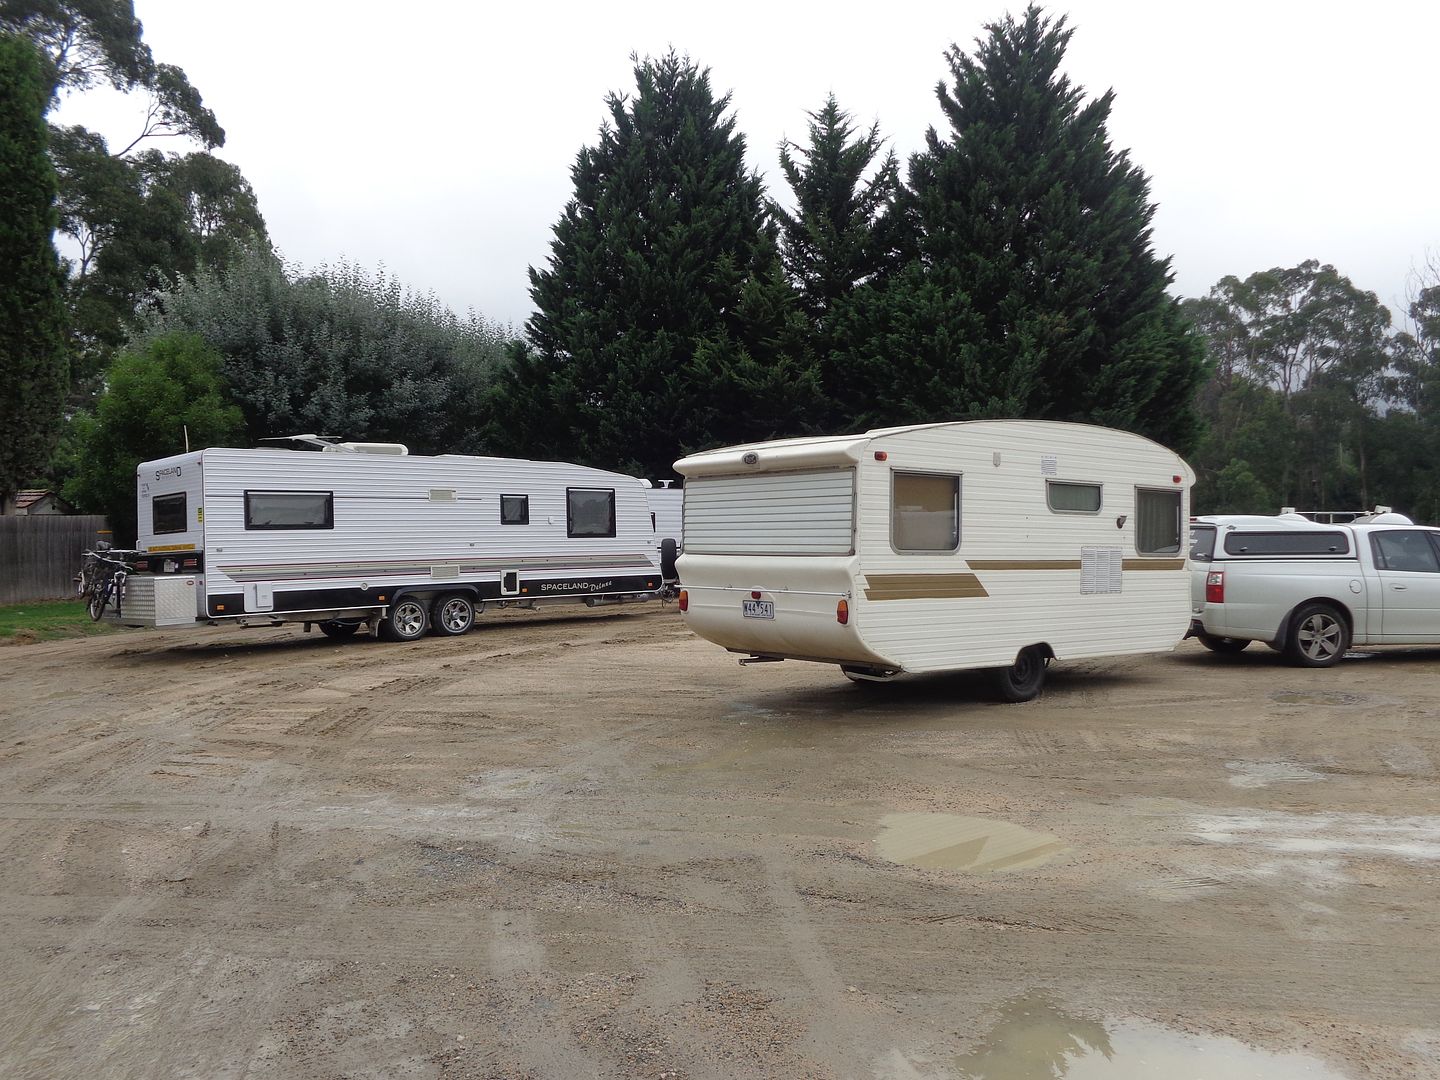 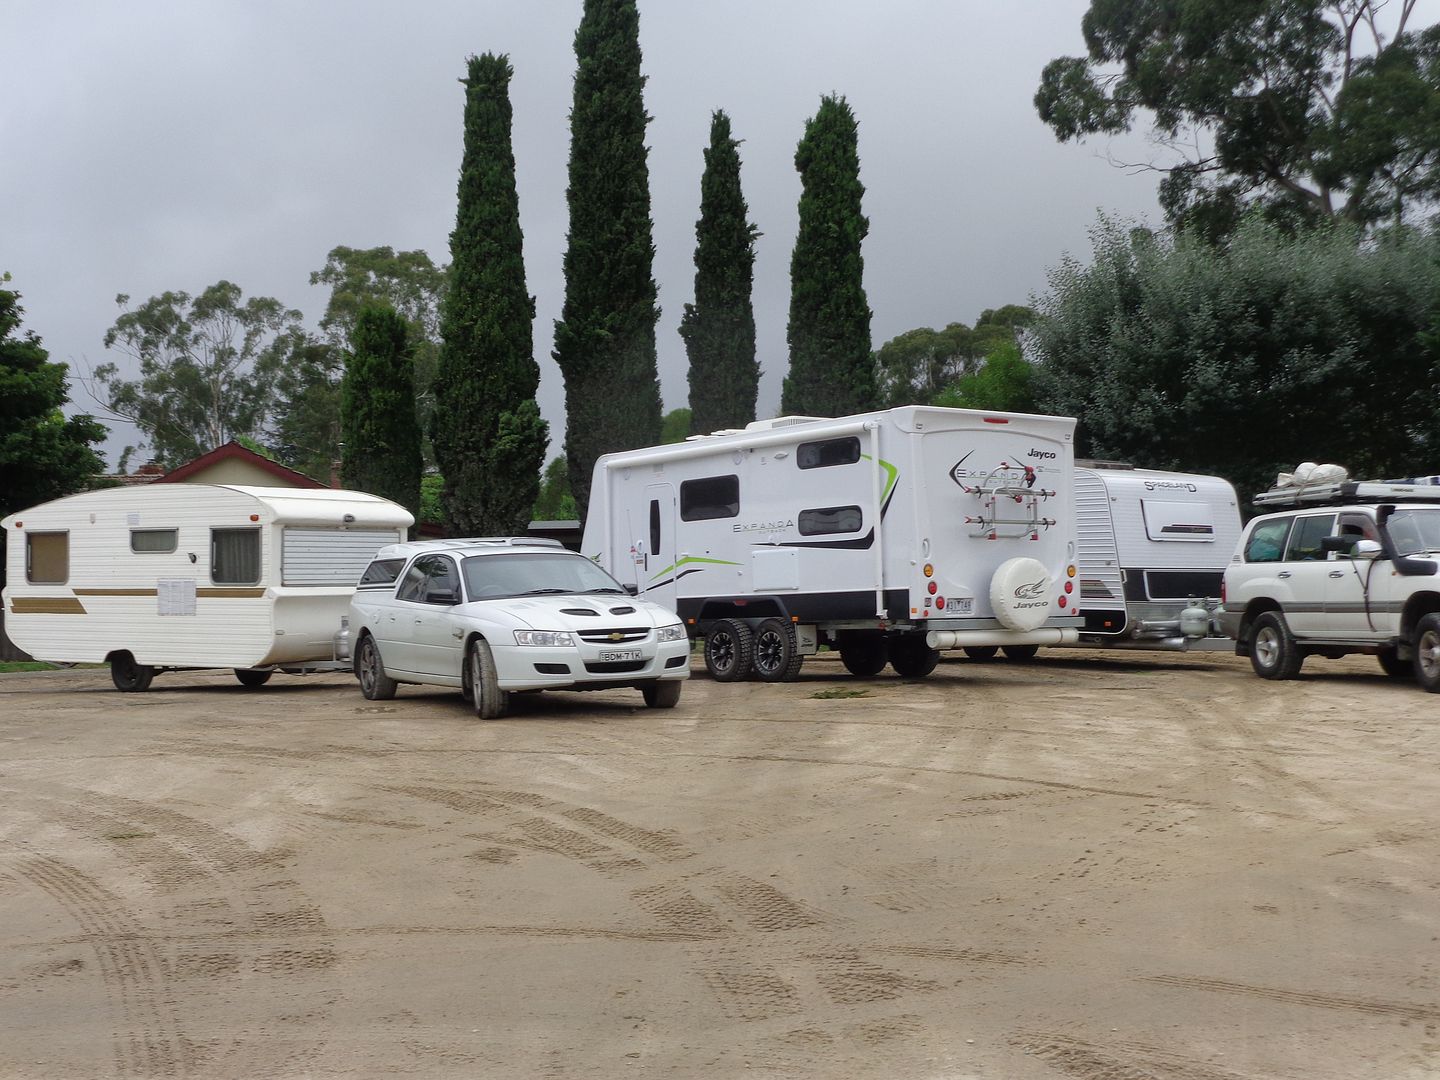 More to come as the rain eases up here. JBJ |
|
|
|
Post by JBJ on Feb 21, 2015 17:35:21 GMT 10
Hi All,
A bit more.
We bought what we were told is a mid 70's Quest. Supposedly 15 foot, but I haven't measured it.Its built as a normal van using all fibreglass panels.
From what we can determine, it was built around 68. The shape of the front & rear are very similar to that of the one Bob & Jacqui had, & that was around 68. There aren't many records or details to compare with.
The one I saw at Morgan SA in 2006 was earlier than ours, but still had fibreglass panels built like a normal van. They took moulds off aluminium sheets for the sides I believe.
The earlier one had diamond pattern glass panels, with the badge below the window.
It supposedly weighs 1000 Kg, but I think from the way it tows it is less. I will put it over a weighbridge soon.
Its a great little van, single beds, water tank above sink, filled from outside. It has blinds on windows that appear original, with brown/orange patterns that say late 60's.
A few areas have been altered by previous owners, but nothing too radical. Its got one funny corner jack, & every join on the body is buried in silastic. I believe I can clean most away, but hope that doesn't create too many leaks.
Interior we intend to give a serious tidy up to, but thats to be expected.
All in all, We are pretty happy to have a unique lightweight van to use.
|
|
|
|
Post by Franklin1 on Feb 21, 2015 21:44:06 GMT 10
G'day JBJ, Very nice van! I'll give you the links to a couple of Quest vans that were posted on the CC forum. The profile of the fibreglass sides is the same for both these vans, but different to yours. All have push-out windows, so are likely to be before 1973... My project 70's Quest Caravan1970 fibreglass Quest 15ftAnd a bit of "useful/useless" info - the tail-lights on your van are available in an LED version from Supercheap Auto. See this post on the CC forum: 1978? Escort Vancheers, Al. |
|
|
|
Post by Don Ricardo on Feb 21, 2015 22:29:54 GMT 10
G'day JBJ and Franklin1, Looks like you've got yourself another great caravan JBJ. No doubt it will look spectacular after you've woven your magic over it. According to the 1969 Winser, the Quest Trendsetter model like Bobandjacqui's - as pictured on the DHL Quest thread - was introduced at the Melbourne Caravan Show in 1968, and I would guess probably the same year in its 'native' South Australia. There is no mention of it in the 1967 Winser. However, the profile of the fibreglass is quite different to that on JBJ's new van. I would presume that means ihis van is a later model, and probably from about the same period (before, after ??) as those shown in the links provided by Franklin1. For what it's worth... Don Ricardo |
|
|
|
Post by JBJ on Feb 22, 2015 2:24:25 GMT 10
Hi,
Thanks for those pix, but my van is different in a lot of areas.
The fibreglass front doesn't have the big roll at top, the roof is flatter, no wrap around corner front windows, side cladding profile different, internal water tank above sink with external filler, & no evidence of spats having been fitted that I can see. My door has 2 diamonds moulded into it, & is a double panel fibreglass door, with diamond shapes inside as well. The hatch has the diamond in it.
The fibreglass ends are very similar to the one piece van they built.
Hopefully something will come up to clarify its production date, but its not that important to me at this stage.
JBJ
|
|
|
|
Post by Don Ricardo on Feb 22, 2015 8:44:53 GMT 10
Hi JBJ,
Very interesting to read that list of styling differences.
As you say, the age of the van doesn't really affect your use or enjoyment, but it is interesting to work out where different vans and models fit in the scheme of things when we are able.
I am looking forward to seeing some more pics of the van as you go along.
Don Ricardo
|
|
|
|
Post by JBJ on Feb 22, 2015 19:05:24 GMT 10
Hi, I got a chance to get the van out of the rain today, & took a few pix. The badges on the front & rear are the same. Backing material is (I think) an adhesive backed thin aluminium sheet, with (probably) screened on lettering. There is what appears to be a metal backed tape overlaid under the "Quest" logo, showing what appears to be "M.L. LOVEDAY PTY. LTD.", but it is very faded & thats the best I can work it out. 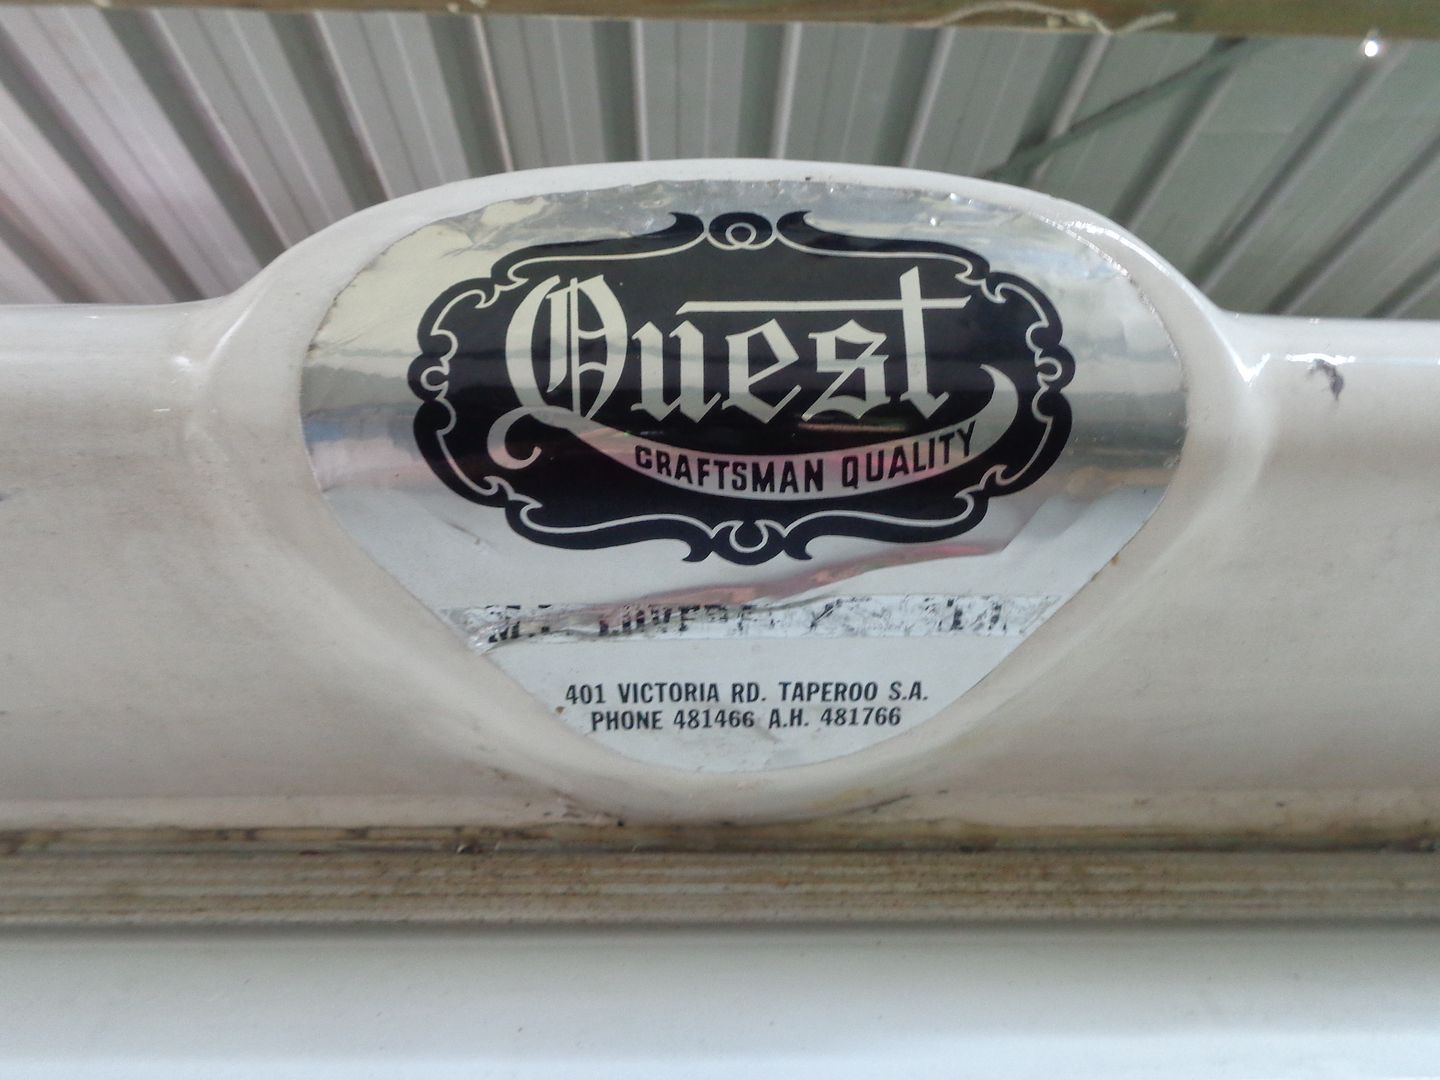 The front windows are opening, & the back window is one piece fixed. 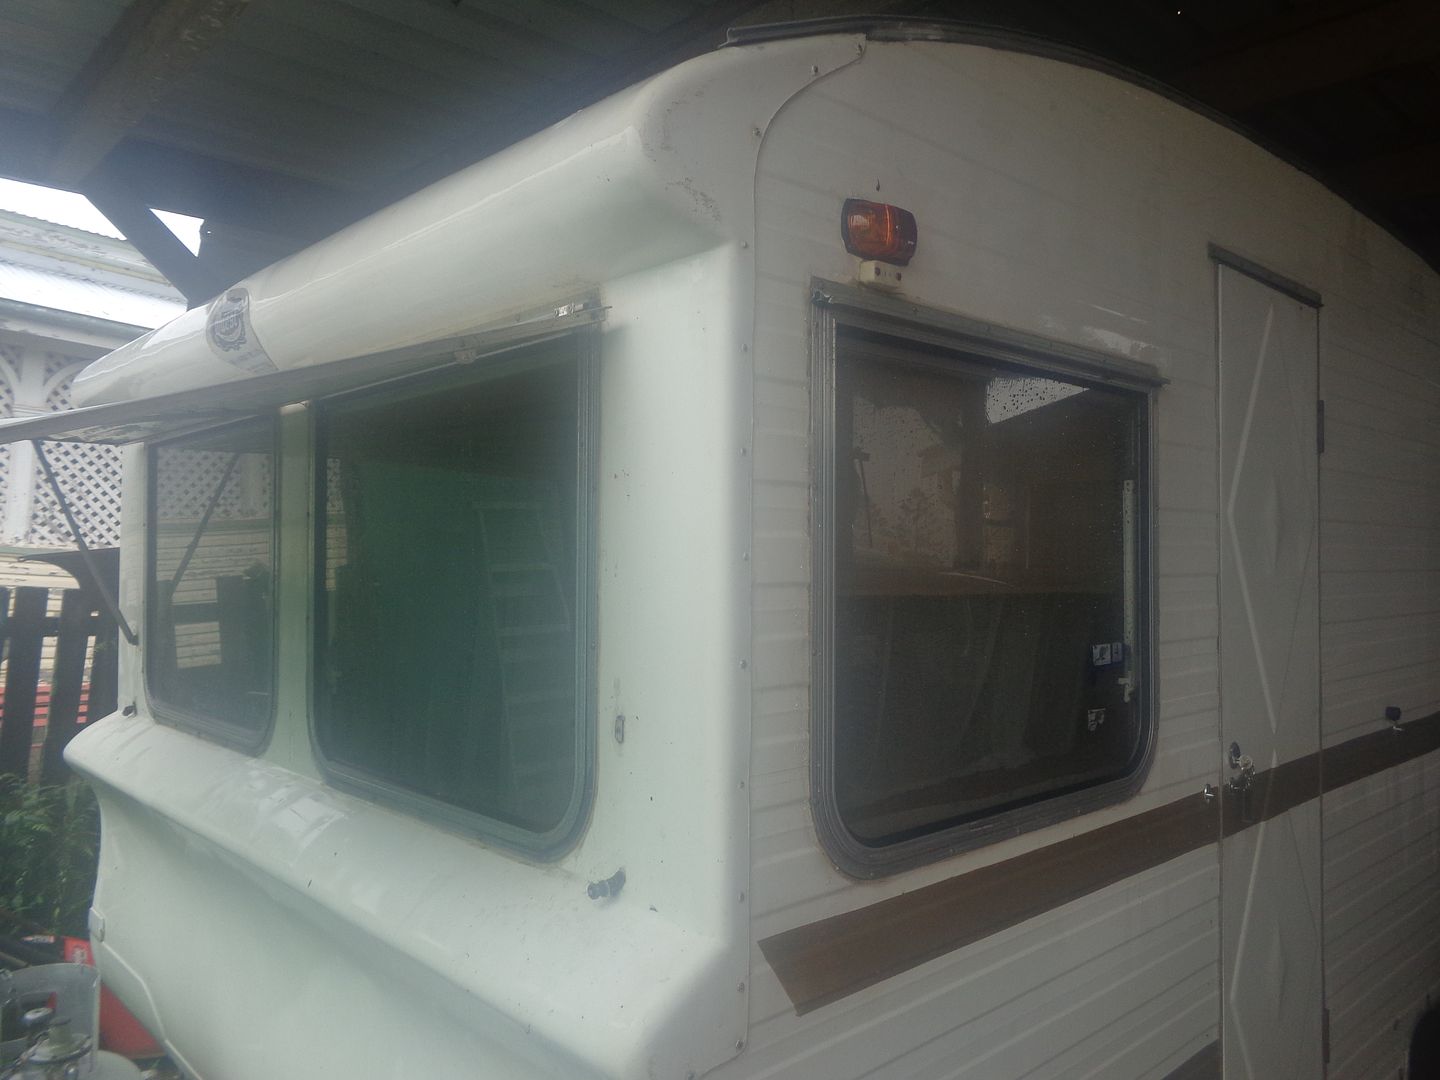 Water tank on top of sink. 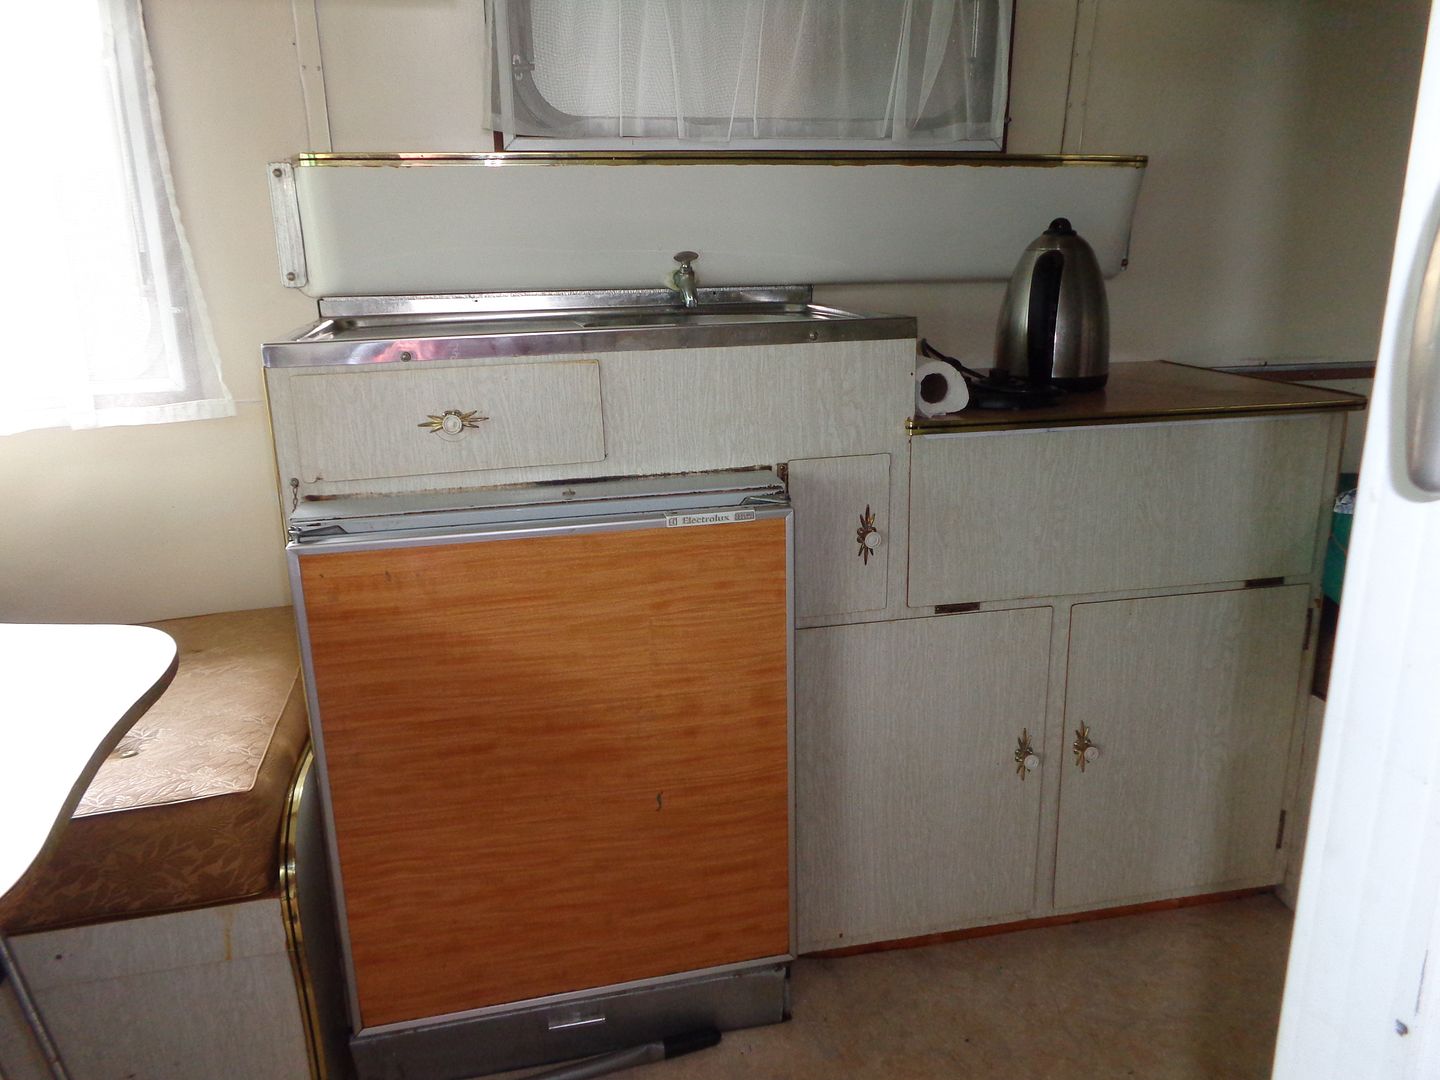 Water filler 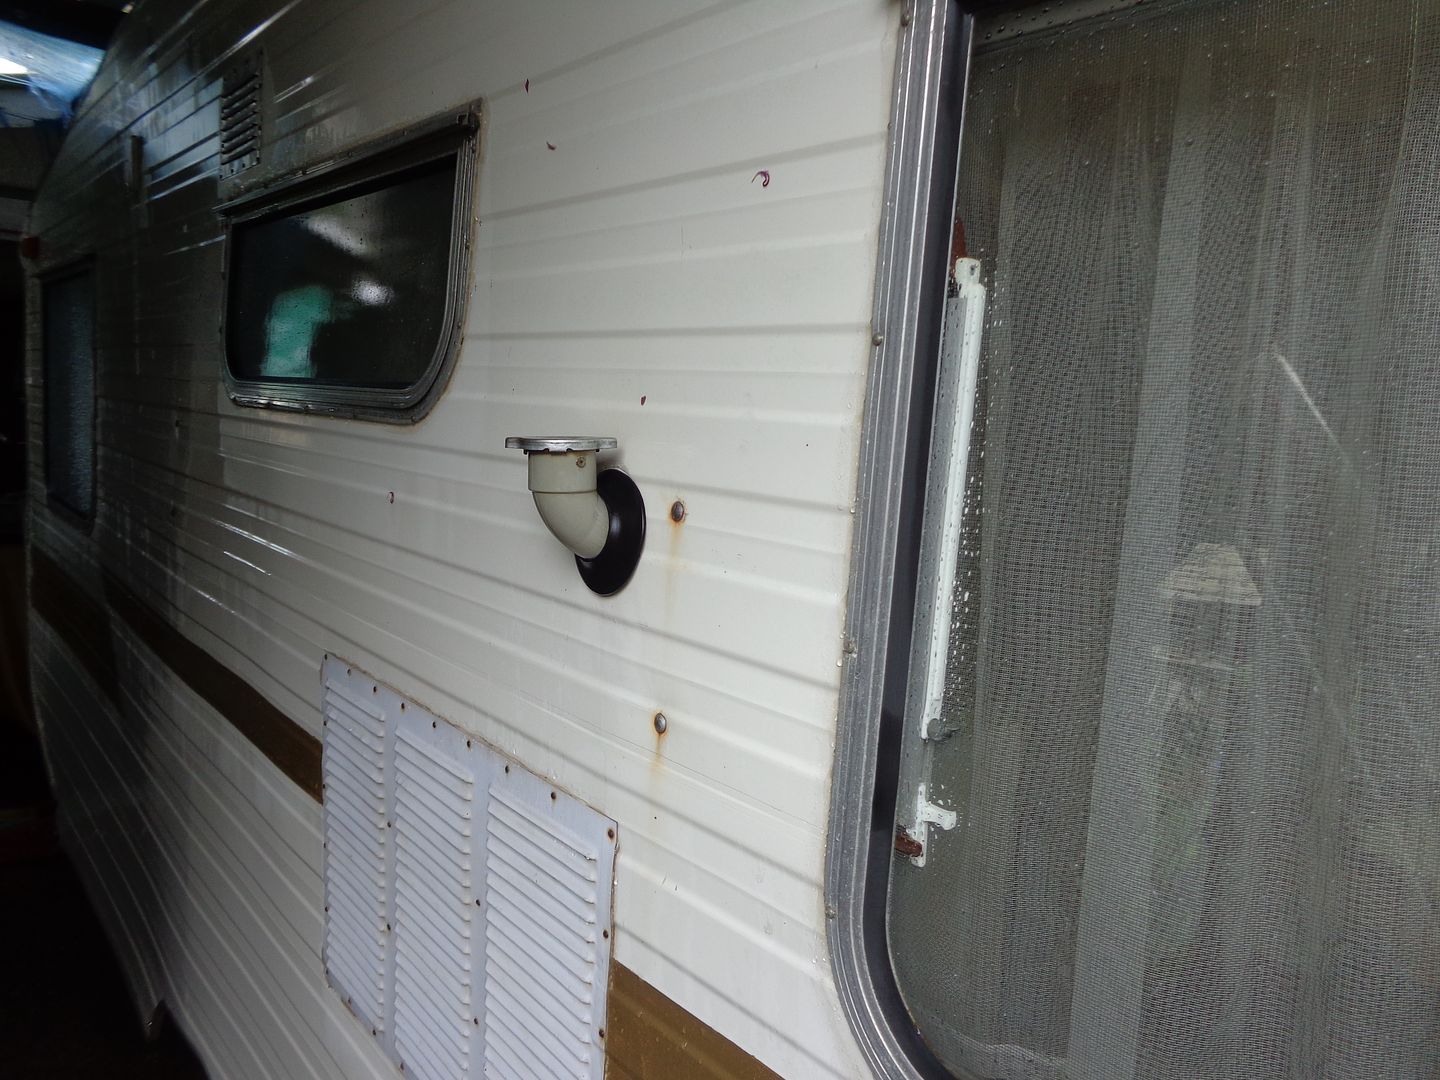 Front table area  Tow hitch for Cobber. Its a Dymwood  JBJ |
|
|
|
Post by cobber on Feb 22, 2015 19:33:48 GMT 10
G'day Den, Thanks for the tow coupling photo, not many people realise how fascinating they are That one is similar to the one dayno gave me to fit to my alley van only it doesn't have the hand brake locking part on it, how does that work on yours ? The patent application for that coupling was lodged in 1963. I think I can see that van getting a red stripe along the side of it Cobber. |
|
|
|
Post by bobandjacqui on Feb 23, 2015 5:59:13 GMT 10
G'day Dennis and Sue, Congratulations on your new Quest. Looks nice and tidy and will compliment the Dodge. We look forward to seeing this combo when you have worked your magic on them.
Cheers Bob and Jacqui.
|
|
|
|
Post by Roehm3108 on Feb 23, 2015 6:57:30 GMT 10
Nice pickup Dennis. You must realling like this fobbergrass stuff  When will you actually stop working and get on the road for that block trip? |
|
|
|
Post by JBJ on Jun 3, 2015 4:26:11 GMT 10
Hi All, Well finally got around to working on the van. We have been (well Boots has been) doing a few little little bits inside, trying to get our heads around what extent we are going to go to with our work. At this stage it will be cleanup & repair as required with the van. Possibly repaint some of the interior. I've started removing the silicon around the openings, & its a big job as its been laid on very thick. I'm removing it using a plastic scraper, & washing it away using gunwash thinners that I still have. I'm then rubbing the fibreglass surface using cutting compound. By doing the rubbing in small areas with hand application, I've been able to restore a lot of the gloss to the gel coat. After I get the exterior uniform, then I'll look at what I need to repair. With the interior, we are removing the gas stove, & it's for sale if anyone wants to make me an offer. It can be sent by Australia Post. We were told it works OK, but thats all I know. 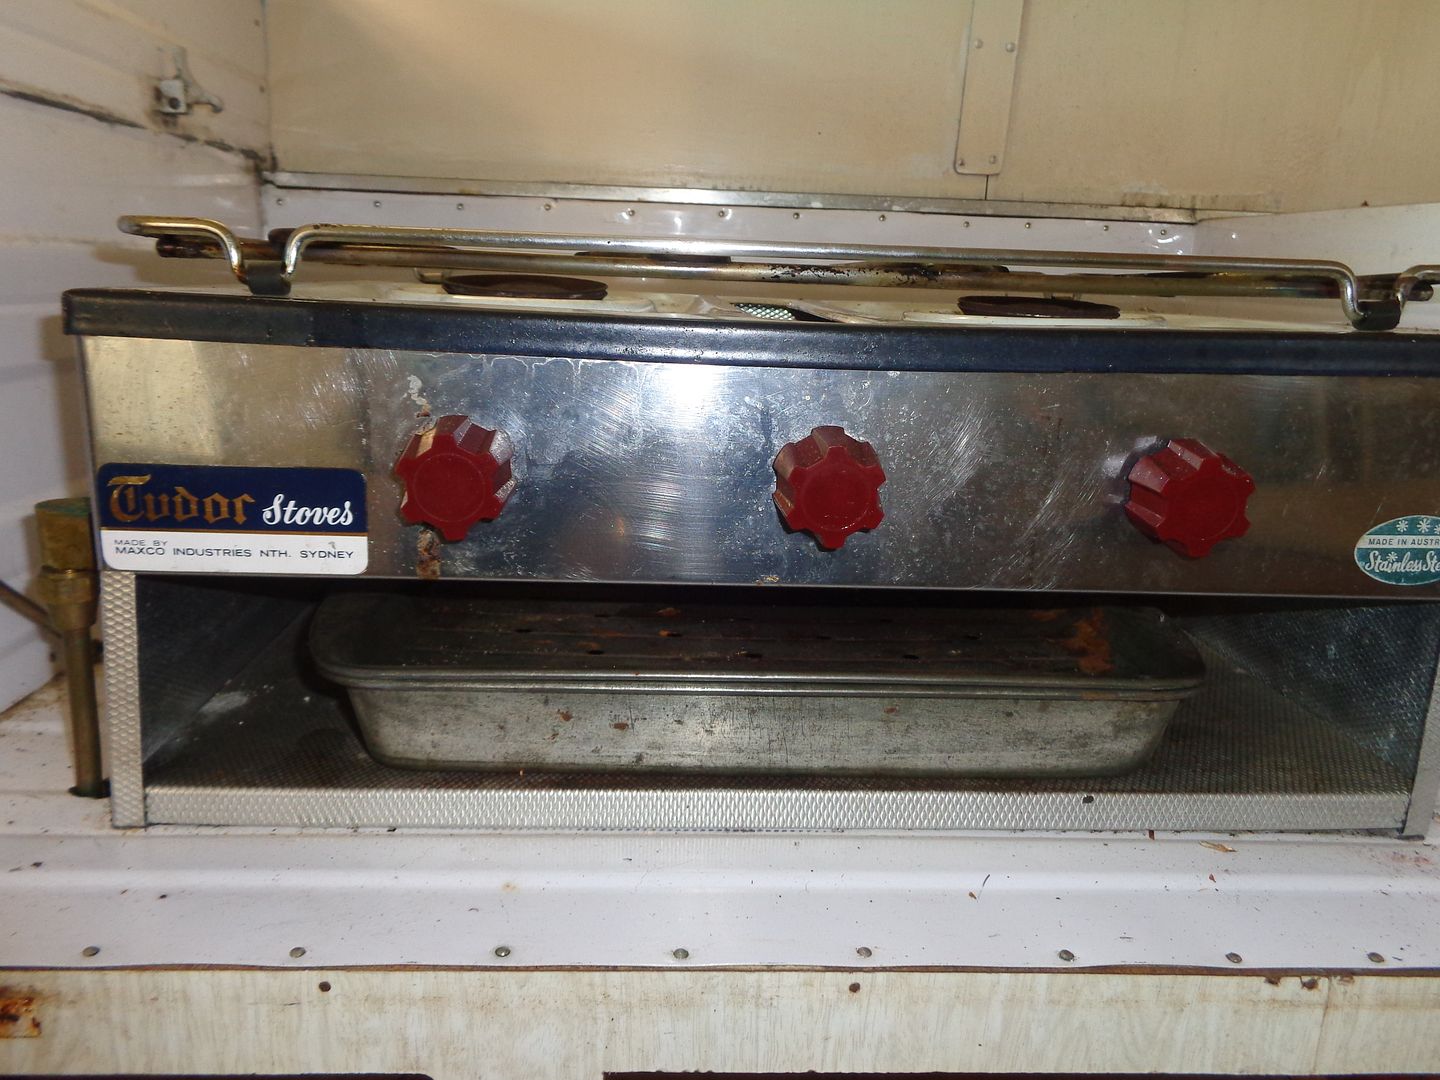 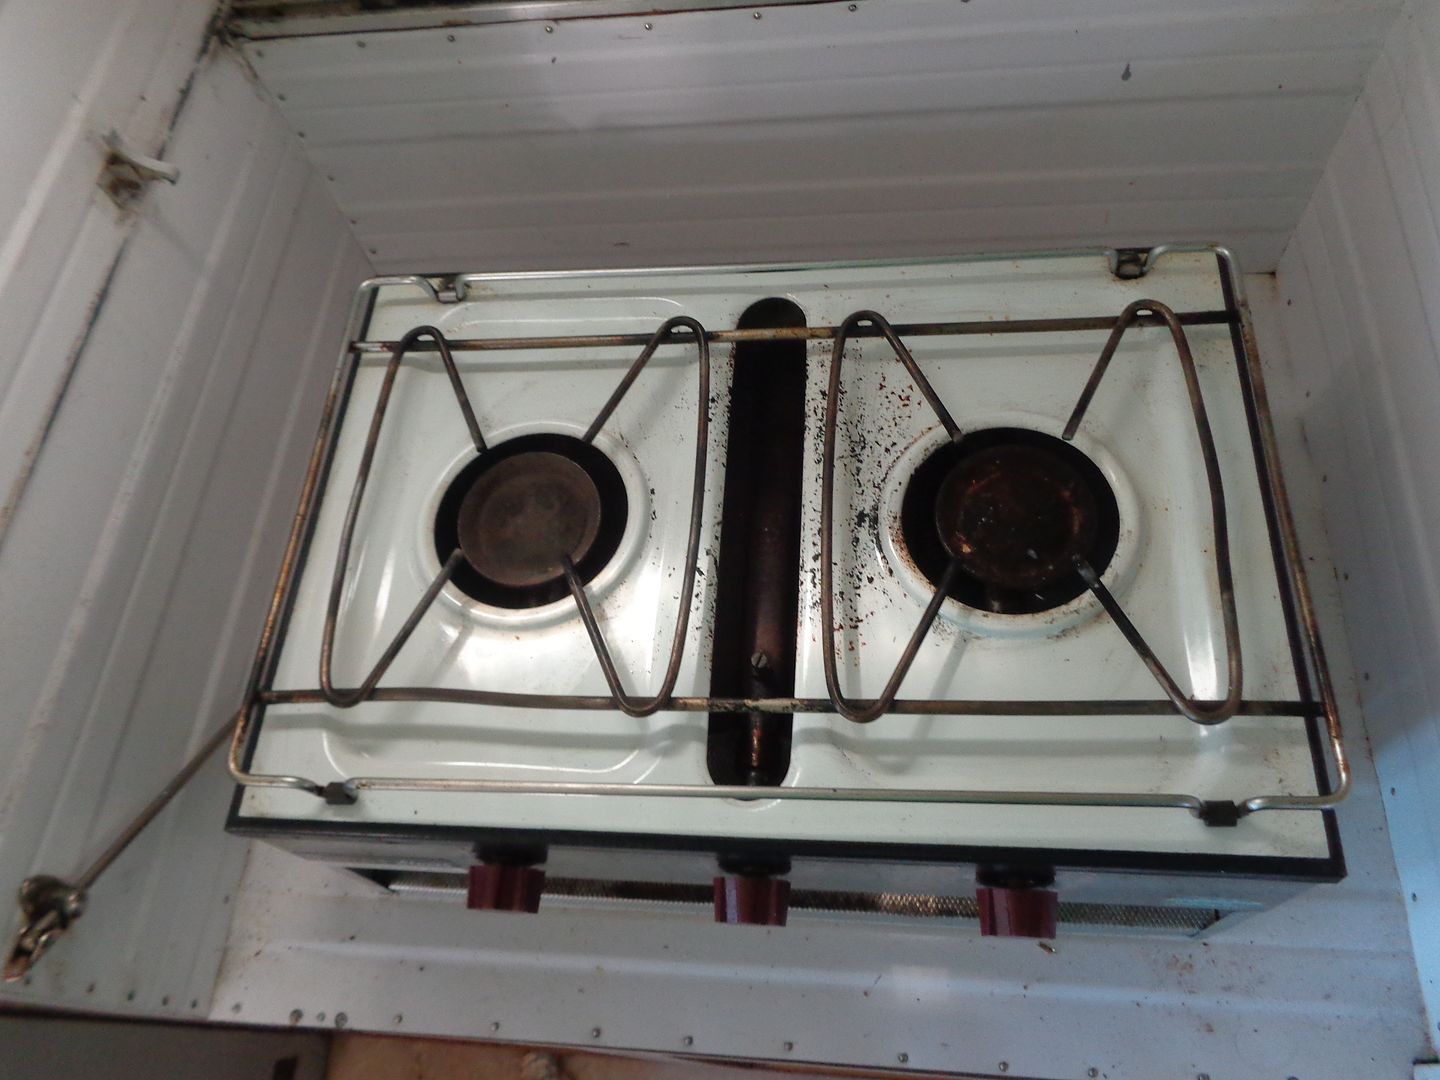 We are also looking for some of the brass coloured plastic edging strip, & a fair bit of ours is damaged or missing. Pix below shows it, 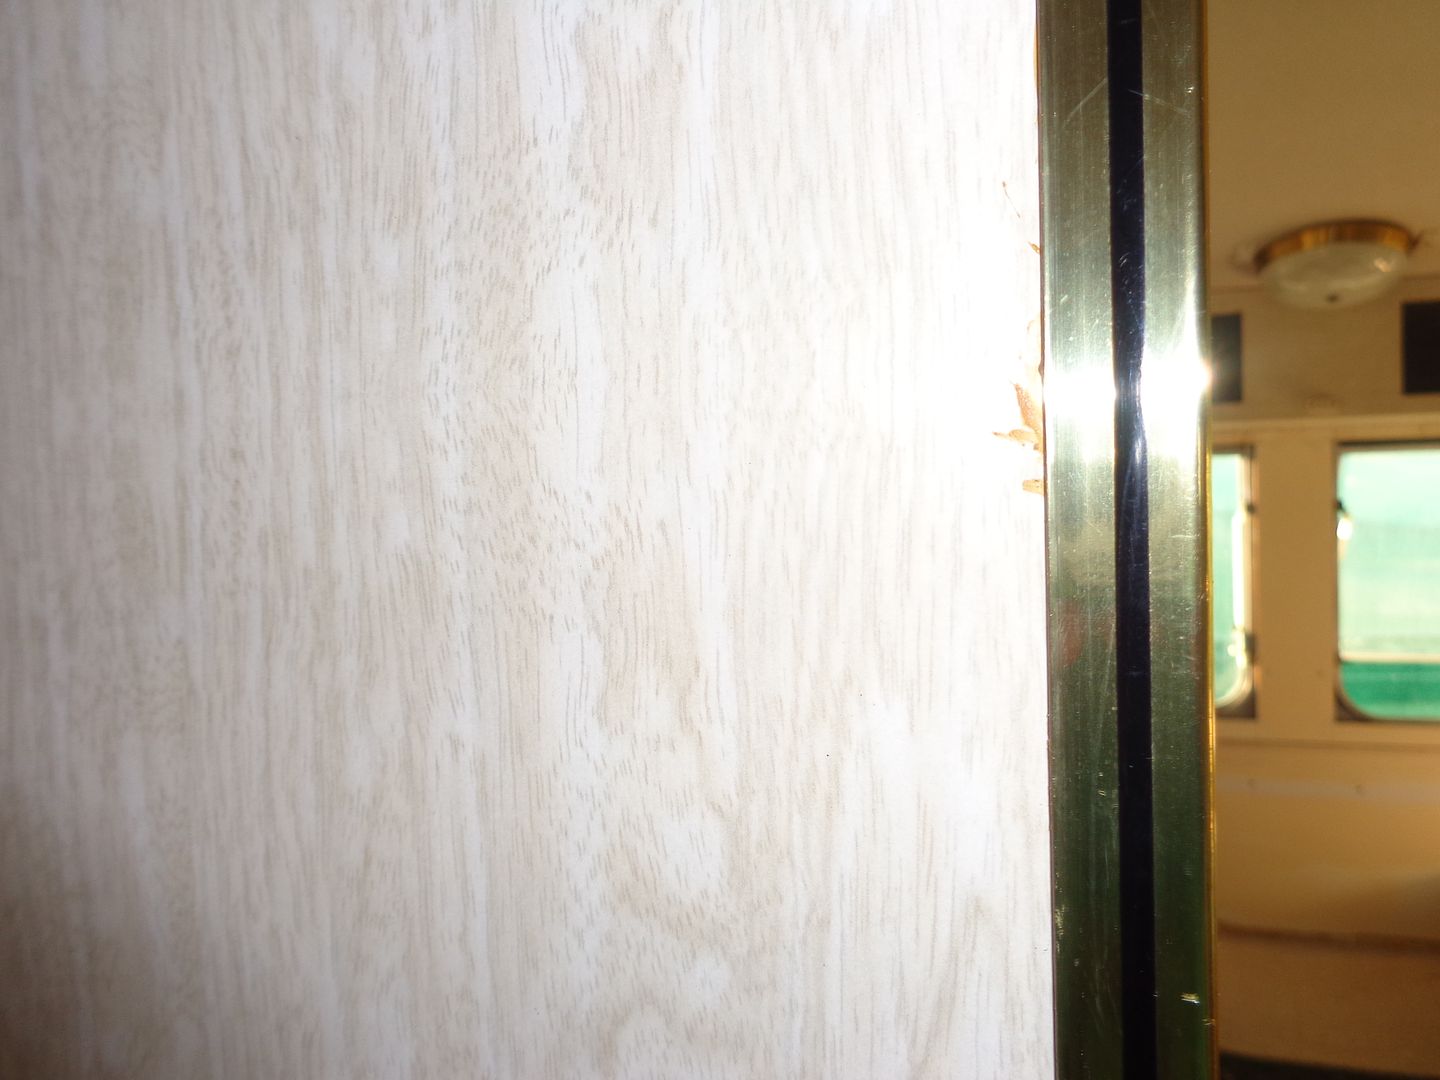 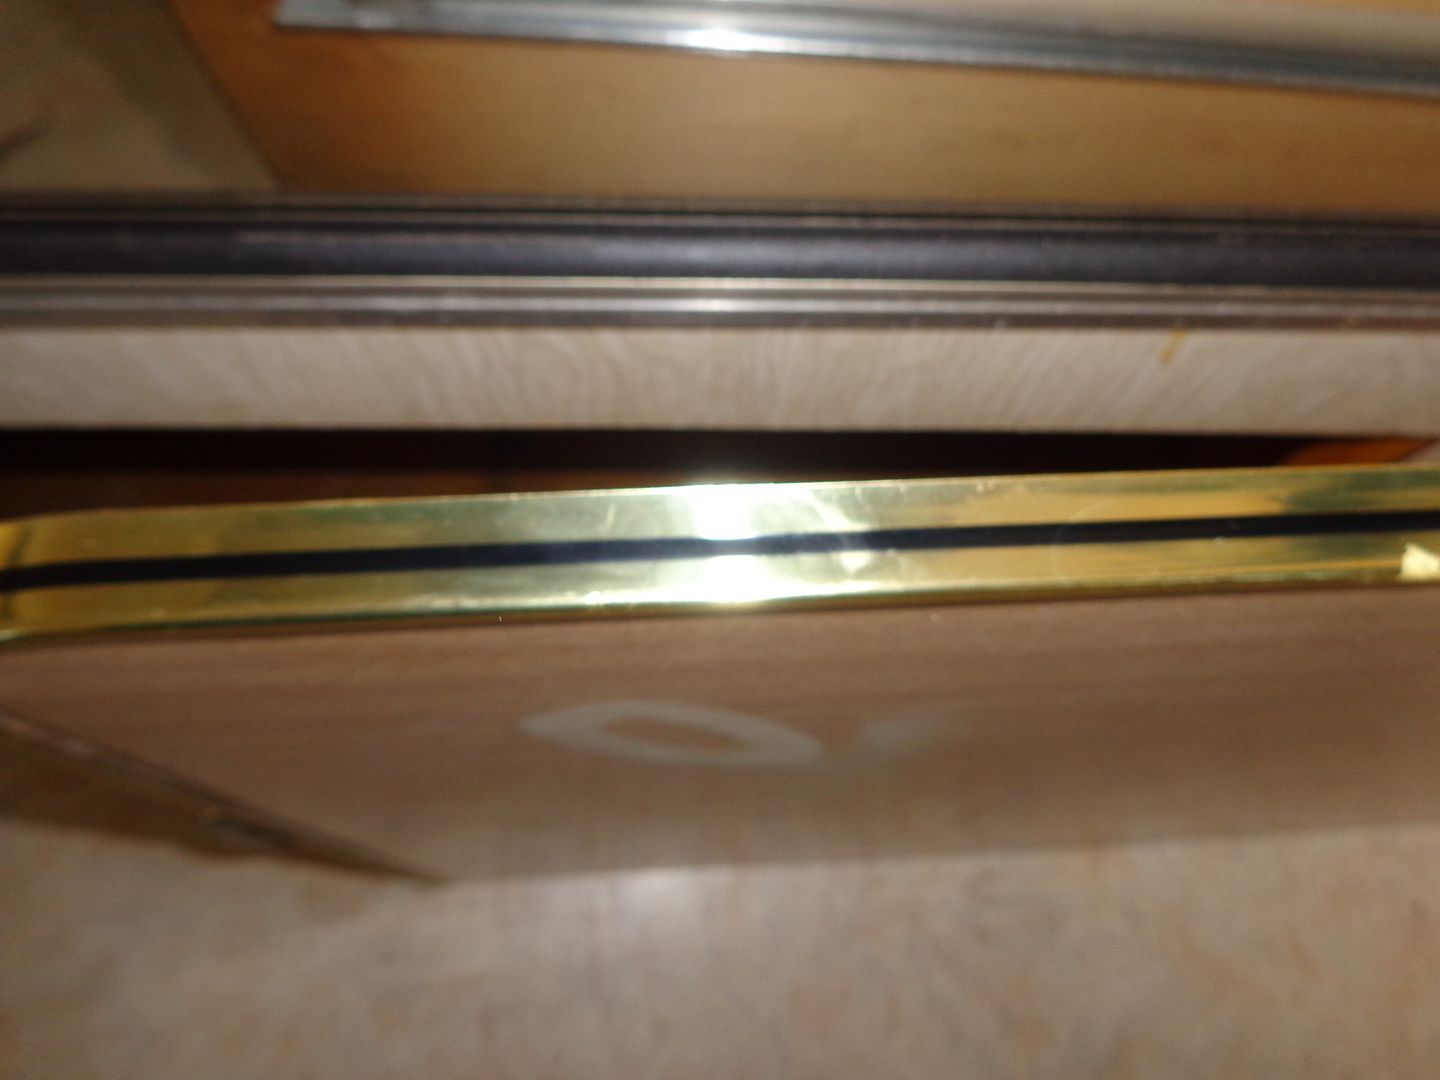 Boots has restored the roller blinds that were in it, & has almost finished painting inside the overhead cupboards, & has cleaned up & repainted all the door catch handles. The orinal hinges are the same as the ones available from Bunnings, so thats easy to fix. Slow & steady with this one for us. JBJ & Boots |
|
|
|
Post by JBJ on Jul 14, 2015 9:07:39 GMT 10
Hi All, Well a lot of time has past, with me looking at this one, & finding problems everywhere I looked. I left it while I worked on my Dodge, as I only work on one project at a time. So while my upholster is still letting me down with his work on the dodge ( he told me he would start on fitting the headlining back in February, & still not in place), I switched back onto the Quest. Its been very frustrating so far. The van appears to be very cheaply/lightly built. Very minimal angle iron chassis, chip board floor  >: >:DD, sides are sheets of ply , with joins vertically at sheet edges, fibreglass skin over glued only at window openings (that I can see), with a light pine 40x20 framing across between the sides to hold up fibreglass roof skin. Front one piece panel had several horizontal 40x20 pine holding up internal 3mm ply skin. I can see why it was so light to tow. So first problem I found was floor was total stuffed & patched up. It was chipboard from factory, which for the life of me I cant understand why someone would use a product that rapidly becomes useless & soft in presence of any moisture. It had been covered on top with 6mm MDF (nearly as bad as chipboard) & patch strengthened from underneath using more chipboard. Not a trace of ply, which is much more suitable. I let that part sit to think about while I started on other areas. The ceiling was plastic coated ply sheets, stapled in place. The plastic was lifting around edges & at joins. This is inside the robe, where I am keeping the plastic sheet. I will instal a quad moulding in corner. It also shows how they covered/joined the side ply sheets. 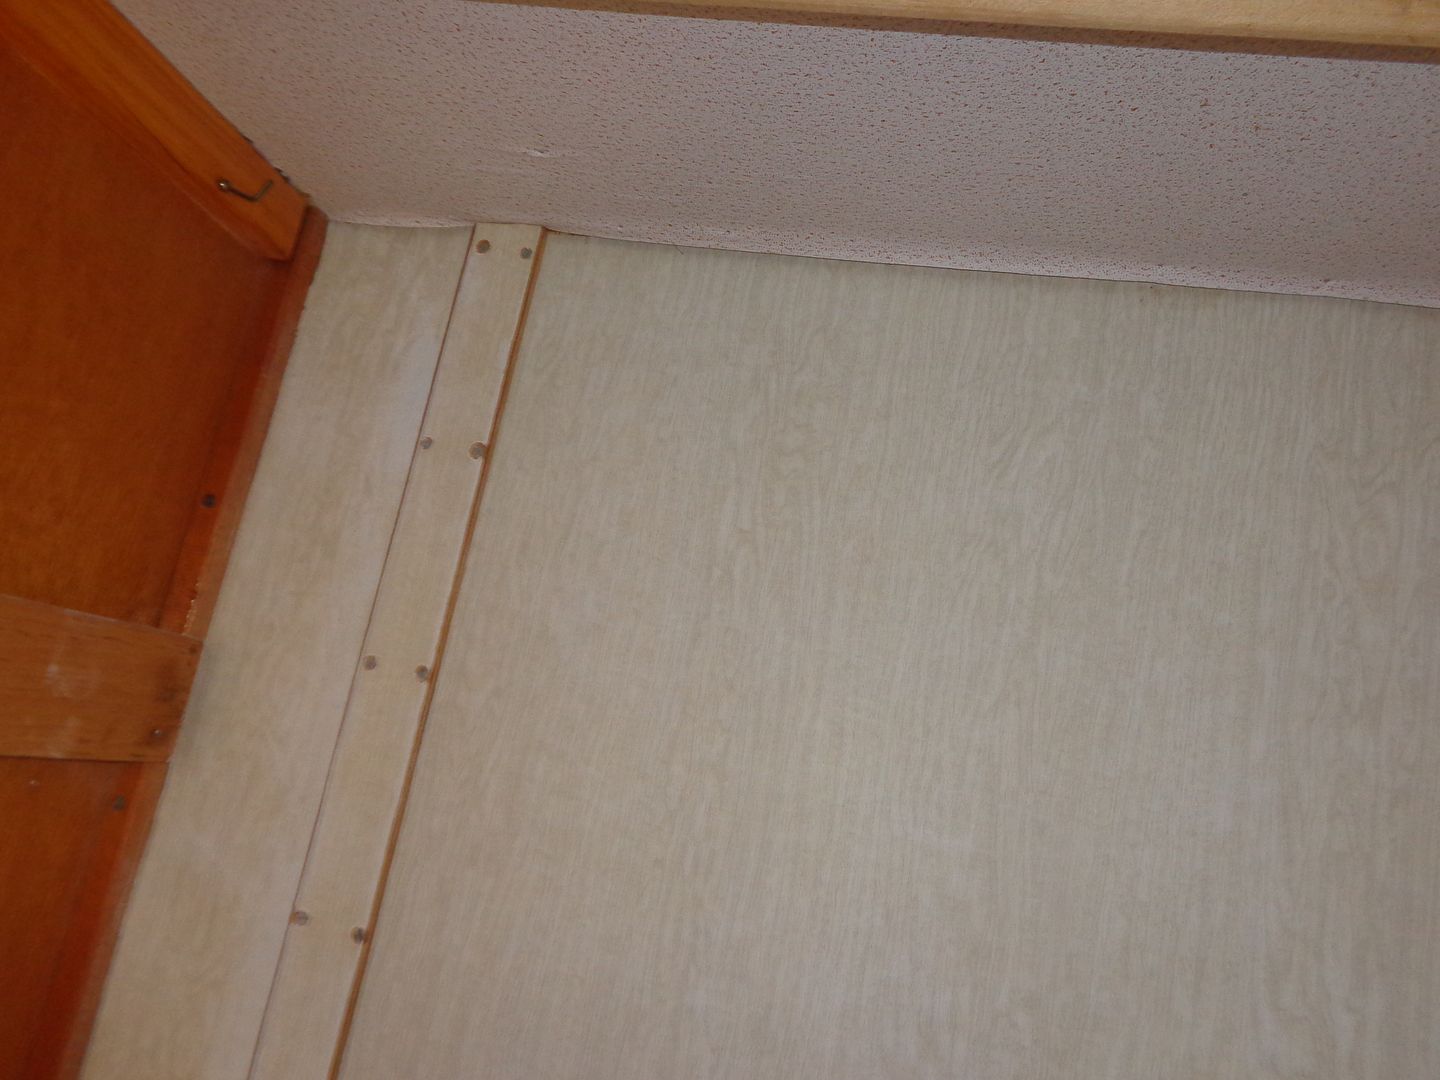 So I decided to tear all the plastic off, then wash the ply with thinners to remove the glue. With a little puttying at edges, I gave it a light sand then a light coat of primer to see if the glue/thinners residue would affect the paint. Been sitting a month or so without any problems appearing, so so far so good.   The internal ply wall linings & cupboard faces were painted woodgrain finish, with a real good gloss finish. But about 50% of the walls had been painted, or covered with MDF sheets. I removed a few of the MDF sheets, & found water damaged ply under. These sections will be repaired as I go. I sanded all the ply, taking the gloss off to give a surface that will accept primer.  I removed the stove, & reconstructed the bench top higher, to create a cupboard for my microwave..  I then started removing damaged internal front panels, & found MDF sheets covering all sorts of damaged ply. But it all cleaned up OK, & will be relatively easy to replace properly. I will also put some extra timber in where I think its needed.  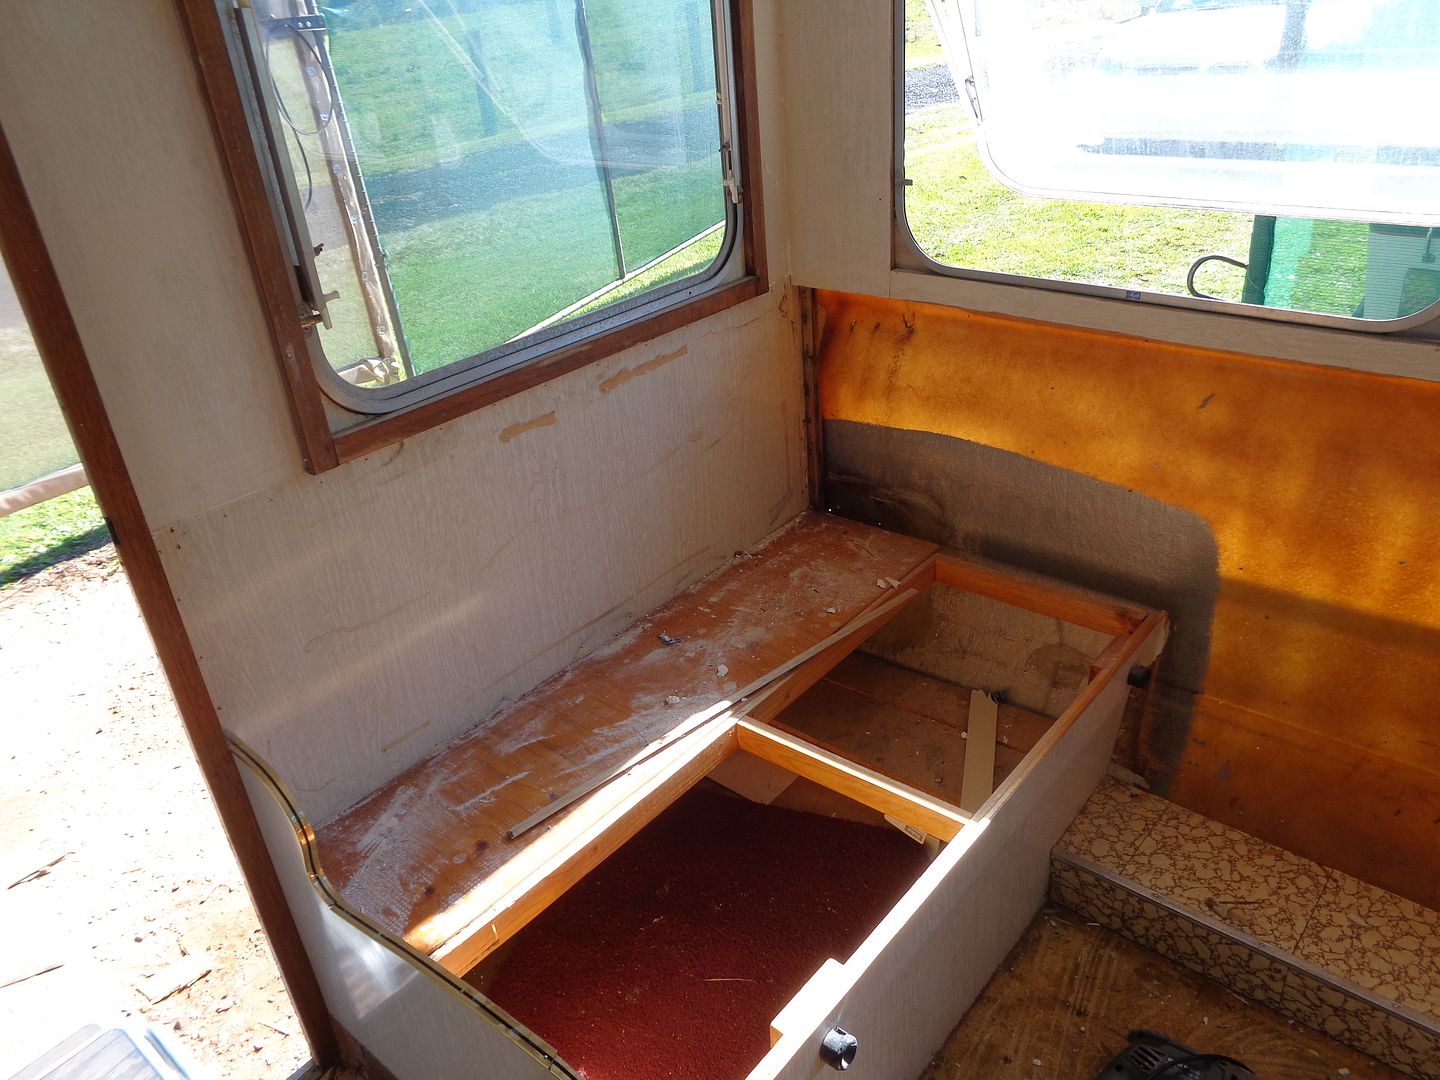 So after much thought, including one of towing the van to the tip at one stage last weekend, I decided to cut the existing sections of chipboard floor out. It was so rotten in many places that I could crumble it to powder in my hands. 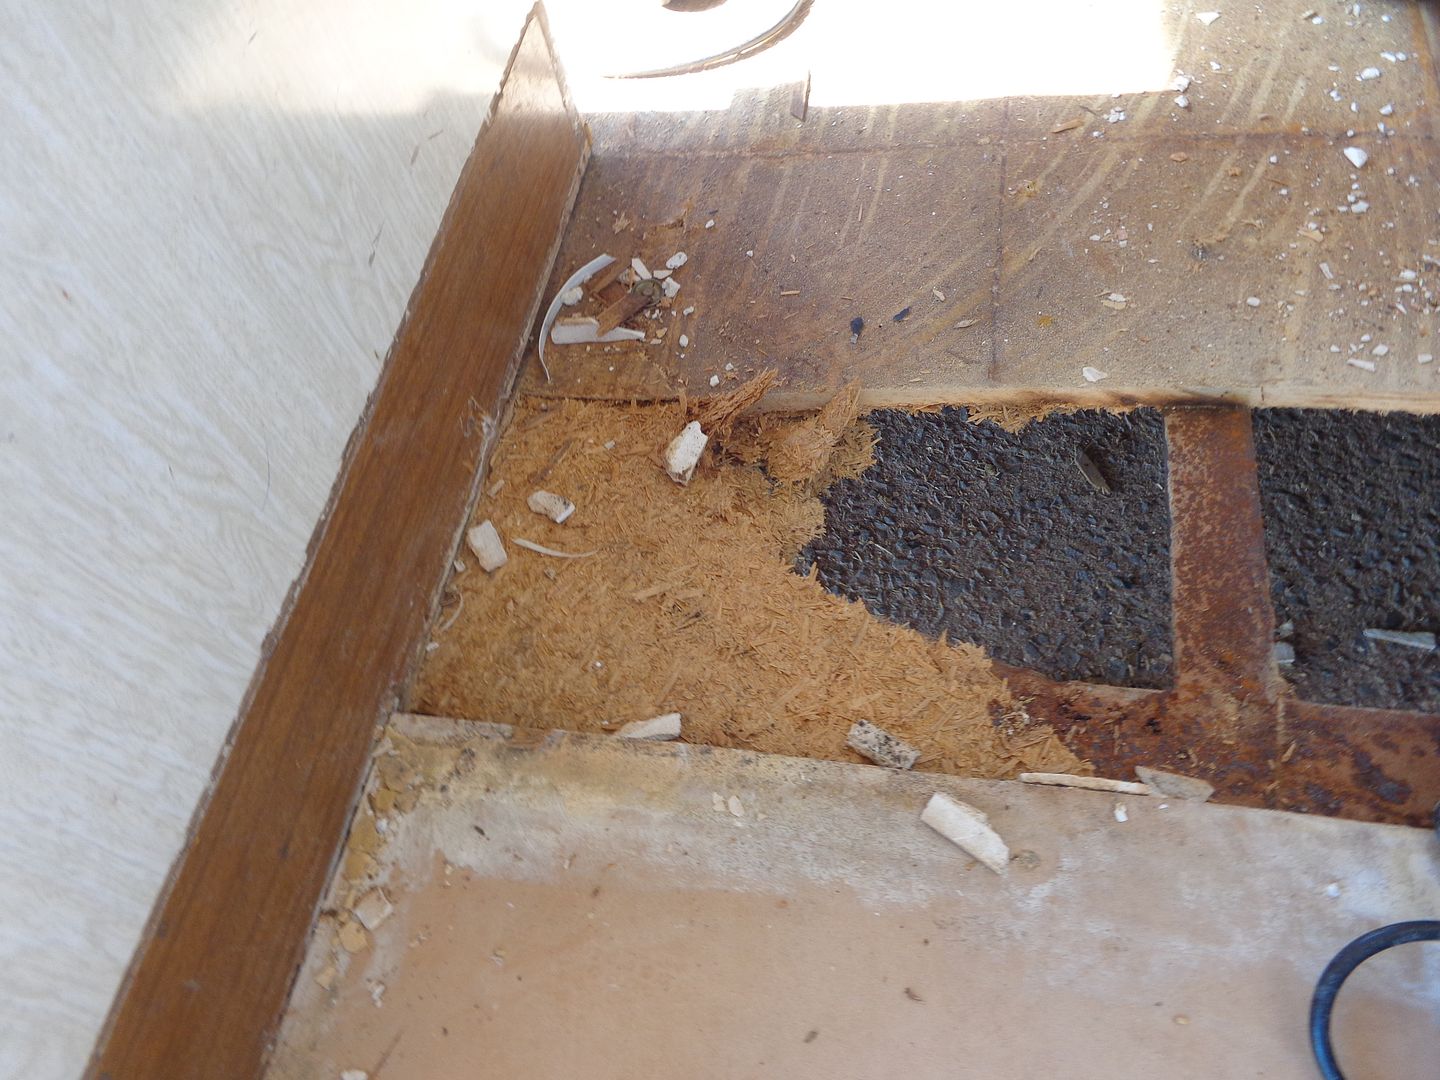 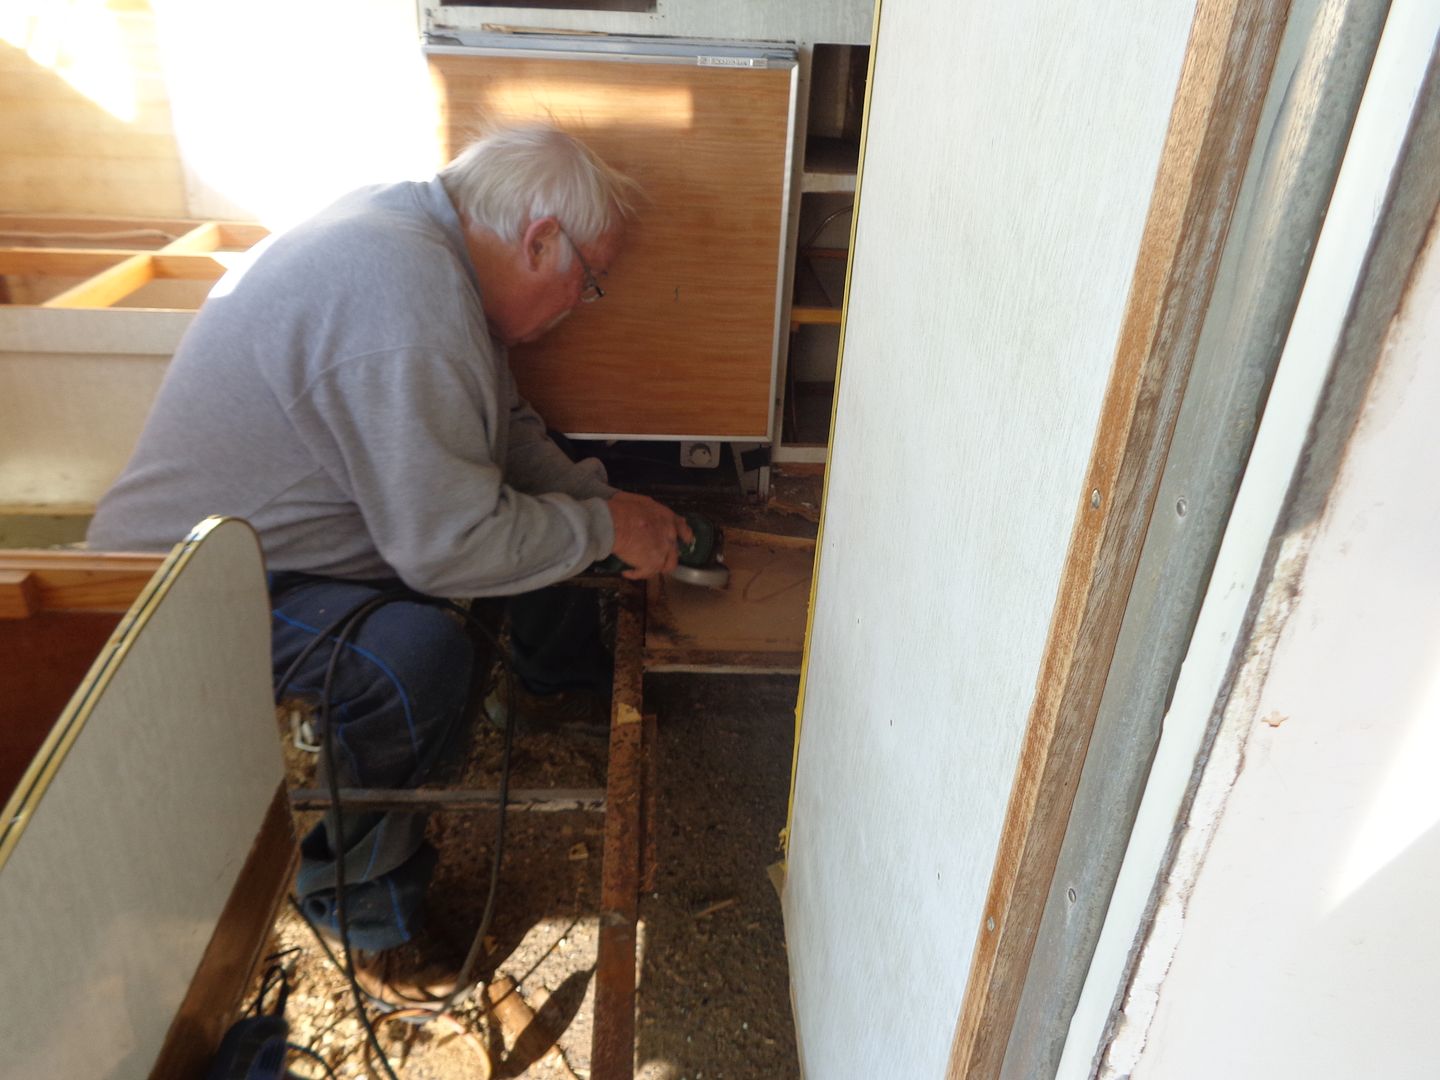 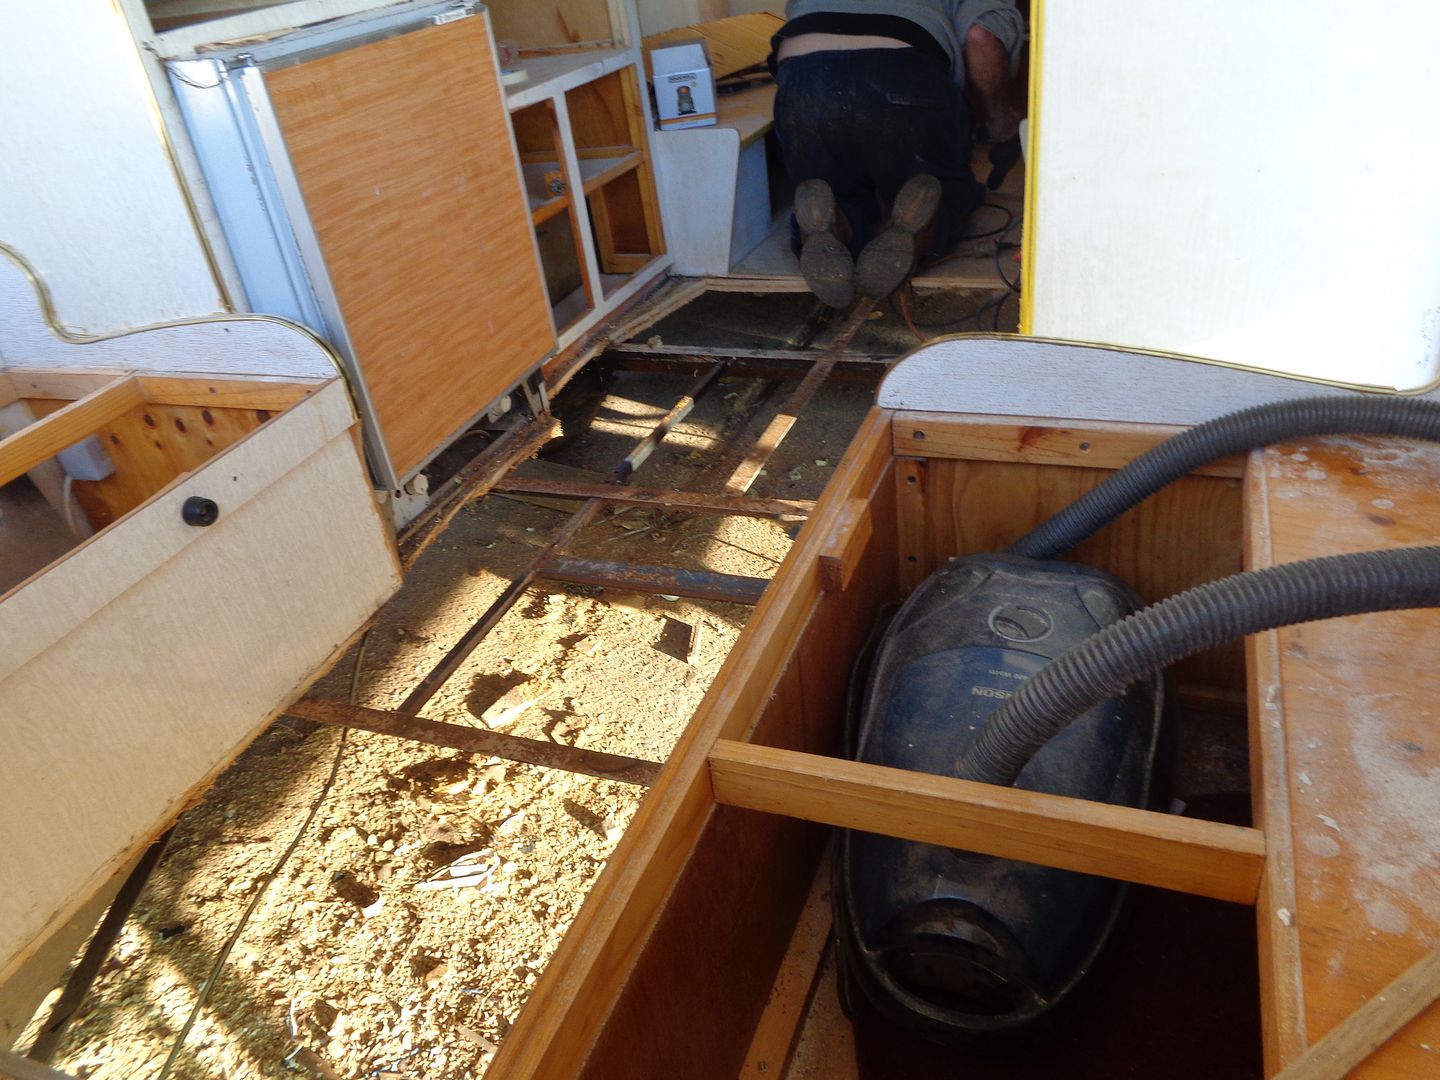 I intend to instal a steel angle iron frame around the edge of the cut out, supporting both the retained chip board under cupboards, beds & seating, & the new 15mm waterproof ply sheet I will be installing. I also will put a lot more angle framing in to reduce the big spacings between the factory chassis angle irons So thats where I'm up to. I had no intentions of rebuilding another van, but I guess S*** happens. JBJ |
|
|
|
Post by humpty2 on Jul 14, 2015 18:52:34 GMT 10
It's still all fun Dennis ...but reminds one of an iceberg....ie most of it is underneath. I won't touch another wood framed van....its fibreglass for me!! |
|
|
|
Post by JBJ on Jul 14, 2015 19:19:46 GMT 10
Hi Humpty
I thought Quest's were fibreglass, but they are are a timber van clad with fibreglass, or at least mine is.
Every van I have rebuilt has ended up being much more work & expense than expected.
But its my choice to get involved, & I enjoy the manual work & thought involved.
It still is nearly always fun working on cars & old vans.
JBJ
|
|
dawso
Full Member

Posts: 141
|
Post by dawso on Jul 14, 2015 20:15:10 GMT 10
Hi JBJ.
I also removed plastic paper from the ply on the internal of Peanut then sprayed a coat of Penatrol over everything then a coat of undercoat and two coats of top coat. No problems.
Dawso
|
|
|
|
Post by JBJ on Aug 2, 2015 19:09:07 GMT 10
Hi All, Abit of progress made. The steel framing for the floor is partly done. Doing a bit as I feel like it. 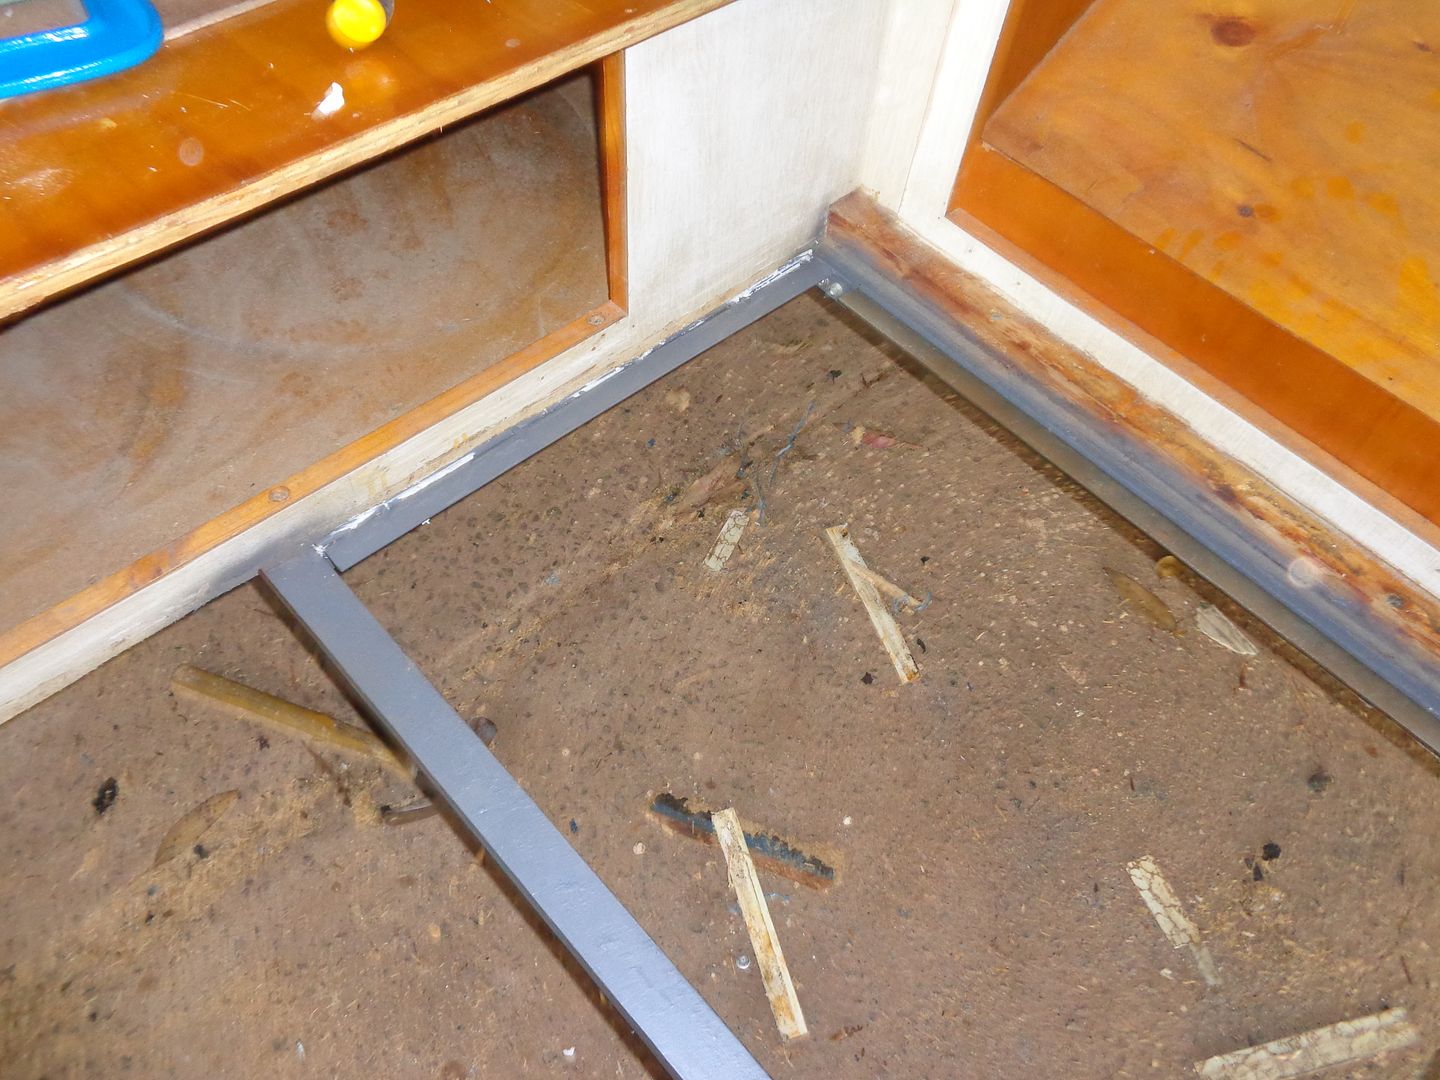 I made the framing, then put a layer of adhesive on top. It then was pushed up under the edge of the existing floor under the cupboard. Framing was then screwed &/or welded into existing chassis. A lot of work, but only way I could think of other than totally dismantle van I replaced the ply in the front corner, & across the front. Made new framing for front ply, & replaced much more than I expected. This van has been patched poorly in a lot of areas. Seeing there is no timber frame, the repairers just stuck MDF over the rotten ply walls. 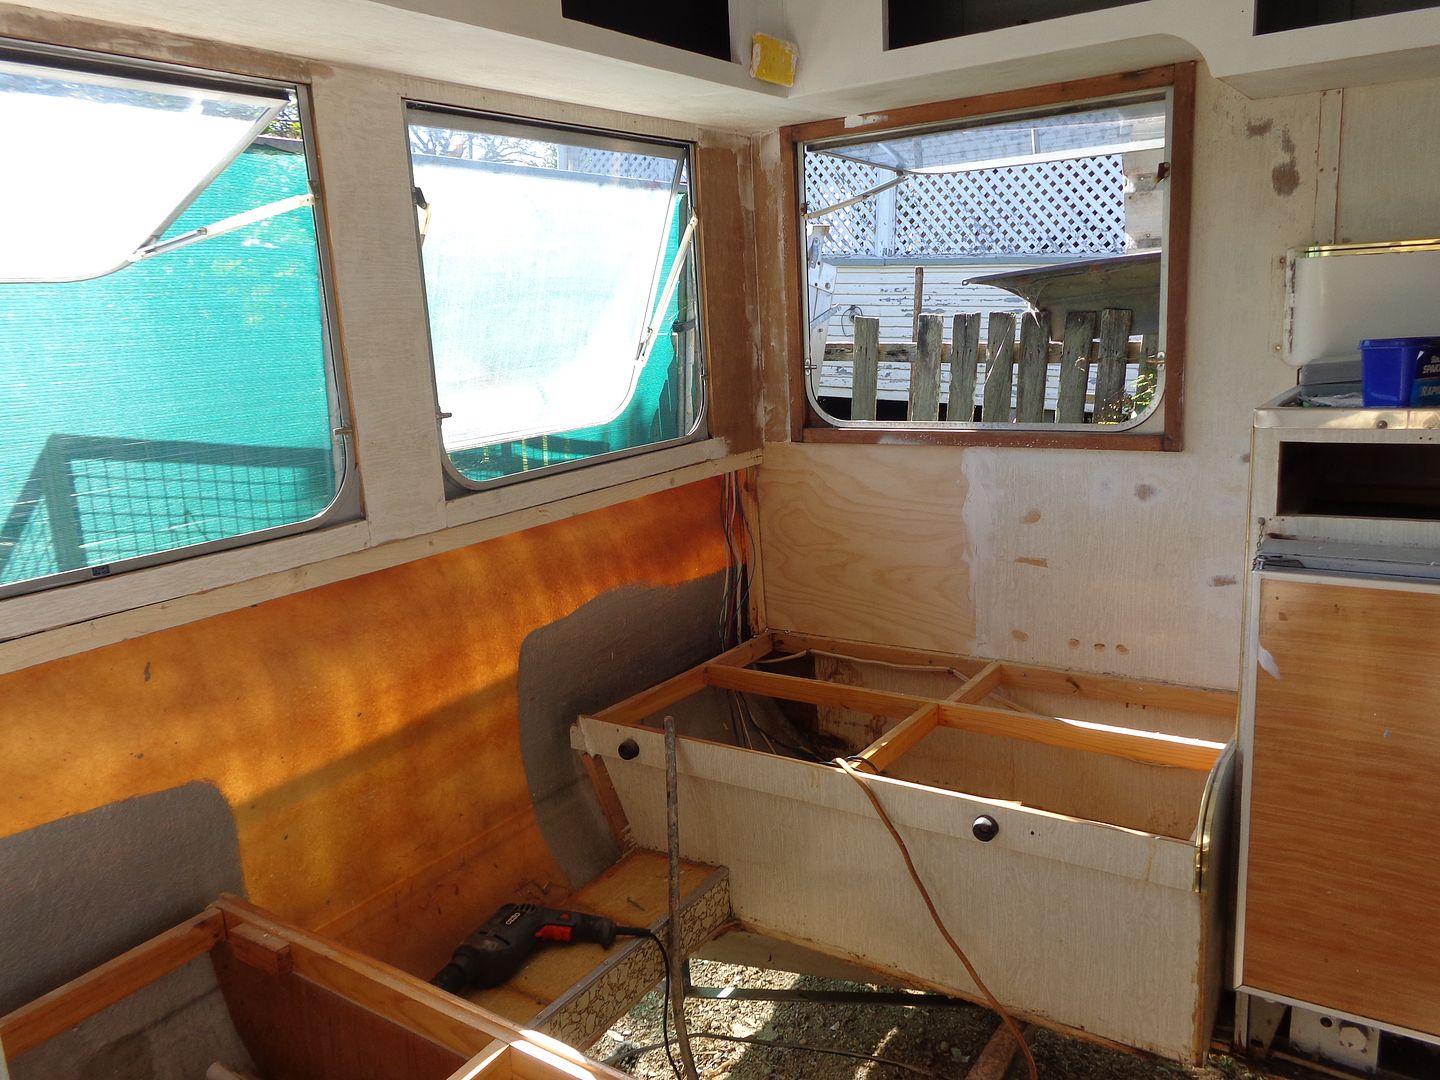 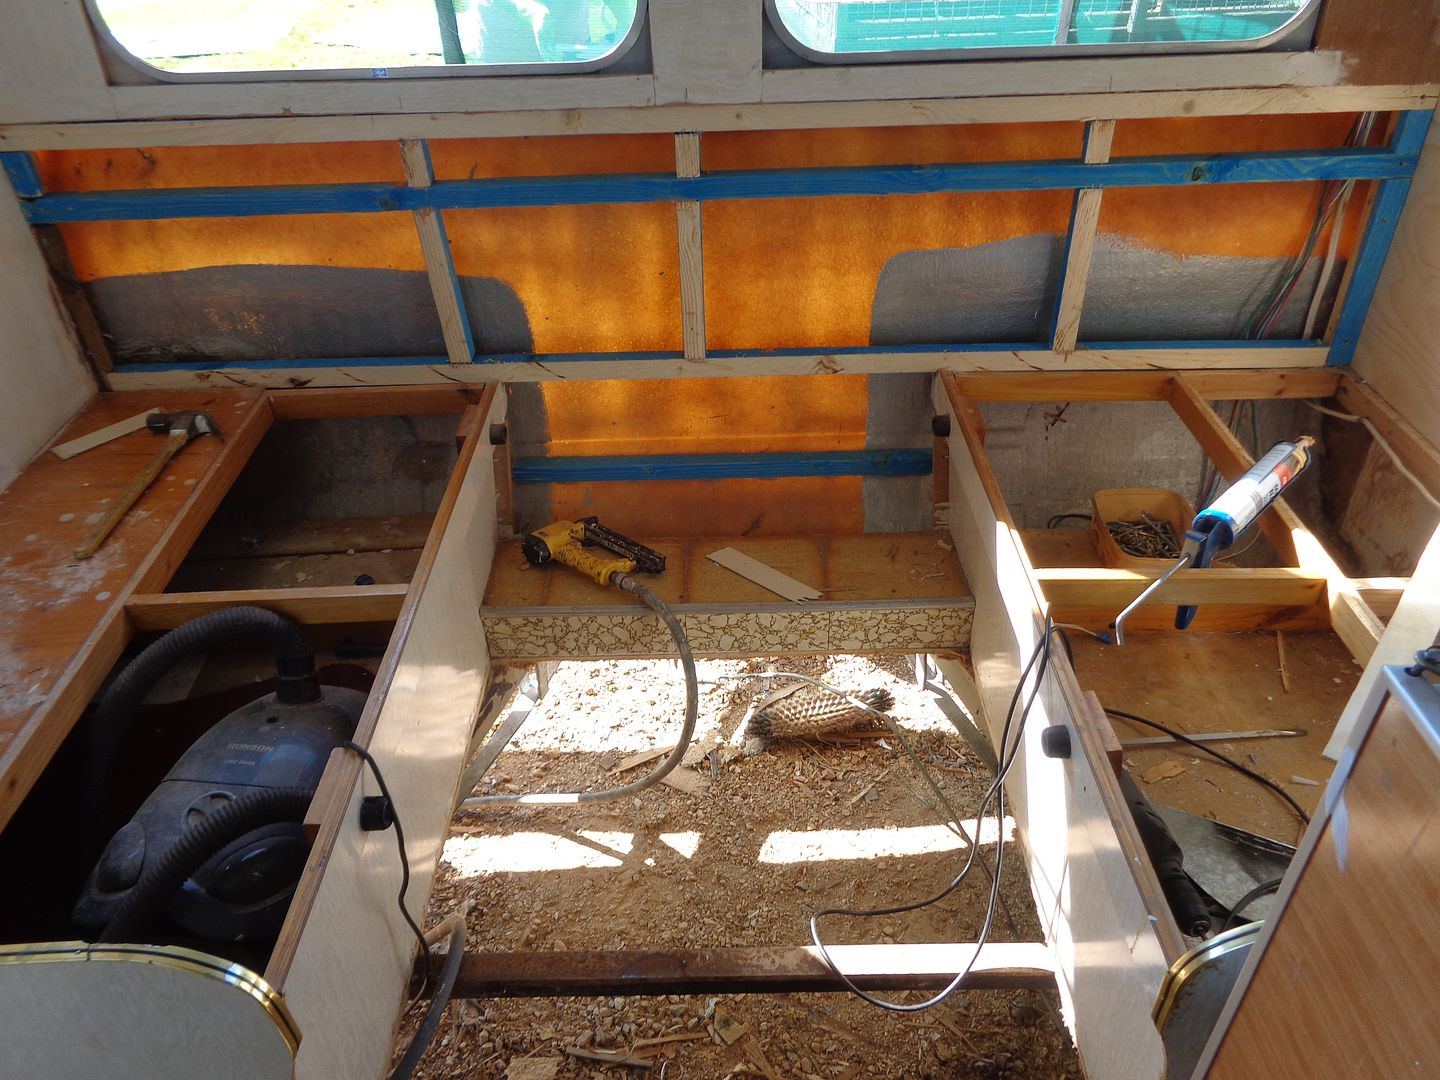 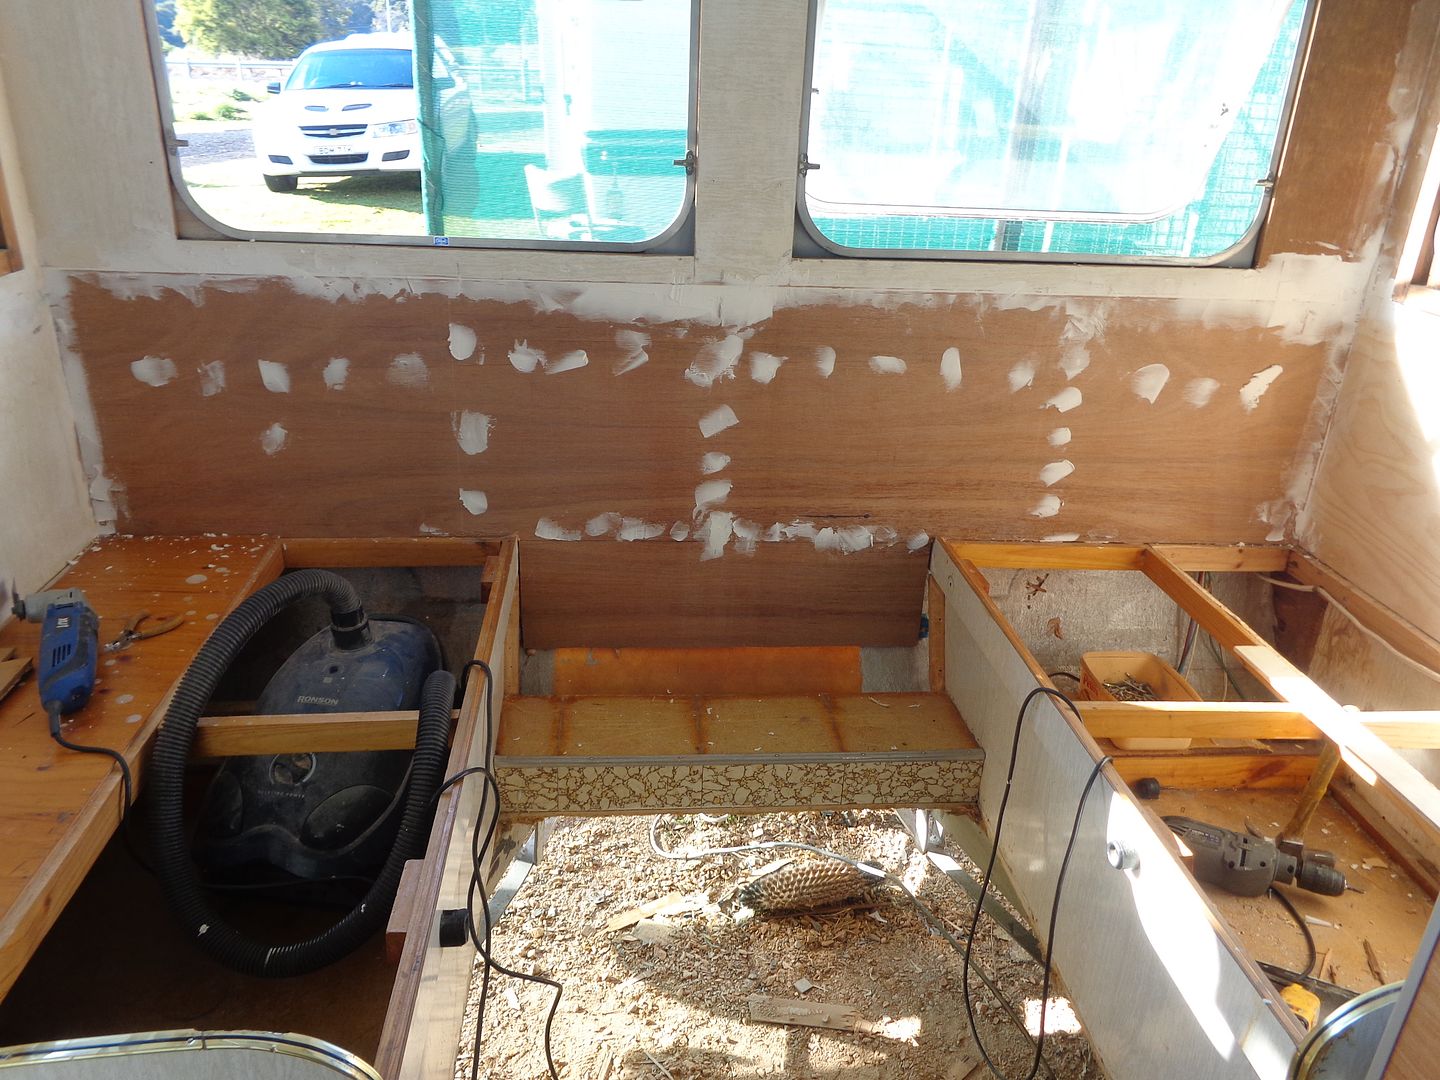 So I've removed as much rotten ply as I can get to, then glued & screwed new ply in place. It seems to work, but who knows what will happen after a bit of travel. We've primed a lot of the interior, as well as the doors. They were varnished over the back of the ply, & pretty poorly at that. I'm taking my time with this one. I have no idea what to expect as I progress, as I havent worked on a van built like this before. Its sot of like a home made ply van, with only ply as walls, then clad with glass sheets, but the whole construction seems to be lightweight & minimally built. It will end up a nice van. Its still fun, much better working on a hobby than worrying about the troubles of the word. JBJ |
|
|
|
Post by JBJ on Aug 9, 2015 8:40:01 GMT 10
hi all, Well I got part of the new floor in place, & its going together like I hoped. The steel frame I made was from 35x35x2.5 Duragal angle. I welded the two pieces of each support back to back, by short welds then a space, as I didnt see the need to fully weld. When installed as a Tee section, one angle supports the existing cupboard, & the other the new floor. 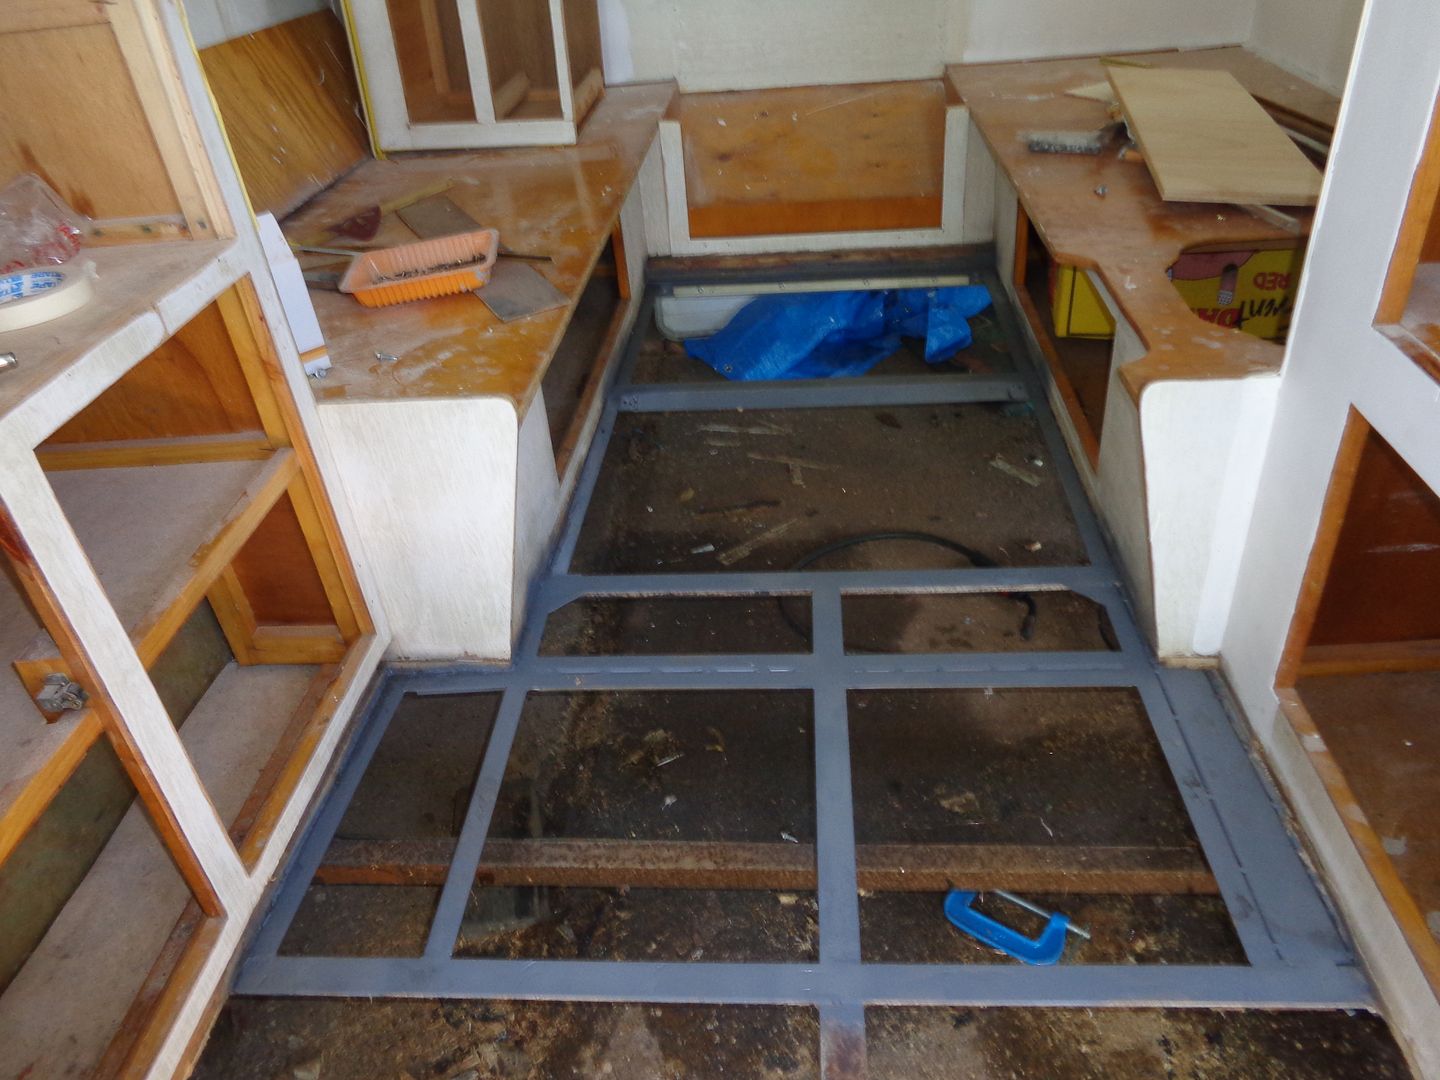 A heavy bead of liquid nails goes along the rotted edge of the chipboard, then the primed 15mm ply is installed. It is then screwed onto the new steel frame & existing chassis rails.  The front section went together similarly 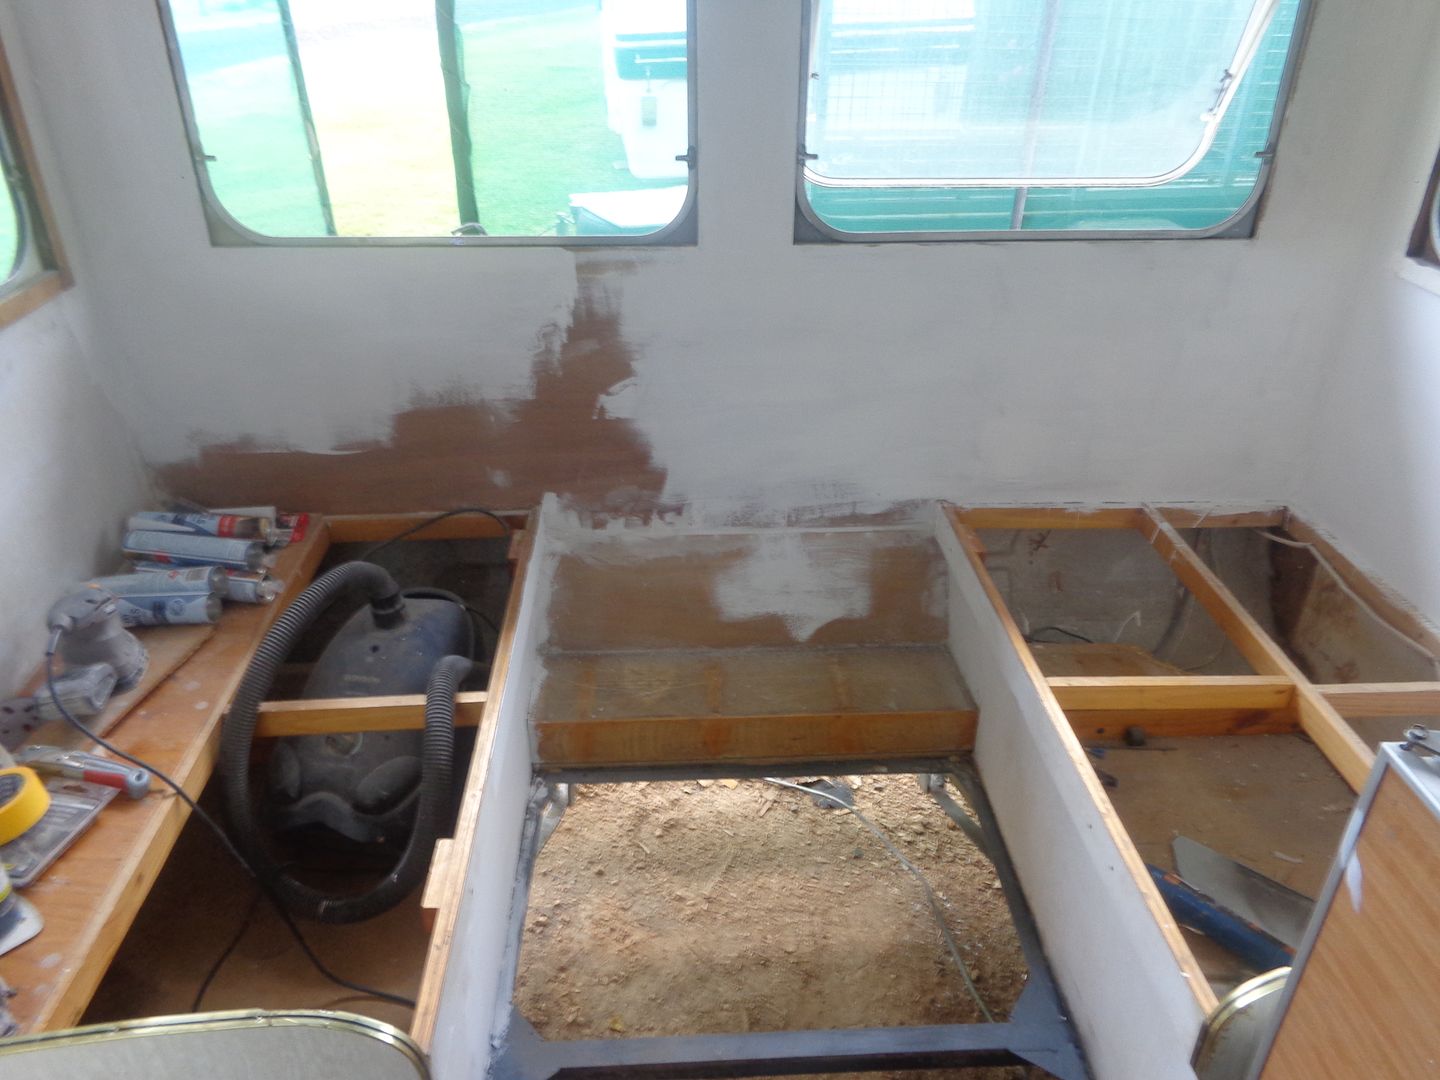 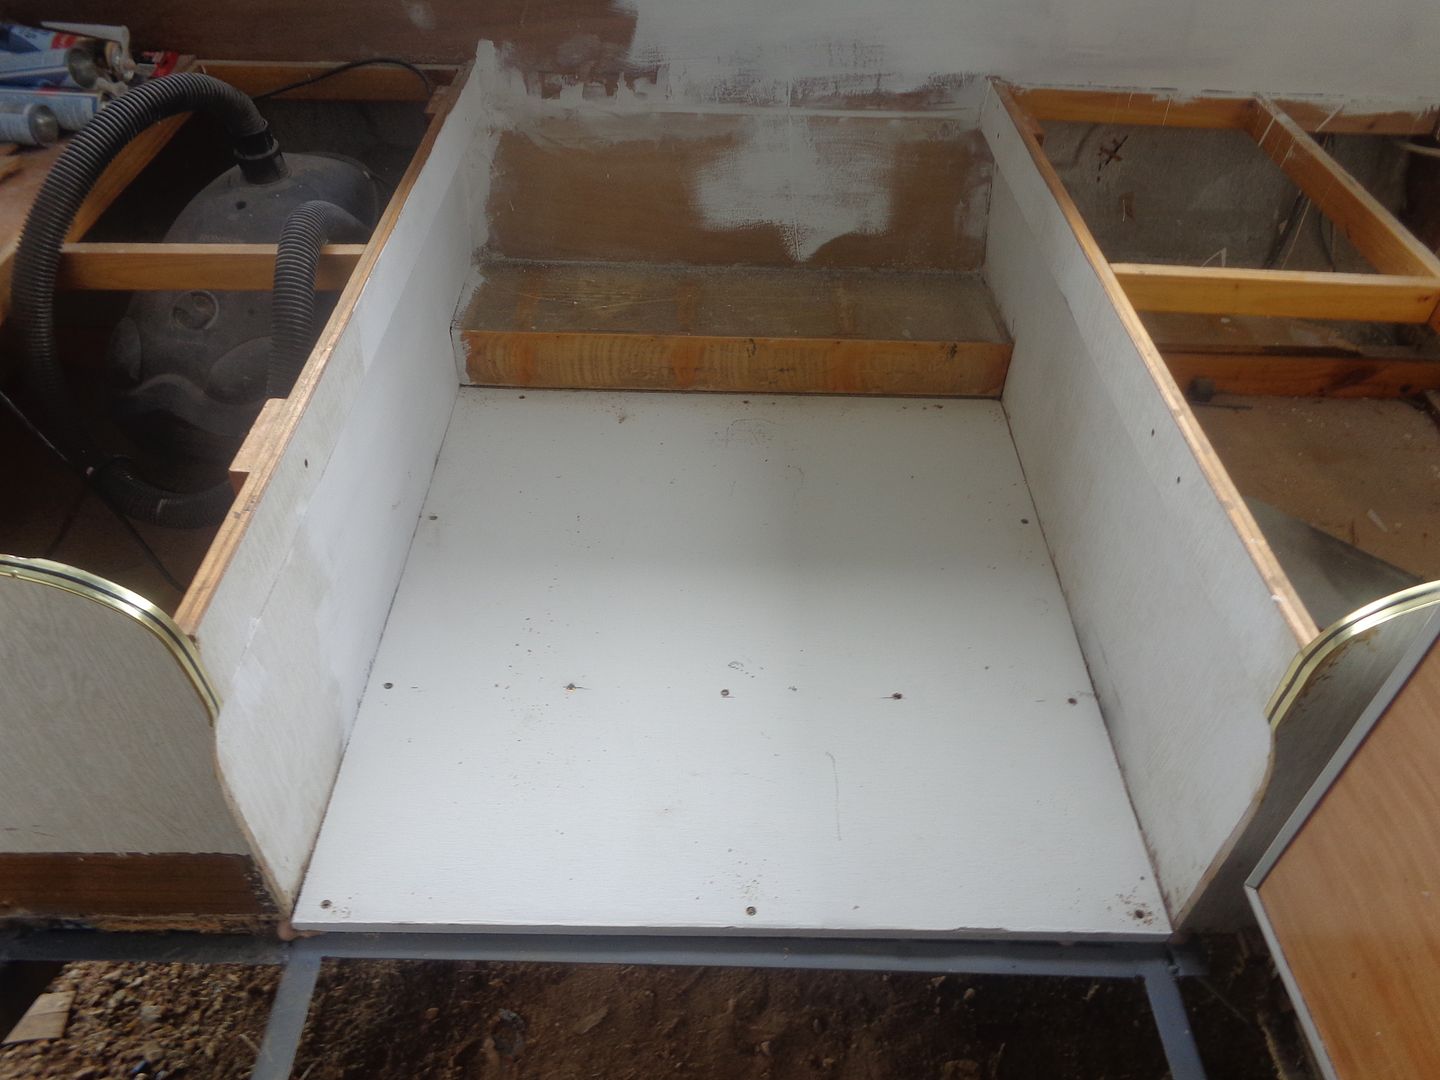 JBJ |
|
|
|
Post by JBJ on Aug 10, 2015 17:21:08 GMT 10
Hi Al, Well after travelling home from Mexico in the van, we decided that if we rebuilt it we would put better beds in it. What was there was about 700 wide x 1820 long. Plently long enough for a short one like me, but not real wide. We looked around at standard bedding sizes, & rapidly realised that decent bedding wasn't available in those sizes. So if we had to have custom made innerspring mattresses, we may as well make them as big as we could. Nothing could be done about the length, & that didn't need changing. But it isn't that hard to widen the beds. So I got a couple of lengths of 120x19 tas oak from Bunnings, stapled it temporarily in place, & presto we have 830 wide beds.' 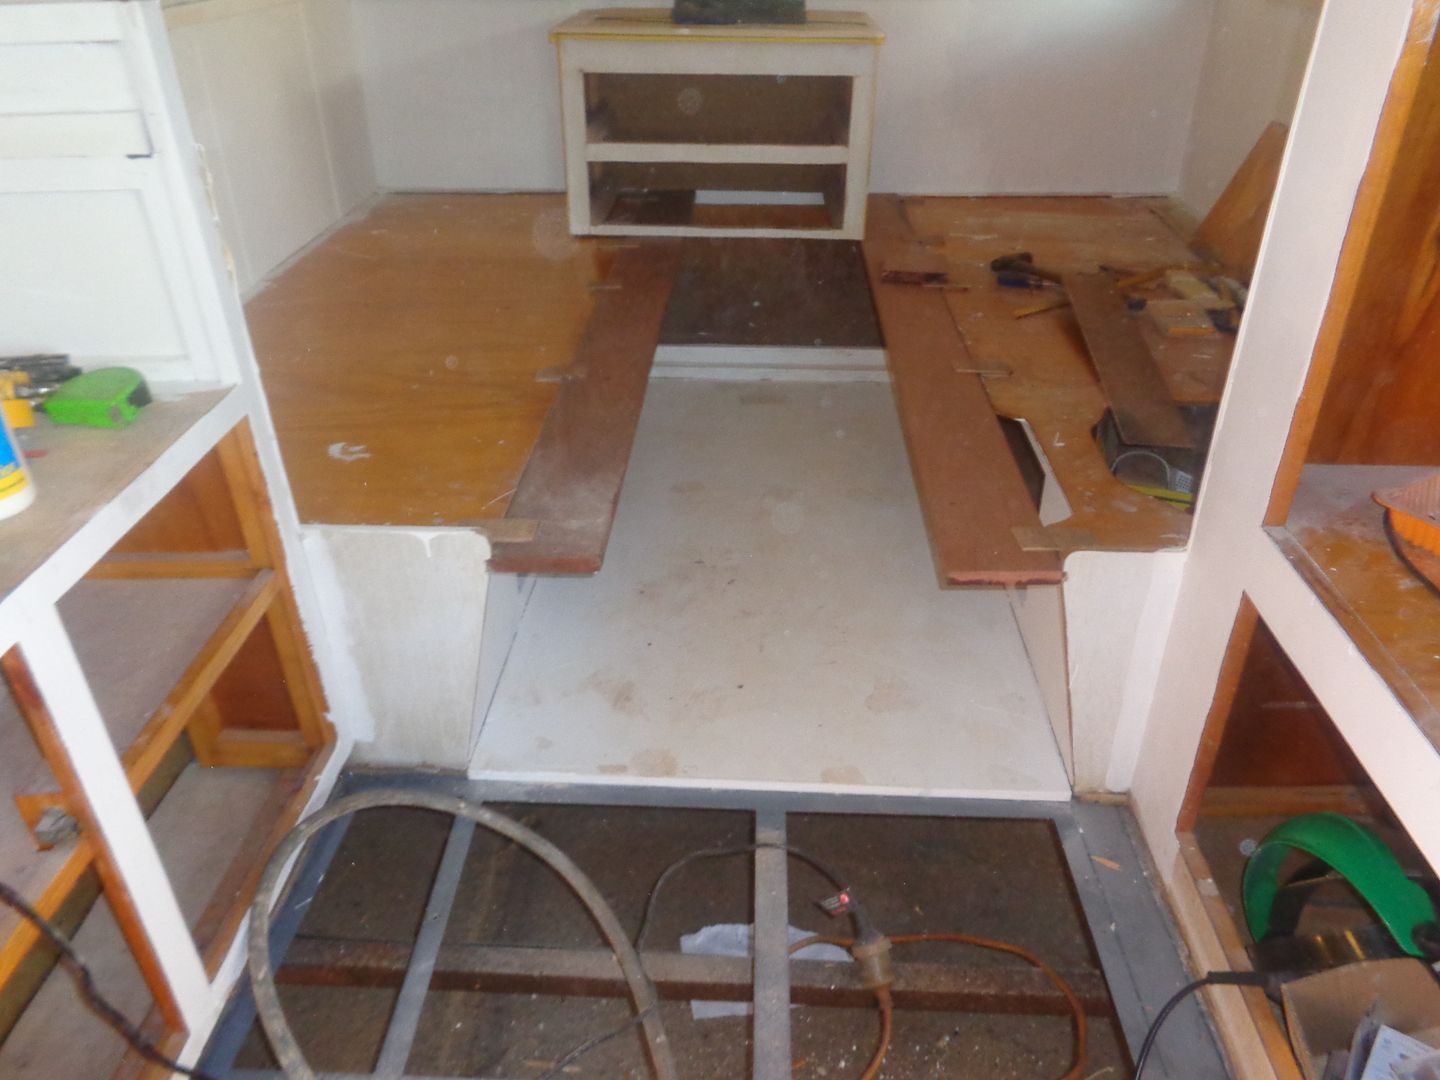 Wont be TOO hard to finish off. have to do a bit of reduction surgery to bedside cupboards, make a few bits, etc, but nothing a few days enjoyable work wont fix. JBJ |
|
|
|
Post by JBJ on Aug 16, 2015 20:30:08 GMT 10
Hi, A bit of progress, albeit pretty slow & time consuming. I managed to finish fit the wider boards, then started narrowing the drawer unit. I have found the back of the van is not quite square, & one side bed is lower than the other. Doesn't really matter much, but makes it real hard to align new work, 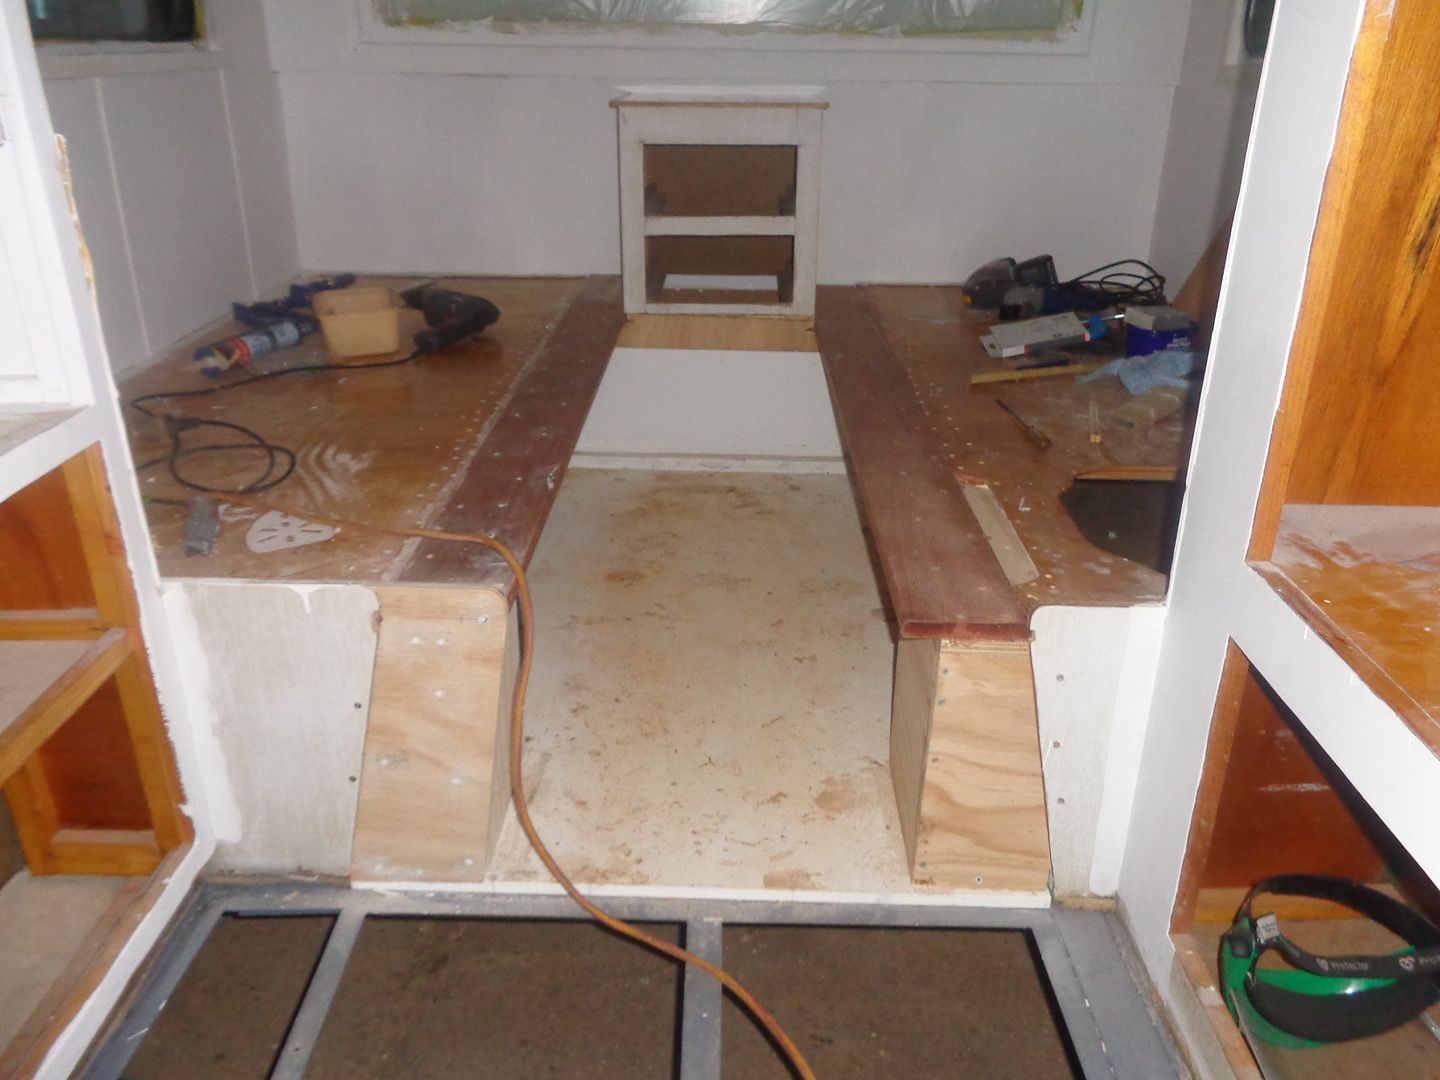 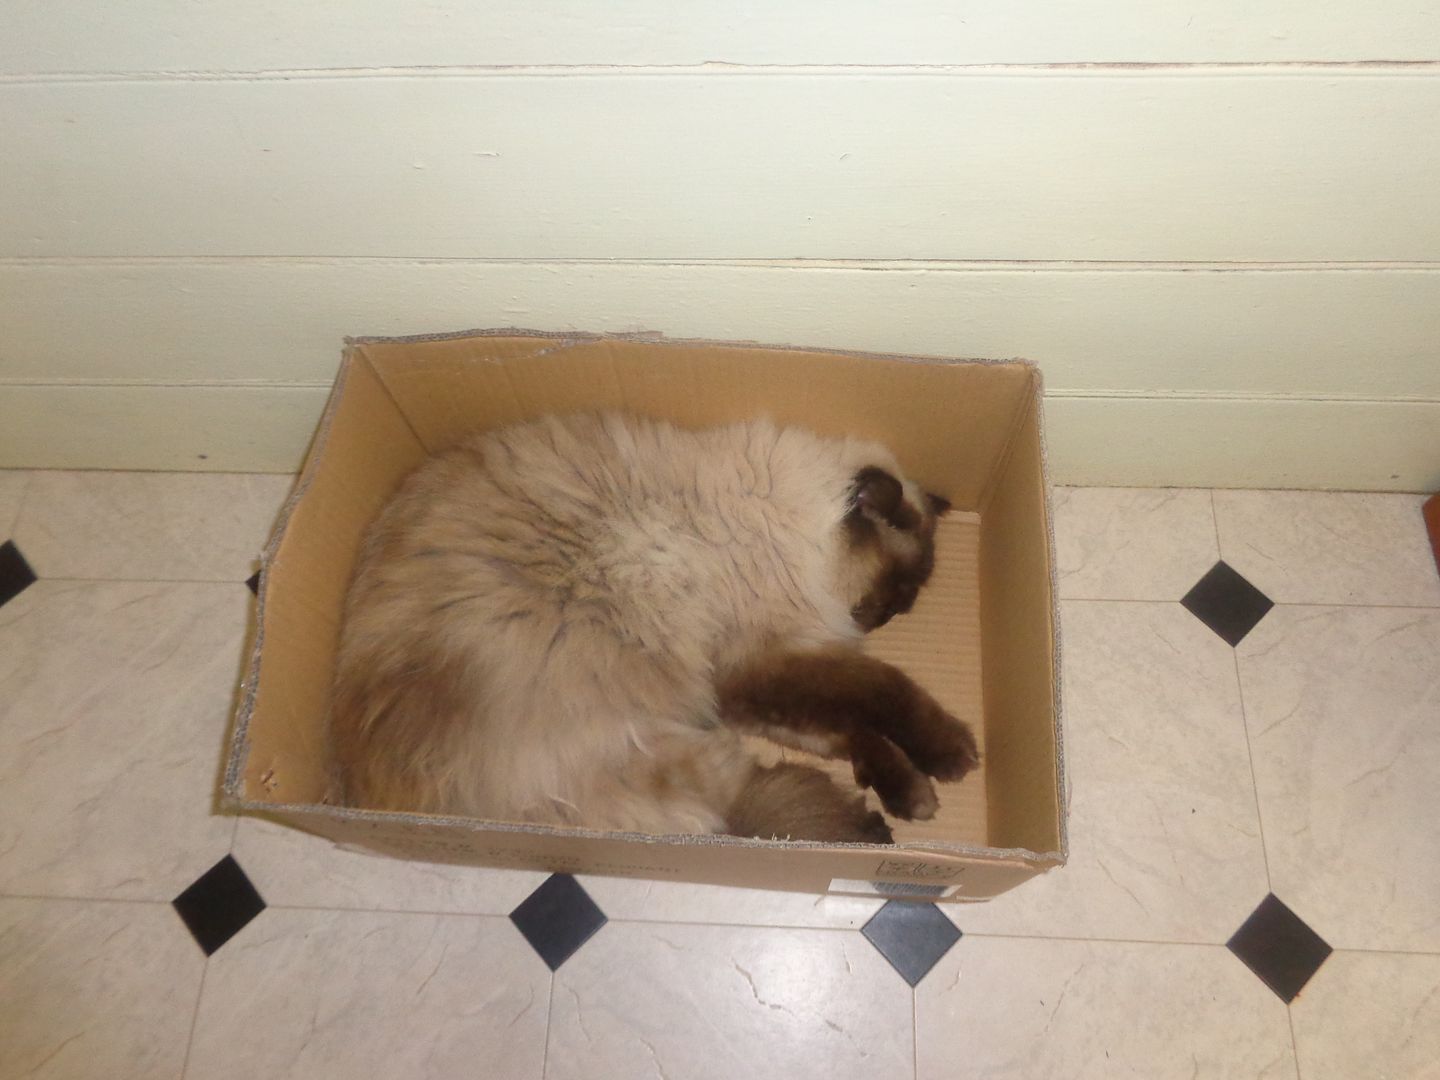 This is my helper. We inherited him about 9 months ago. He is a pug nose long haired Himalayan desexed male. He weighs 6.5 Kg, & we think he is about 2 year old, but we have no definite idea. He is a very people oriented cat, & doesnt like being away from us. I just wish we could have been given him when he was a kitten, so we could train him to travel with us. JBJ |
|


 When will you actually stop working and get on the road for that block trip?


 >: >:DD, sides are sheets of ply , with joins vertically at sheet edges, fibreglass skin over glued only at window openings (that I can see), with a light pine 40x20 framing across between the sides to hold up fibreglass roof skin. Front one piece panel had several horizontal 40x20 pine holding up internal 3mm ply skin.