|
|
Post by cobber on May 13, 2011 20:30:57 GMT 10
You're a pal Al, but my bolt fits into a hole in the plunger so it only needs to be finger tight. The ball adjusting bolt on your coupling isn't evident on any of the Locktite/ Newcastle hitches I've seen or on the registration of a design submitted by John Walsh..... matter of fact neither is the locking bolt that is on our couplings, so it looks like it might be a modification to the original design too......... BUT NOT BY ME YOU UNDERSTAND  Cobber. |
|
|
|
Post by Franklin1 on May 27, 2011 20:09:40 GMT 10
I've finally got the braking system sorted out on this van. Many thanks to kaybee for some technical help in the background, which sent me down a different path to the one I was contemplating. All the fittings and cable are marine grade 316 stainless steel, used on yachts... 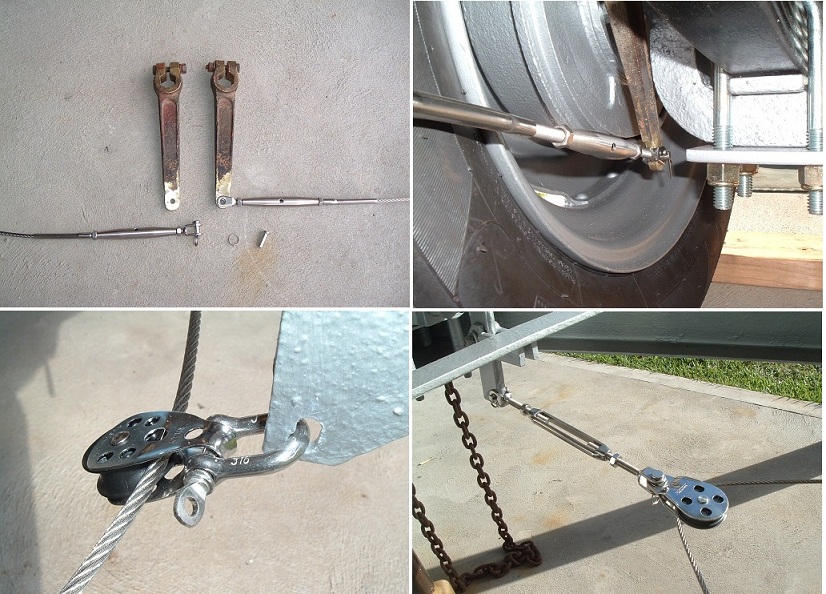 It sure pays to shop around and compare prices. The turnbuckle fittings I used on the brake levers are sold in our local Bunnings store for $41.30 each, or $82.60 for two. Then you have to go find someone to swage (crimp) them onto the cable. Less than a kilometre down the road is our local yacht shop, who charge $14.25 for exactly the same turnbuckle, and $5.50 for swaging each fitting onto the cable. So, for $39.50 all up, I got both fittings plus had them swaged, for less than the Bunnings price of one fitting. (And please, no war stories about Bunnings. This might have been "just one of those things".) The other job I've completed is the jockey wheel. I gave up on the original wheel, because the wheel and swivel head are both completely locked up with rust/dirt/dust/. The threaded screw shaft also slops around in the holder "nut" due to wear and tear over the years. I've substituted a jockey wheel I got at the local markets for ten bucks a couple of years ago. That's been refurbished and now fitted...  I'll keep the old jockey wheel in case the next owner of the van wants to go back to "original"  . Plodding continues... cheers, Al. |
|
|
|
Post by Don Ricardo on May 27, 2011 20:31:08 GMT 10
You're doing a great job there, Franklin1.  You always seem to find ingenious ways to do with problems. A much to be admired quality with projects like the one you are doing. Some people would give up - or make a hash of it - while you think about it, get advice, and come up with the goods. Nice to hear also that the "category killers", as they refer to the big retailers, don't always have things their own monopolistic way. Don Ricardo |
|
|
|
Post by curtis on May 27, 2011 21:35:02 GMT 10
Hi Al,
Great work - I do enjoy reading your updates, your quality of workmanship is inspirational to say the least.
Keep up the good work
Dave
|
|
kaz
Junior Member

Posts: 99
|
Post by kaz on Jul 10, 2011 19:38:03 GMT 10
hows the van going, have u anymore pics of late
Kaz
|
|
|
|
Post by Franklin1 on Aug 9, 2011 21:07:40 GMT 10
G'day All, (and especially kaz, for whom I have a couple more pictures...  ) With the crappy winter weather now appearing to be coming to an end, it is time to resurrect this project... Before it, and I, went into hibernation, I had completed the chassis ready for the cabin to be built. I haven't progressed beyond that, with the last job being the addition of mudflaps to the chassis... 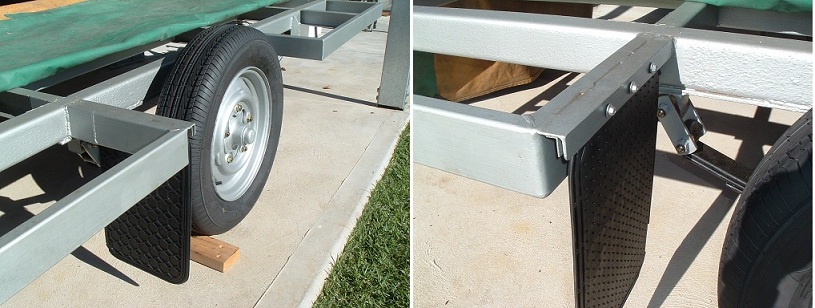 Some people may say it's a bit "wanky" to have mudflaps on a vintage caravan, but I needed to stop mud getting up behind the bit of angle iron that was welded on the frame, as a result of me stuffing up my measurements on the frame repair. And besides, the van now complies with the following recommendation from the RACV published in December 1965 ... 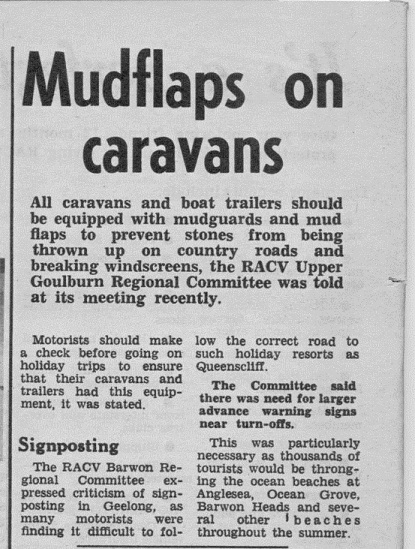 ---------------------------- One of the drawbacks to demolishing a van, and taking all the crap to the tip, is that you've got nothing to copy the rebuild from. (Hindsight is wonderful!  ) So, I've had to try and draw a plan of the van, and make it as close to the original as I could get it. I only had photographs to work from, such as this one... 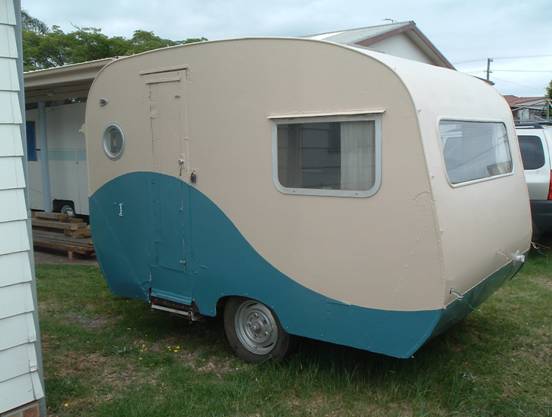 ...so lots of measuring and 'guesstimating' was required, to end up with a scale plan like this... 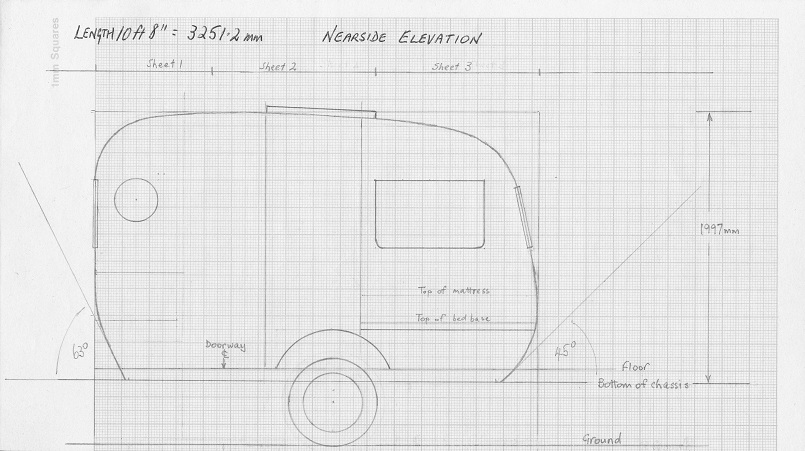 I also had to do a lot of measurements on the chassis, to see how 'true and square' the foundation was that I had to work on... 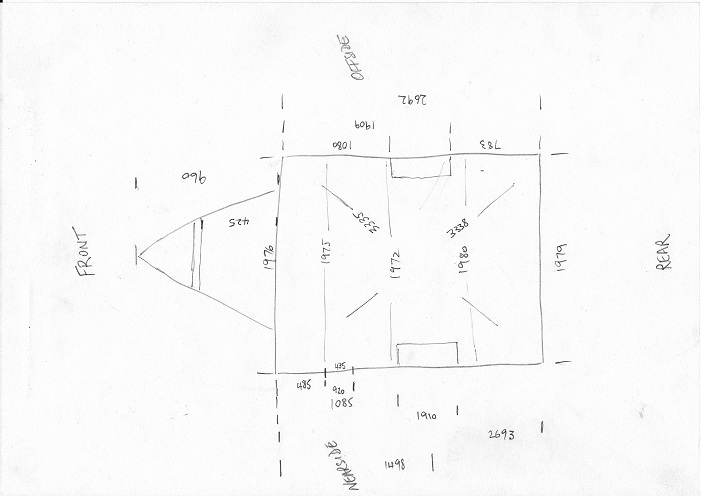 Now I'm up to the part where I have to calculate how many sheets of ply I need, and where the joints in the sheets are gonna go, and how I'm gonna join them together, and how will I lift them once they're joined, and...and...and... I'm getting a migraine... cheers, Al. |
|
|
|
Post by sportsman 1 on Aug 10, 2011 10:23:30 GMT 10
Hi Al,
looking good there ol buddy.
Just a reminder that if you are lazy like me you could get the sheets made for the sides (and possibly the front and back also) in one piece. Reasonably easy to handle with 2 people and they were a breeze to fit up onto the van.
Keep plugging away at it, looking forward to seeing it at Cowra!
Leigh.
|
|
|
|
Post by Franklin1 on Aug 10, 2011 19:23:11 GMT 10
G'day Leigh, Good to hear from you again. ;D Yep, I remember you talking in your thread about having the ply scarfed in the factory. I also seem to remember you said it cost about $700 for the amount you bought, is that right? I went to my local Bunnings today, to suss out what types and sizes of ply they stocked, and the prices being charged. They have 12mm in marine ply, and it's priced at $176 a sheet (2400 x 1200mm). Struth!! Their other sizes of 9mm and 6mm are only the 'CD grade', which is about the equivalent of using ply from old packing crates. They don't have any exterior grade ply in their stocklistings, so I'll have to suss out some other suppliers and prices. I'll check through the Suppliers List in the Techo section, and see who I should be contacting (Did you hear that Cobber?!... I said I'll CHECK THROUGH THE SUPPLIERS LIST IN THE TECHO SECTION! [Like everybody should!]) Using $176 as a guideline, it looks like my wallet is about to cop a real hiding for the amount of ply I'll need to do the job. I wonder if lawn bowls would be a cheaper 'hobby'?? cheers, Al. |
|
|
|
Post by cobber on Aug 10, 2011 20:35:03 GMT 10
G'day Al, Good to see you are into it again with the same gusto for doing it right and shopping around for the best materials. Those two Aussie plywood suppliers in the tech section are good to deal with and will let you know who stocks their product close to you..... probably NOT Bunnings  As usual let us know how you get on because your research is invaluable to the rest of us. Just watch the bowls on TV mate...... you and I are too young to take it up as a hobby yet. Cobber. |
|
|
|
Post by seeshell on Aug 10, 2011 21:59:57 GMT 10
Hey Al You might try going to some place local to you like Amerind who have ply sheets in much larger sizes - usually they sell to trade, but if you have a sob story or at least an interesting one you will find a sympathetic rep who will put it through their account for trade prices and right sizes.  Cheers Seeshell |
|
|
|
Post by cobber on Aug 11, 2011 10:59:07 GMT 10
G'day seeshell (& Al), That's what I was getting at seeshell ..... I wanted Austral Plywoods “Bendy Ply” at one point and emailed them asking for the nearest stockist. They contacted a warehouse not all that far from me to make sure they had it in stock and then let them know I was on my way to pick it up, I bought all my ply for the job from that warehouse, worked out cheaper and …... I got what I wanted  . So it is worth a go Al. Cobber. |
|
|
|
Post by Franklin1 on Aug 11, 2011 14:35:34 GMT 10
G'day cobber, I've sent you a PM so you can whisper the name of the warehouse to me... I've been 'surfing the web' to suss out plywood prices, and came across an interesting comment on the Gunnersen website relating to Exterior Grade plywood (and also relating to the oft-debated topic on this forum of oil-based paints versus acrylic paints on plywood)... "IMPORTANT: Do not use oil based products on Hoop Pine plywood. Please visit www.australply.com.au for more finishing guidelines. PRODUCT WARNING: Austral Plywoods will not be involved in future disputes for end users using oil based finishes on our plywood. The above caption now appears on all invoices and delivery dockets. There are a number of warnings on our website and EWPAA website. Our recommendation is Dulux Intergrain UltraClear UV Non Yellowing Water Based Polyurethane." cheers, Al. |
|
|
|
Post by cobber on Aug 11, 2011 14:59:50 GMT 10
G'day Al, You trying to start another argument..... like a bloke I know who recently said "you can lead a horse to water....."  Cobber. I've answered your PM. |
|
|
|
Post by Franklin1 on Aug 11, 2011 18:42:36 GMT 10
No, not trying to start another argument...
It's just that I'd never seen the second sentence before, where they are not getting involved in any disputes if oil-based finishes are used. That sort of shifts the original recommendations or advice a bit closer to the "do this or else" level.
cheers,
Al.
|
|
|
|
Post by seeshell on Aug 11, 2011 18:43:53 GMT 10
Hi Cobber Must have missed your post about that, but good to hear that there is more than one sympathetic provider out there. Best of luck on the job Al! Sheeshell |
|
|
|
Post by Franklin1 on Aug 26, 2011 20:50:51 GMT 10
G'day All, Finally got the plywood for this van today. Did a 200kms round trip from home up through Sydney to the northern suburb of Brookvale (...home of the Manly 'Sea Eagles' rugby league club, if you're into that sort of thing ). City traffic is absolute crap! No wonder people sell up and 'go bush'!! Buying the plywood turned out to be just as much 'fun-and-games' as the wheel bearing debacle was. Started the whole process a few weeks ago, by driving 20kms to our local plywood specialist store. Not a good feeling when you arrive at their gate to find the place deserted, and a "For Lease" sign on the fence. Rang the 13xxxx number and was told they'd shut down over a year ago. Nearest store is 50kms in the other direction, up over the mountains. Rang them, but they don't deliver to my area (but are setting a system up). Put an enquiry in with Bunnings, but 9 days later they were still waiting for an answer from the supplier. Gave up on that one. Found a couple of suppliers in the Sydney region on the internet. Nup, they don't deliver to my area either. Struth! Running out of options here! Finally negotiated a deal with the cheapest internet supplier, but I had to go and pick it up, so that's where I went today. After learning as much as I could about plywood, I ended up buying Exterior Hoop Pine plywood with a B-grade face on both sides... 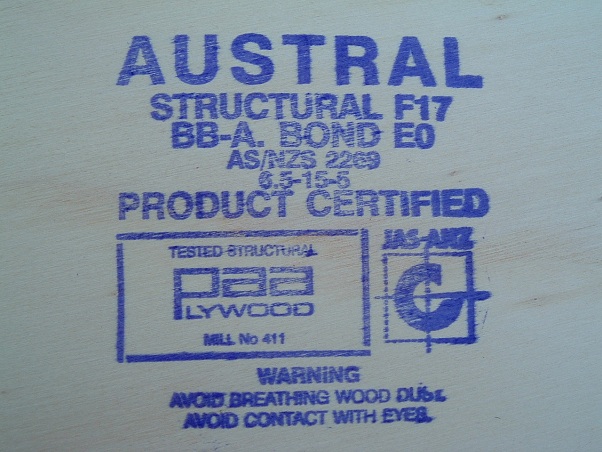 I've put together a table to show you the prices I found in my research, so you can get a rough idea of how much this grade of plywood is likely to cost you... | Exterior Hoop Pine 2400 x 1200 | Internet supplier #1 | Internet supplier #2 | Retail chain store | Weight per sheet | | 6.5mm thick | $59.93 | $69.44 | $75.00 | 11kgs | | 9.0mm | $78.69 | $90.10 | $95.00 | 15kgs | | 12.5mm | $97.39 | $111.74 | $130.00 | 23kgs |
I bought 18 sheets in total, and the savings amounted to about $330 less than the retail quote I was given. However, if you are only buying one or two or three sheets for your restoration, I'd suggest you save yourself a lot of hassle and just buy from the nearest outlet to you, and pay whatever price they are asking. The internet supplier I bought mine from has three warehouses that he deals with - one in Brookvale, NSW and the other two in Burleigh Heads and Labrador, Qld. If you are really close to those regions, you could try this internet supplier: Supplier #1, who is really just a trader ("middle man") who sources the timber from DMK Forest Products. As for me, now all I have to do is join 18 sheets of plywood together to make a caravan. Hmmm... that's gonna be interesting... cheers, Al. |
|
|
|
Post by Franklin1 on Sept 13, 2011 12:32:42 GMT 10
Well, there's been lots of cutting...  Lots of glueing...  Lots of intricate shaping, drilling, and bolting... 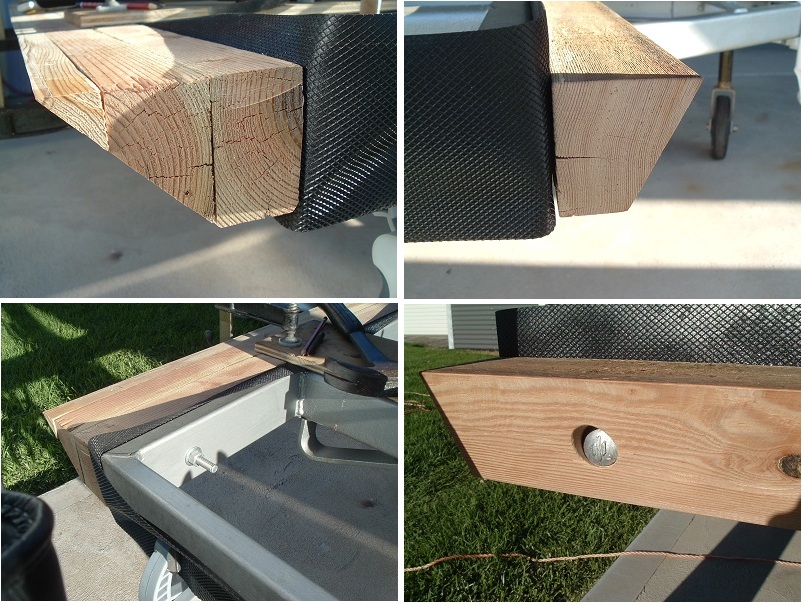 ...to end up with this... 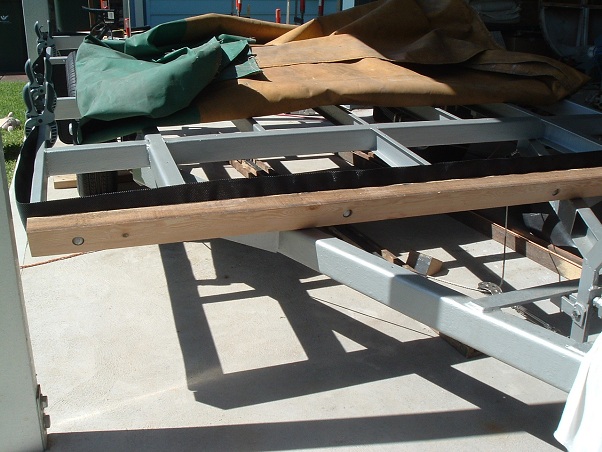 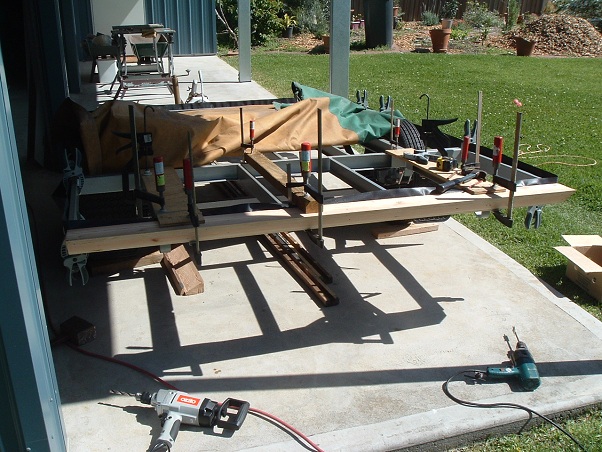 If you are familiar with the polyethylene flashing that is used on the bottom of aluminium window frames in houses...  ...then you will understand me when I say I put a strip of that flashing around the perimeter of the chassis... 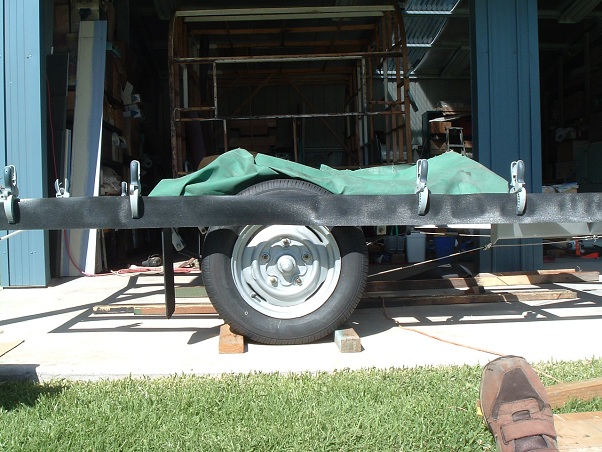 My logic is that it will provide a barrier between any future soggy plywood and the steel chassis, so that the chassis won't end up looking like this again... 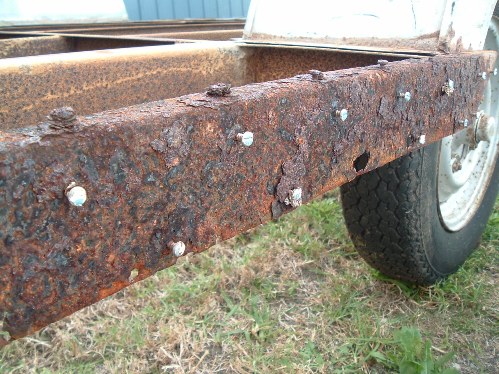 Next step is to fit the mudguards back on, and then cut and fit the new floor on. cheers, Al. |
|
|
|
Post by Franklin1 on Sept 20, 2011 22:27:31 GMT 10
A quick update... The mudguards were glued on with Sikaflex-11FC... 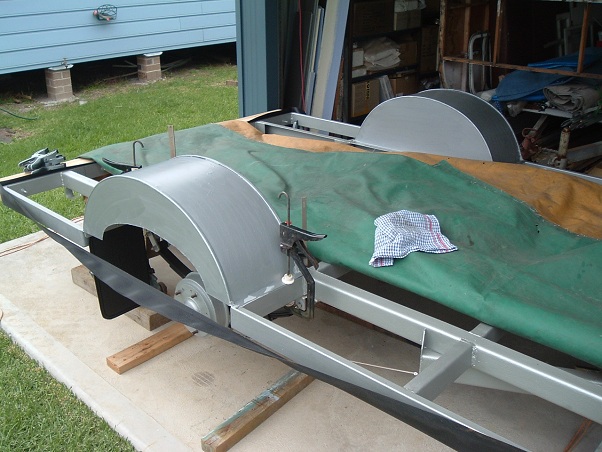 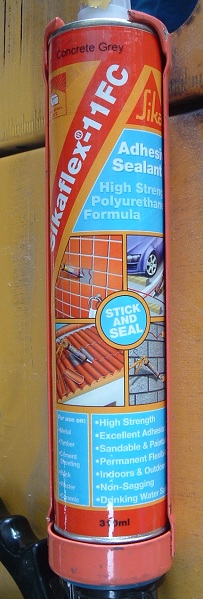 This Sikaflex is pretty good stuff, although at $16.98 a cartridge, you wouldn't want to be needing too much of it. I was hoping to use another Sika product that I'd used a couple of years ago, but it's been discontinued. That one was only $7 per cartridge back then. The other thing I noticed about the Sikaflex-11FC is that it hardened in the cartridge nozzle overnight, even when I taped over the nozzle opening. It's not easy to get the plug of hardened sealant out of a tapered nozzle the next morning. Next, the floor sections were cut and fitted... 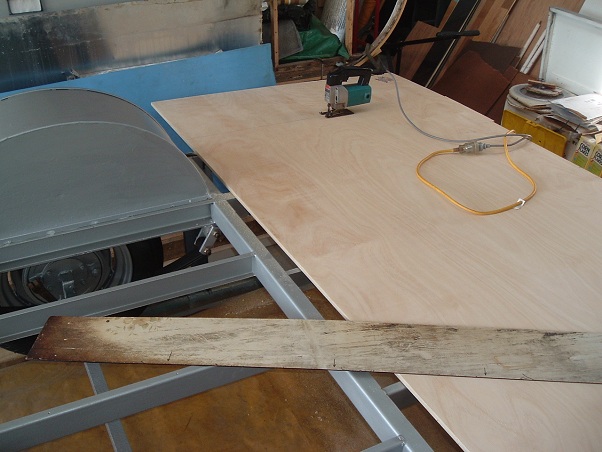  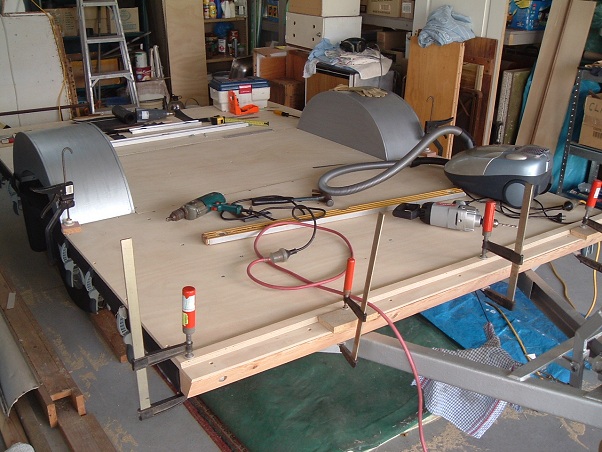 I drilled a gazillion bolt holes/screw holes in each section. Once the floor is finally bolted down, it won't come off again, even in a Category 6 cyclone! But all the timber is coming back off again tomorrow so it can be painted underneath. cheers, Al. |
|
|
|
Post by adam12 on Sept 21, 2011 18:20:36 GMT 10
Hi Franklin1, have been enjoying following your restoration progress, keep up the good work. I look forward to more updates and seeing the van finished.
Could you please give us a bit more info about the mudguards i.e did you make them, and what was the process you went through to stick them on. I am new to all this and trying to get some ideas for when its my time to restore a "VV". still on the look out for a van, hope to find one soon.
Thanks for the post and picks
Adam12
|
|
|
|
Post by dirtyclarry on Sept 21, 2011 20:51:43 GMT 10
quote "But all the timber is coming back off again tomorrow so it can be painted underneath.
could you advise what you will coat the underneath with cheers Clarry
|
|
|
|
Post by Franklin1 on Sept 21, 2011 21:36:07 GMT 10
G'day adam12, Thanks for your comments. The mudguards are the original ones. If you go back a couple of pages in this thread, you'll see what they looked like when the van was demolished. All I did was paint them up to look pretty. The sealant was run in a 10mm bead around the perimeter of the chassis wheel opening, and then the mudguard was pressed down onto the sealant and left overnight for the sealant to cure properly. The guards weren't glued down when the van was originally built, because back then the floors were made in one piece of ply. It would have been fairly easy to position the guards on the chassis, and then lower the complete floor down into position in one go. Unfortunately, now that we have to make new floors out of multiple sheets of ply, I realised I needed to fix the guards into position first, so that I could then make accurate measurements to cut the ply, particularly the piece of ply that sits between the guards. Does that all make sense? ---------------------------------- G'day dirtyclarry, I just used some Wattyl Solaguard paint that I had in the shed. I don't think you need any fancy paint for the job. Most vans of this age don't have any paint underneath the floor anyway. I just decided to do it because it's easy to do when the flooring is off the chassis, and I have to use the 4L can of paint on something, otherwise it would be a wasted "bargain" (cost me $10 for the 4L can because it was a mistint ). It's a coincidence that you should ask about painting, because today's photos are of that actual paint job. One coat of primer and three topcoats applied to five pieces of timber all in the one day.  It was one of those jobs where you start on the first piece, and by the time you finish the fifth piece, you can go back to the first piece and apply the second coat, and so on and so on. A marathon round-robin event... 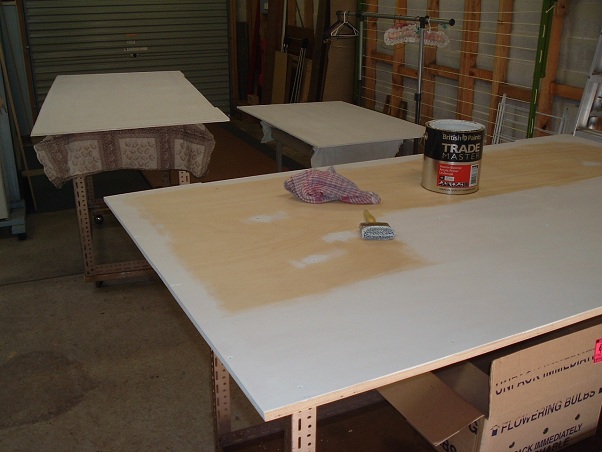 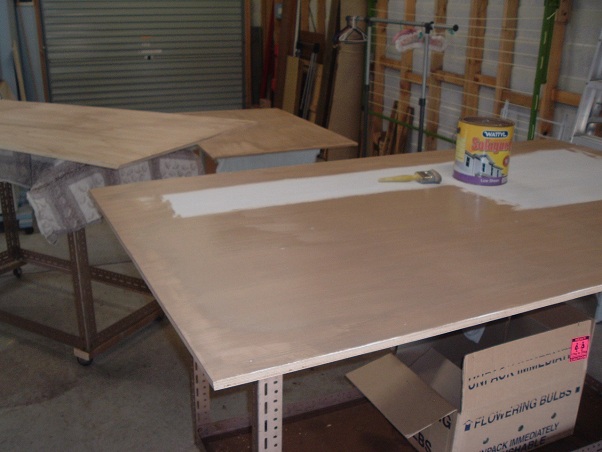 Sorry about that second photo being a bit blurry. Obviously I didn't focus the camera all that well. cheers, Al. |
|
|
|
Post by Franklin1 on Sept 25, 2011 19:11:44 GMT 10
A short update... The way the mudguards were made means there's a section missing in the corners... 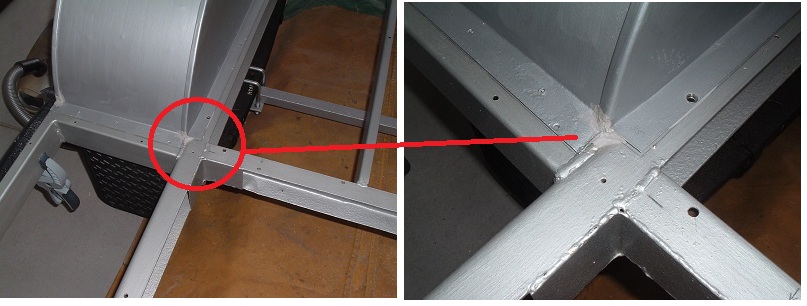 That can allow water splashing up from a wet road to leak up into the flooring. I've covered that section over with the Sika adhesive/sealant, but who knows how long the sealant will be good for. After a bit of experimenting, I worked out how to soften some polyethylene flashing with a hot air gun, and how to stretch the soft plastic with a paint scraper. I cut some L-shaped pieces of flashing, and moulded them to fit around the mudguard corners... 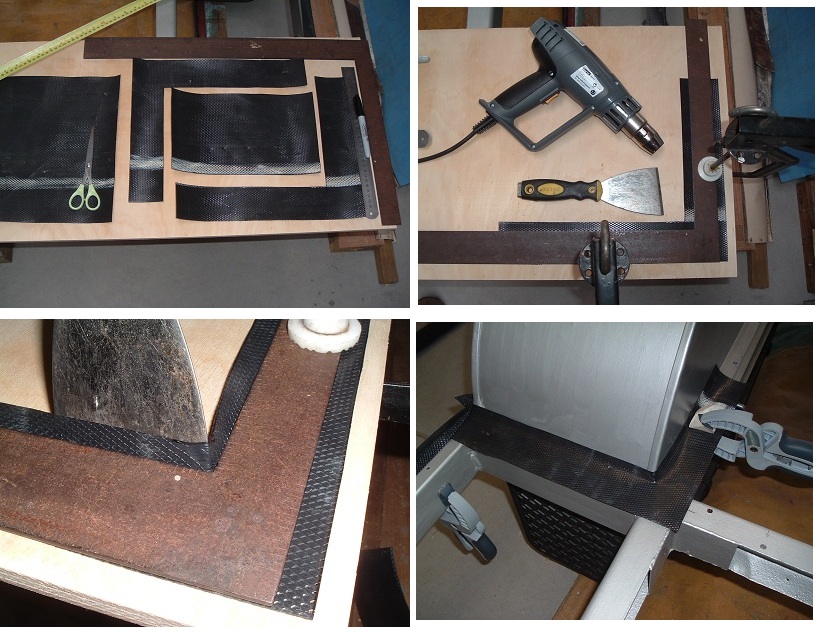 The flashing will hopefully provide a second line of defence against water getting into the cut edge of the ply. cheers, Al. |
|
|
|
Post by humpyboy on Sept 25, 2011 20:04:40 GMT 10
Very clever Al, coming together nicely.
|
|
|
|
Post by seeshell on Sept 26, 2011 6:36:05 GMT 10
Hi Al
You cunning little devil - what a good idea!
Cheers
Seeshell
|
|
|
|
Post by Franklin1 on Sept 27, 2011 18:14:10 GMT 10
OUCH!!!  Goddam plywood splinters  ...  Betcha don't get these problems with fibreglass. Safety Hint: Keep your fingers out of the way when you're sanding the edges of plywood, ok? |
|


 .
.


 )
) )
)


 .
.

 It was one of those jobs where you start on the first piece, and by the time you finish the fifth piece, you can go back to the first piece and apply the second coat, and so on and so on. A marathon round-robin event...

