|
|
Post by hilldweller on May 12, 2013 15:12:39 GMT 10
Hey thanks for that Sharon - good to know what it's called. They've certainly lasted exceptionally well. Spent a while crawling around underneath yesterday to remove the wiring that ran underneath from the drawbar to the number plate, as well as up to the two side/clearance lights, in anticipation of the sandblasting. The end that plugs into the car is a small round two-pin arrangement. Also had a go with paint stripper on the drawbar to check the sequence of colours before it all gets blasted off. Seems to have been the current green over darker green over a bright orange over grey, which I guess might have been primer. I'm a bit puzzled by the orange which seems too bright to have been original for that era and not really in keeping with the tan and cream that seems to have been the original livery for the masonite?  Perhaps there was another colour, long since removed. Also investigated a small patch welded to one side of the drawbar and underneath all the paint found the numbers 9104 stamped into the metal. I've no idea what that signifies. |
|
|
|
Post by hilldweller on May 25, 2013 17:37:58 GMT 10
Yay some progress! Gone is the green paint, the other green paint, the orange and grey and brick red paints, a little bit of surface rust and some very fine cobwebs. In their place we have a reddish brown, and lots of lovely clean lines and shininess that should protect her from further rust for a long long time, I hope ;D 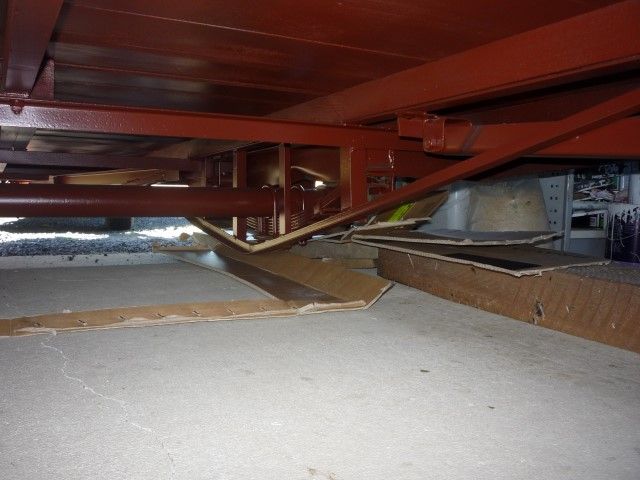 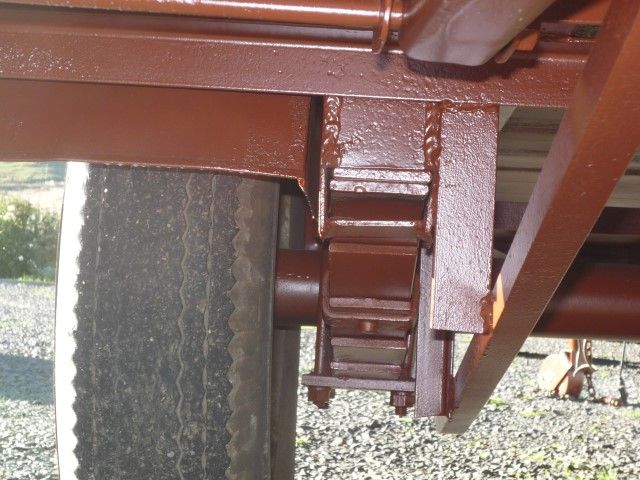 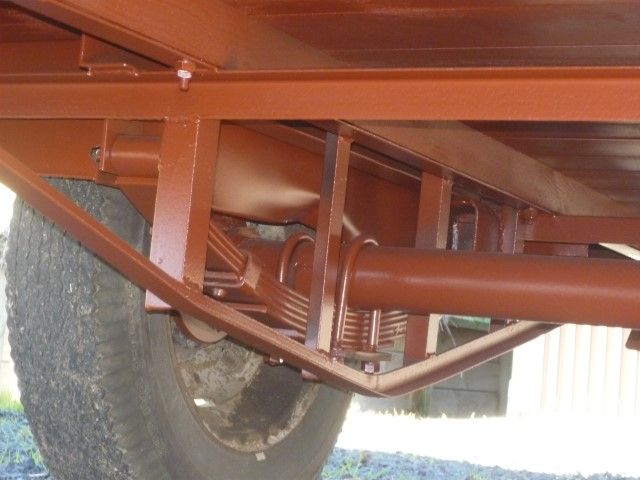 The wheels will be done this week hopefully, with the tyres off. Removing the tyres is possible now because after about three hours of limboing through the door frame whilst taking great care not to scratch the newly painted undercarriage, she is finally in the garage  . Ended up rolling her in on the wheel hubs, raised up on big blocks of wood with some cardboard padding and that's how she still is as I couldn't jack her high enough to get the newly purchased axle stands underneath  It probably was possible but I was very unsure about where it was safe to put the jack. Will she be OK like that for a week or so while the wheels are at the sandblasters? 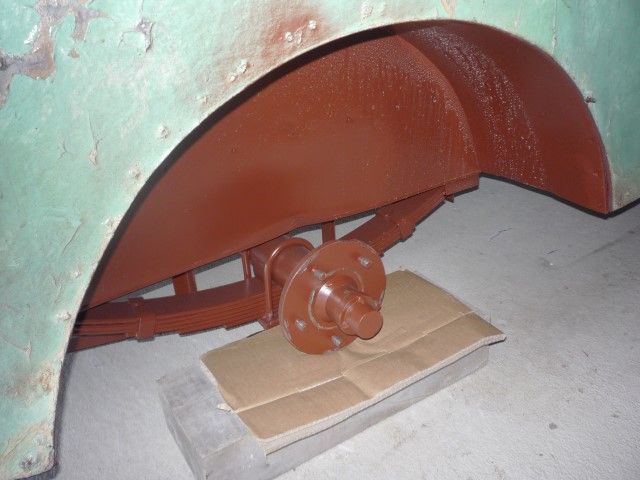 And for those not so interested in chassis, after browsing Trademe on and off for ages looking for a pretty vintage fabric that wouldn't be completely overpowered by the squab covers and was available in sufficient quantity to do five small sets of curtains, I found this. Rayon, apparently. Do the style gurus think that will be suitable? (If not, please do say so). 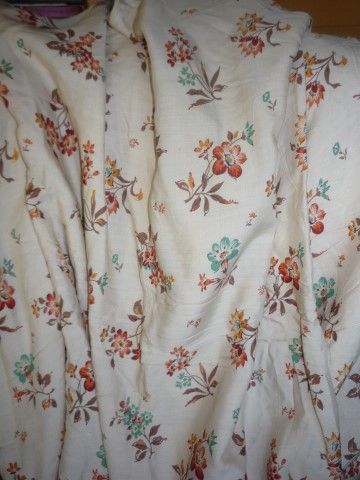 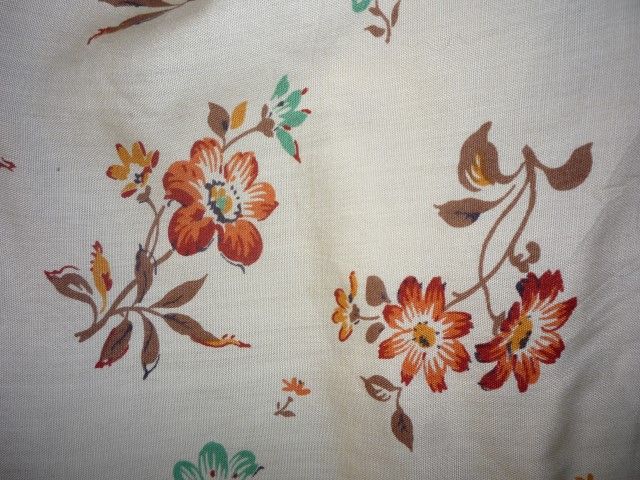 So all I have to do now is replace all the cladding, perhaps some of the lining, probably some framing, the entire roof including canvas, make two windows and a door, find a coal stove and chimney, and sand and paint the lot. Practically finished LOL  . |
|
|
|
Post by humpyboy on May 25, 2013 18:00:58 GMT 10
Practically finished ?? Yep not long now Mabel should be fine as you have her,resting on the hubs (at least she wont fall far if she moves ;D ) |
|
|
|
Post by seeshell on May 25, 2013 18:41:10 GMT 10
Hi HD
I think Mabel's undercarriage is looking lovely - I do like the colour as well.
The fabric is quite lovely. The pattern is very period appropriate and so are the colours - I think it is quite a find to get enough to make the curtains too! Shhh! you needn't tell anyone it's rayon... To get the right weight for the curtains if they are just to hang, they may need to be lined. If you are going to tie them back or mount them on spring rails top and bottom, you probably won't have to, but may still do that just to make them a bit more light proof.
Loverly!
Seeshell
|
|
|
|
Post by hilldweller on May 27, 2013 17:29:26 GMT 10
Thank you both  Wheels are at the sandblasters now. The bit under the tube was in good nick, painted black. Still no luck with tyres so the old ones may have to go back on for garage purposes. Seeshell yep I may have to line them as you suggest but I think she had blinds underneath originally as there are marks in the paint and screw holes. Little blinds with scalloped edges and a crocheted pull-ring would be cool if I can find or replicate some |
|
|
|
Post by seeshell on May 27, 2013 19:16:10 GMT 10
Hi HD
Any blind place will be able to make you some pull down Holland blinds with scalloped edges. Or if you're lucky you might find some at a hardware store - though lately everything seems to be more "minimalist". You can buy the right kind of trim though and embelish and add the pull rings (with a bit of a cotton crochet cover over them! another skill to learn...)
Cheers
Seeshell
|
|
|
|
Post by Jennison on May 27, 2013 19:33:16 GMT 10
Spotlight for your Holland blinds............get yourself a quote for your blinds then sit back and wait for one of their VERY regular 50% off weeks then go in an order them....save hundreds$$$$$ ;D
you can get "old style" trim etc
jenno
|
|
Deleted
Deleted Member
Posts: 0
|
Post by Deleted on May 27, 2013 20:11:42 GMT 10
Is the brown under carriage paint any thing special or just paint ??
Jill
|
|
|
|
Post by barkpaint on May 28, 2013 14:48:39 GMT 10
|
|
|
|
Post by Jennison on May 28, 2013 14:58:38 GMT 10
spotlight do the crocheted blind cords and all
jenno
|
|
|
|
Post by Geoff & Jude on May 28, 2013 15:06:55 GMT 10
spotlight do the crocheted blind cords and all jenno hi jeff, nice to see you're not afraid to show your feminine side.  ps - do they come in pink?  geoff 'n jude |
|
|
|
Post by hilldweller on May 28, 2013 16:32:48 GMT 10
Is the brown under carriage paint any thing special or just paint ?? Jill Um... I don't actually know  The sandblasting place gave me an industrial looking paint chart and I picked a colour off that and said full gloss. Also said I wanted a rust inhibiting undercoat and he rattled off the name of some product they normally use and I said that would be fine. It's a place that blasts and paints big hunks of metal mostly for commercial clients, not a caravan or car specialist, though I did notice a Lilliput waiting its turn when I dropped off the wheels. I'm sure there are people on here who have researched the matter much more thoroughly and could give you some good advice. So Spotlight, the rest of you reckon? We do have them over here, so that's encouraging. The local branch is an absolutely hideous place but I will steel myself to venture in one day and see what they have in the blind department. Don't want the modern ones with those endless plastic chain arrangements. I've seen the little crocheted rings on line if Spotlight doesn't have them and if really pushed I could possibly recall enough of my Grandmother's tuition to make them myself. Edit for Jill: Just picked up the wheels and they gave me some leftover paint for touch-ups, in the original tin. It's a 2 pack paint called International Interthane 870. Forgot to ask about the undercoat. Was expecting to have to pay a bit more for the wheels but apparently they were included in the original $300, which was nice of them The wheels are great. Nice and round |
|
|
|
Post by Jennison on May 28, 2013 20:26:25 GMT 10
Bunnings for girls (and male VV restorers) ;D |
|
|
|
Post by hilldweller on Nov 24, 2013 17:32:32 GMT 10
Yay, finally! ;D Poor Mabel's been neglected all winter but this weekend did a bit of a garage clean-up, swung her around to sit sideways for better light and access, and removed the various bits of external hardware and then the door, the three original windows and the two replacements which can go on Trademe. Still got some stubborn paint-filled screws to attend to, to get the window hinges off. 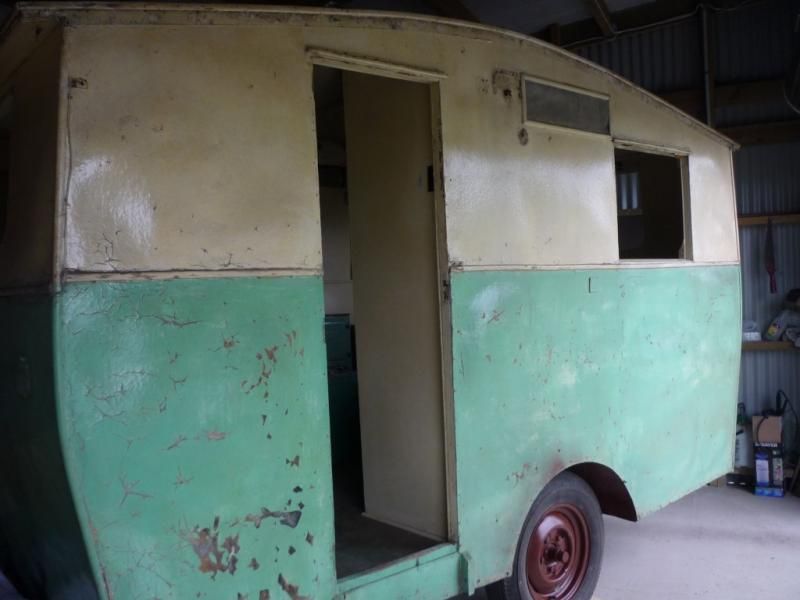 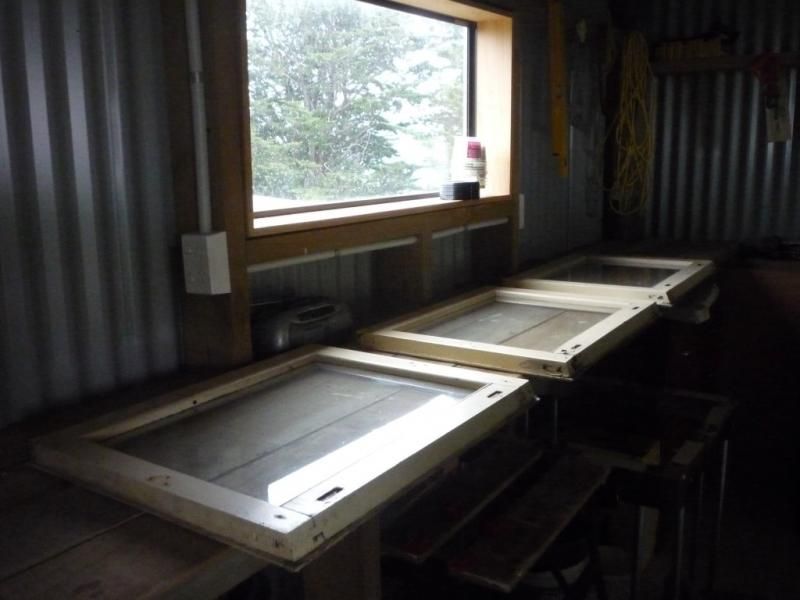 One of the windows definitely has some rot in one corner; the other two I can't tell yet. 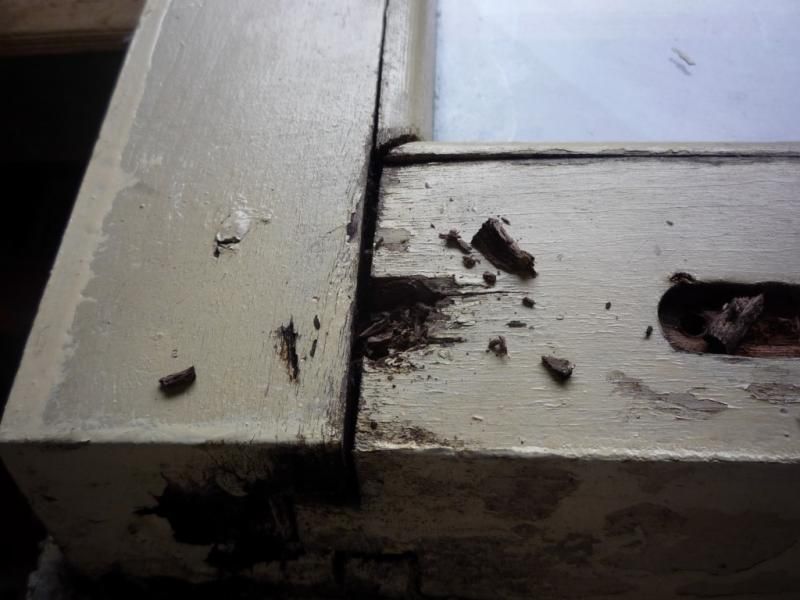 Can someone tell me what these are please? There are five left of what looks to have been a semi-circle above the wheel arch. They just screw in. 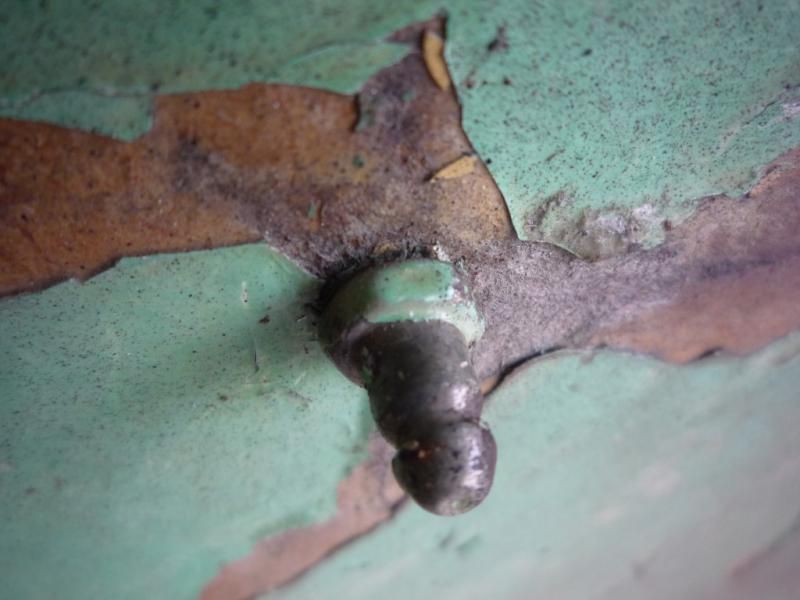 I'm taking heaps of photos of everything before I pull it apart. I'm very worried I won¡¦t remember how to put it all back ! I've seen threads on here of vans that look a lot better than Mabel one post and nothing but the chassis the next . Just itching to see what's under the distorted hardboard though  . OK, fingers crossed for Photobucket, which has changed again since I last used it.......  OK second attempt.... third attempt... Hallelujah! Thanks to the helpful people in the 'whatever' section who pointed out the issue with the length of file names. |
|
|
|
Post by Rattles on Nov 24, 2013 18:06:13 GMT 10
They are called "Lift the Dot Snaps" They probably were to attach a canvas draft cover over the wheel arches see image below:  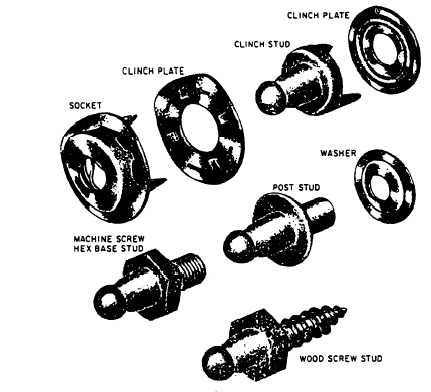 The stud C shown in the picture 1 is a rivet type, and Parts A and B are affixed to the canvas, see Picture 2 for the different stud types. Rattles |
|
|
|
Post by Roehm3108 on Nov 24, 2013 19:20:51 GMT 10
Well done HD, you've crossed the greatest hurdle - starting!! ;D ;D Aren't you glad you've learnt to be the queen of framing from your previous project. rebuilding those few window frames will be a cinch!! Keep it up and keep them pics coming, so we can see what you can.
Ray
|
|
|
|
Post by seeshell on Nov 24, 2013 19:55:26 GMT 10
Hi HD Well, congratulations! It's quite satisfying to start taking things apart - just calibrate yourself for how long it is before stuff starts going back on. Mabel looks like she's well tucked away - a shed to work in is a real boon in both the hot and the cold! You'll have the luxury of going out for a slow putter and peruse in any weather, which I am sure you will enjoy. She's a lovely old girl. Down to your chassis! Seeshell |
|
|
|
Post by hilldweller on Nov 25, 2013 17:35:05 GMT 10
Thanks for the encouragement guys, and big thanks to Rattles for putting a name and purpose, in six minutes flat (!), to the little thingummywhatsits. I really had no idea what they were and had assumed the ones on the offside had fallen out, along with half of those on the door side. So that means Mabel had a full awning with sides etc, doesn't it? I had been thinking of getting a plain canvas roof awning for her, eventually. The old awning track is a bit weatherbeaten but I think it will still work.
|
|
|
|
Post by hilldweller on Nov 30, 2013 18:38:53 GMT 10
Ta da!!! We have framing . Can’t believe how long it took to remove the hardboard on just one side, and I’ve still got to get rid of about a million little tacks and nails. 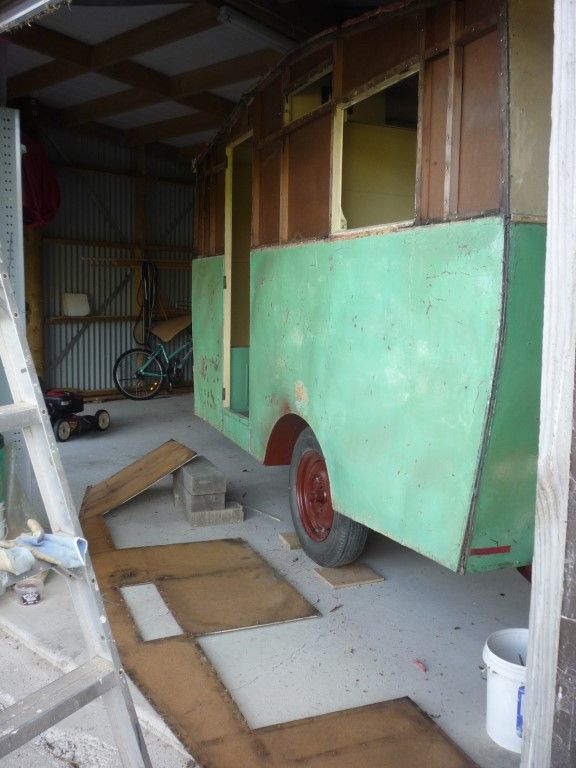 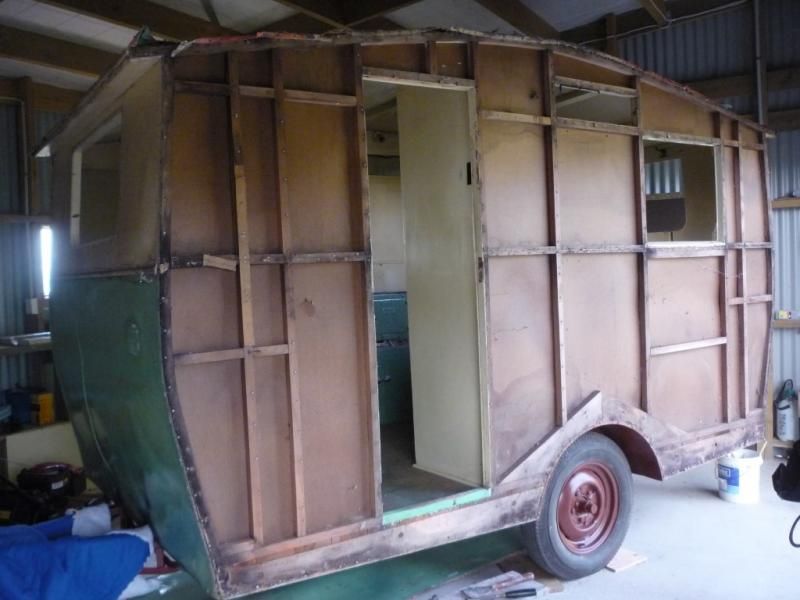 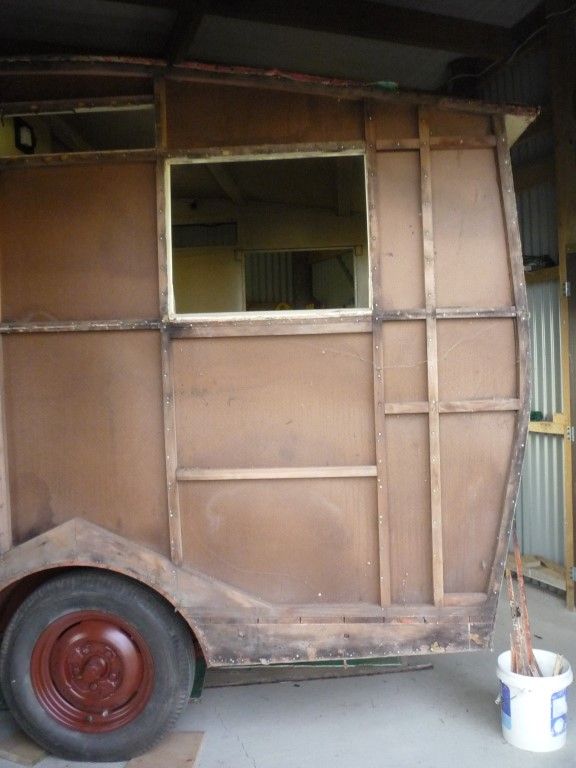 I particularly like this bit . 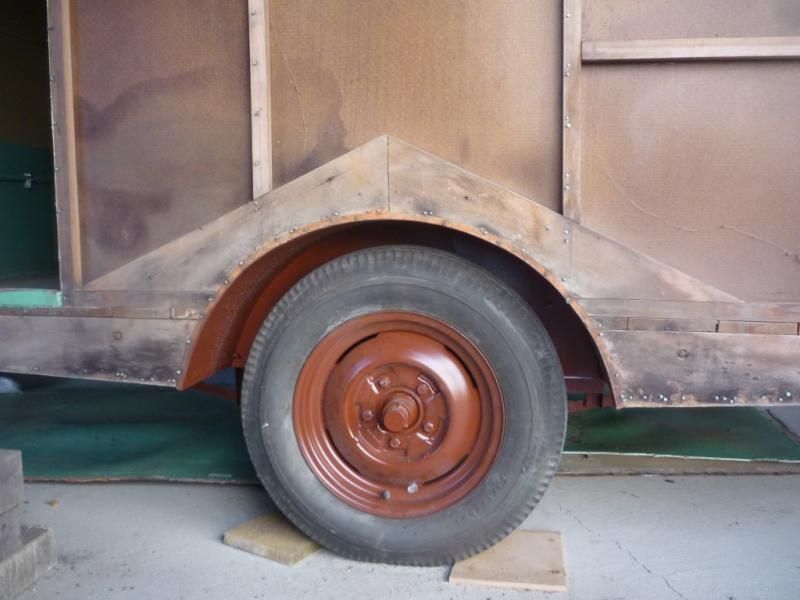 Not so keen on this . 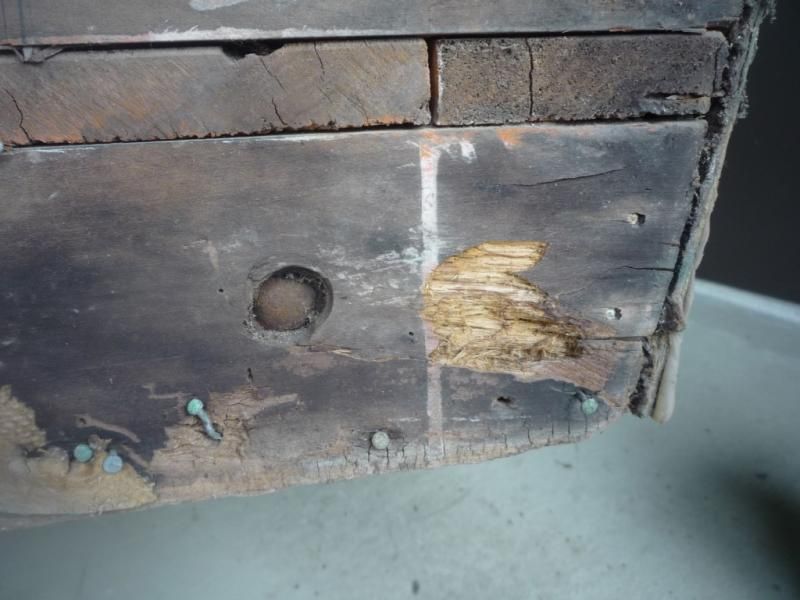 The roof isn’t quite as I was expecting. The top side of the canvas is painted, or at least the edges are, dunno about the rest yet, but it wasn’t painted onto the hardboard, in fact nothing was painted onto the hardboard . It's quite a heavy canvas, definitely not calico. 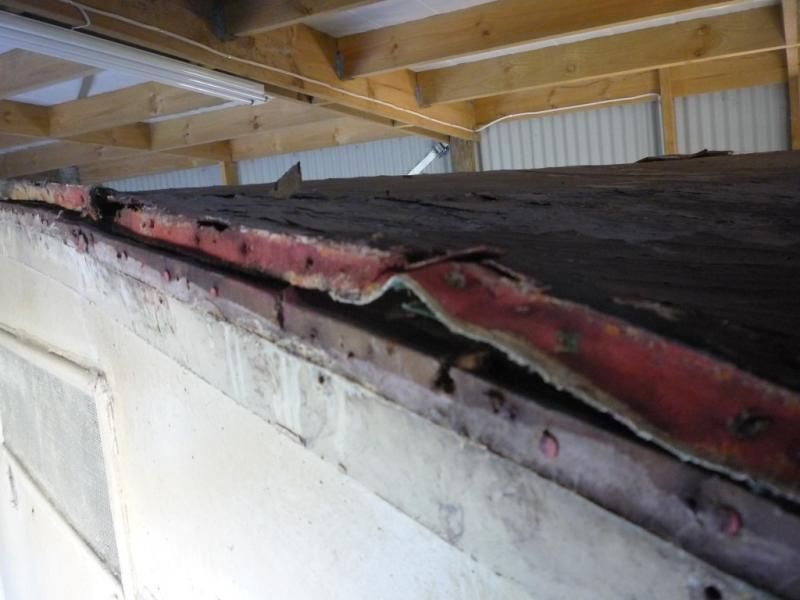 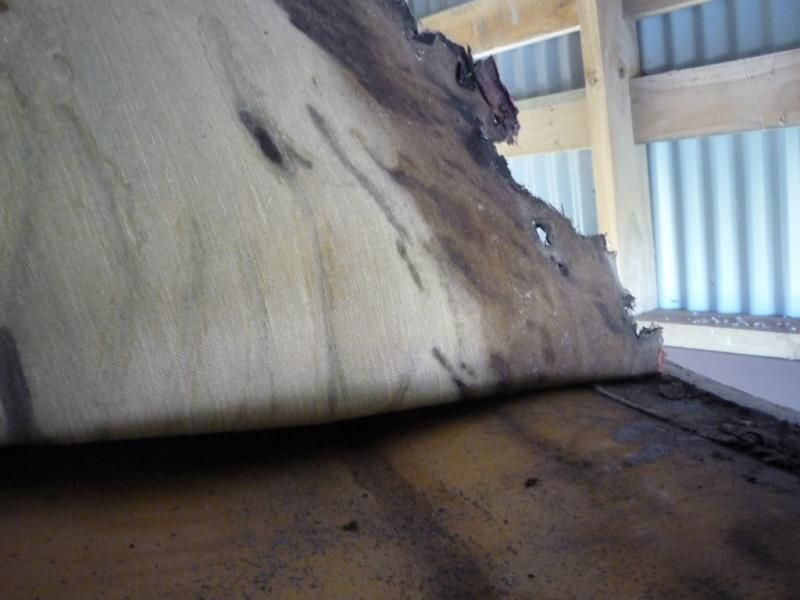 There's no going back now! |
|
|
|
Post by hilldweller on Dec 1, 2013 15:50:48 GMT 10
All the cladding's now off ;D 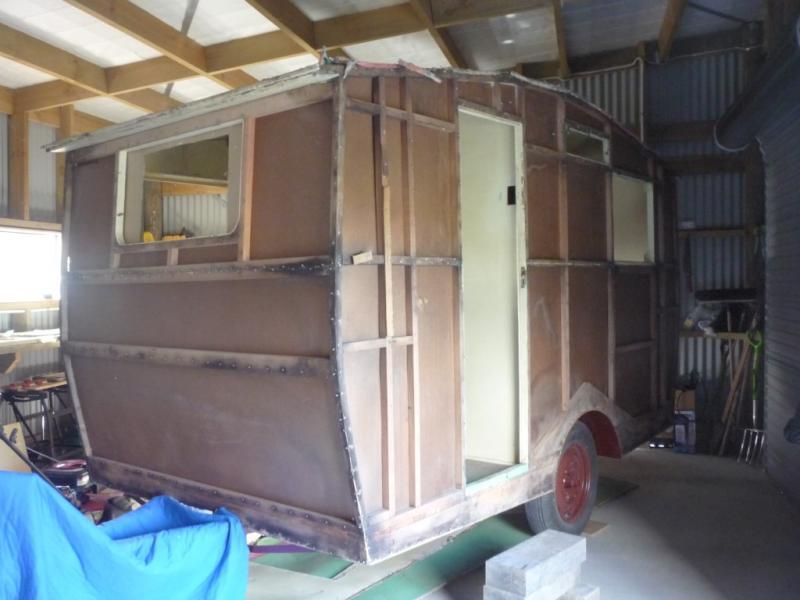 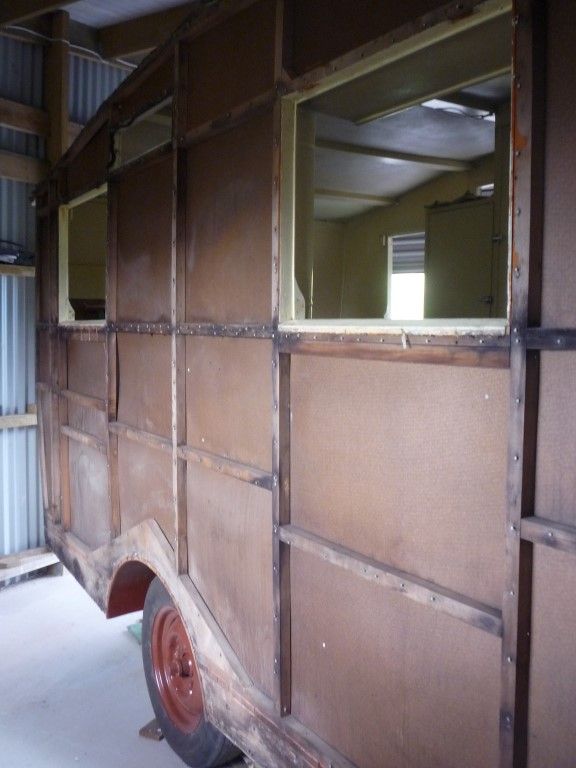 From marks on the framing it looks as if the original front and back windows were narrower than the aluminium replacements she was wearing when I bought her, but the bottom rail is in the right place. I can't tell where the top is supposed to be but I've made a cardboard cut-out that would have the top at the same height as the side windows to see how she'd look with much smaller re-replacements. The aluminium ones are on Trademe. Smaller windows will of course reduce the light but I think Cobber had it right in another thread: 'As is the case with my Ol' 36, no matter how much you butcher and try to modernise Mabel she will never be as comfortable as a younger van, and the more you interfere with her originality the less interesting she will be as an example of "the way things use to be".' In fact I think I should print that out and pin it up above the workbench, just in case I get carried away with 'improvements'! Now, some I have some questions as I'm just a tiny little bit out of my depth and Mabel is nothing like the Caravelle LOL. First, in terms of general approach, am I right in thinking it would now be best to fix up the framing before pulling off the roof or doing anything to the interior? Second, how do I tell which of the framing needs to be replaced? There's some obvious rot in most of those boards around the bottom and some splintering of the rails right at the top where the roof sits. In between it all looks solid but there are areas where the reddish timber has blackened and the surface feels just slightly soft when poked with a sharp object though not flaking away. Do those need to be replaced? And third: Some of the framing seems a bit 'minimalist' by comparison with most of the pics I've seen on here, eg this lower front section. Should I add to what's there, since it won't be seen? Most of the internal hardboard has warped over the years. Water damage presumably has something to do with that but I'm thinking a little more framing might have helped. 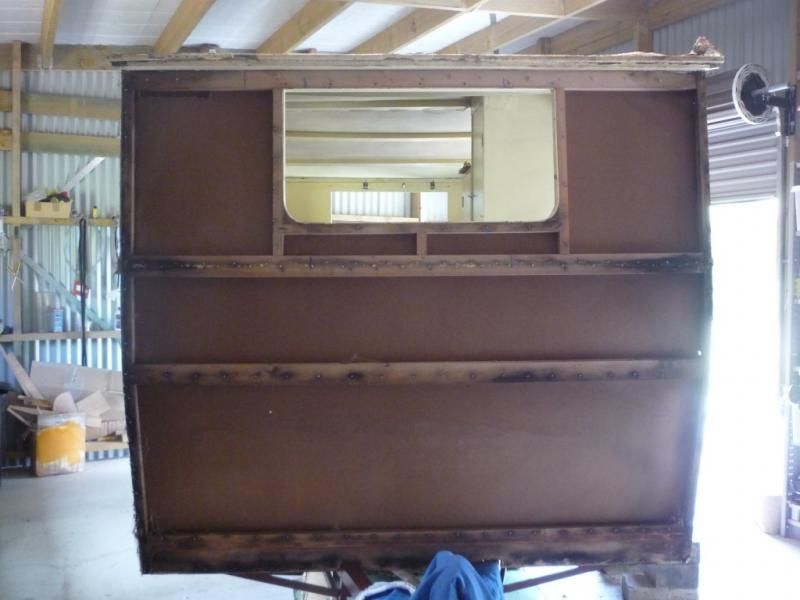 That's all for now except to say that it's great to have this site - I'd be lost without it and more importantly so would Mabel! |
|
|
|
Post by Franklin1 on Dec 1, 2013 20:28:15 GMT 10
G'day hilldweller, It's difficult to give you firm advice based on photos only, so allow me to tell you how I would go about your project, which is different to me telling you how you should go about your project... I wouldn't dismantle any more of the van until I assessed what I've got so far. I would get a sharp-pointed item (a cake skewer; a nail through a bit of timber; etc) and go all around the side and end frames, poking the skewer into the timber wherever I thought there was rot or damage. I'd get a box of coloured chalks, and mark any damaged areas according to a colour code - red means the sharp point easily goes deep into the timber, and the timber needs to be replaced; yellow means the sharp point only goes a few millimetres into the timber, and I could get away with chipping out the rot and filling it with a repair medium; green means the sharp point doesn't penetrate the timber, and the surface is only water stained. I could get away with sanding the surface of that timber to make it good again. After I've assessed the van, it might look like this... 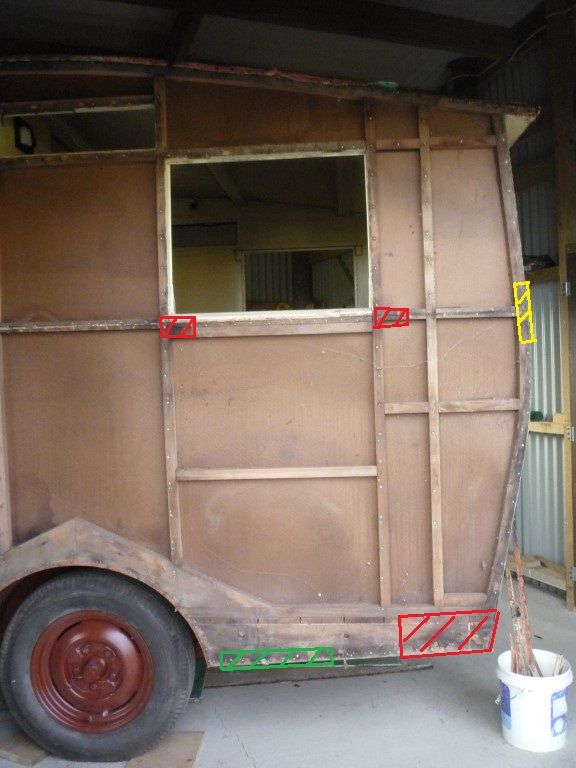 Then I'd put a plan together on how to fix the various areas. For the red areas, I'd make a cardboard tracing of the timber size and shape, and use that cardboard tracing as a template for cutting any replacement timber. Only then would I think about removing the red timber from the van. For yellow areas, I'd educate myself by Googling wood rot repair (or "dry rot repair" - same thing), and learn about the products available today to fill the rotted areas. For green areas, I'd just sand them down with 80 grit sandpaper. For the warped masonite, I would assess whether the warping was really a problem or not. Is it only an appearance issue, or is it interfering with other parts of the van (eg. does it stop doors opening or sitting flush; etc). I might decide to add more framework to the van, and nail the warped hardboard to it so it sits flat again. Or I might do nothing, depending on how fussy and finicky the job would be. As far as extra framing in general goes, remember that the van has stood for 50 years or more with the framework it has already, so it's not a major requirement for additional framework. There might be the odd area or two where adding some additional framework might make sense, but by and large you should be able to get away with the amount you've got already. Perhaps the warping is from water getting onto the hardboard through leaks, rather than the lack of sufficient framework. Hope this helps, cheers, Al. |
|
|
|
Post by Geoff & Jude on Dec 1, 2013 21:10:25 GMT 10
hi hilldweller there's a product called earl's wood hardener which is available from bunnings and other hardware outlets. it suitable for restoring the integrity of wood rotted timber that is not of any structural significance. i've used it previously on house windows and after removing any superficial flaking rot (without digging out unnecessarily) you paint or push or inject the solution into the rotted timber and after a curing period, the timber is a solid as the original timber. if you do remove any flaking areas, the surface can be filled with builders bog or you can use their powder putty or filling products to regain shape for aesthetic reasons. as i said, i've used it in the past and found it to be as good as it's advertising. here's a link to their website listing all the products and descriptions. www.timbermate.com.au/products/Earls+Wood+Hardener+Rotten+Wood+Repairer.aspxand a film clip Geoff 'n Jude |
|
ihritch
Junior Member
 Woody - the house wagon
Posts: 54
|
Post by ihritch on Dec 1, 2013 21:32:35 GMT 10
Hey HD, looking great, your attention to detail with the undercarriage looks amazing. Looking forward to seeing more progress, slow and steady is the way to go, mine was 16 months of weekends. Keep up the good work.
Cheers Iain
|
|
|
|
Post by brucenan on Dec 1, 2013 22:09:44 GMT 10
Earlier in the year I had similar issues when working on my Wilson. The best tool I had for removing soft and rotted wood was the one that is called a renovator. Cut out the rot up to where it is solid, use the piece you cut out as a template. Cut a new piece and glue and screw in the new piece. You will find heaps of uses for this tool working on a bondy. You can buy them from hardwares and from supercrap but beware that even with same named brands the fittings can be different and may not interchange. Bruce
|
|
|
|
Post by hilldweller on Dec 2, 2013 18:04:10 GMT 10
That's awesome thanks guys - some encouragement, a plan, a product, a tool, a pic and even a video!!! What more could a girl want? Stand by for further questions in a week or two |
|


 Perhaps there was another colour, long since removed. Also investigated a small patch welded to one side of the drawbar and underneath all the paint found the numbers 9104 stamped into the metal. I've no idea what that signifies.


 . Ended up rolling her in on the wheel hubs, raised up on big blocks of wood with some cardboard padding and that's how she still is as I couldn't jack her high enough to get the newly purchased axle stands underneath
  It probably was possible but I was very unsure about where it was safe to put the jack. Will she be OK like that for a week or so while the wheels are at the sandblasters?


 Wheels are at the sandblasters now. The bit under the tube was in good nick, painted black. Still no luck with tyres so the old ones may have to go back on for garage purposes.
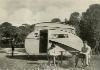


 The sandblasting place gave me an industrial looking paint chart and I picked a colour off that and said full gloss. Also said I wanted a rust inhibiting undercoat and he rattled off the name of some product they normally use and I said that would be fine.


 OK second attempt....


