|
|
Post by kaybee on Nov 1, 2009 19:53:33 GMT 10
Hey Humpty dear, try your local library......you won't even have to buy the book...... ;D ;D
|
|
|
|
Post by humpty2 on Nov 2, 2009 18:55:18 GMT 10
|
|
|
|
Post by kaybee on Nov 2, 2009 20:00:16 GMT 10
Hmmm....do I detect a hint of sarcasm there ?...... ;D ;D ;D
|
|
|
|
Post by humpty2 on Nov 5, 2009 18:49:02 GMT 10
Nup..........it's just an age thing!!
I have actually looked in libraries with no luck. There must be a good beginners book out there somewhere.
|
|
|
|
Post by chev51 on Nov 6, 2009 15:12:34 GMT 10
Hey Chev51 Have you thought of starting a thread that explains making a plug - mould - product? A proper explaination would be better than my ramblings Having recently been working with skiboats I learnt a lot. Looking at my posts regarding fibreglassing it isn't complete or easy to read Would think it is far better coming from someone with more experience Just a thought Cheers Atog I have to make a pair of guards soon, if people are interested I will take photos and try to explain it, just need to find the time to actually do it. Between the Van + wooden boat there seems to be none ;D ;D |
|
|
|
Post by minicamper on Nov 10, 2009 5:30:41 GMT 10
Hey Chev,
I started this thread with what I thought was a simple question.
The information given so freely has been AMAZING and is a testament to the sorts of people you can "meet" without ever actually seeing them.
I'm very grateful for the help ATOG has given (although I too am yet to find time to try) and I'm sure everyone here would be VERY interested (i for one am) to see the process that you are going to do.
I am almost motivated to do the new Wildgoose (mini-camper) roof in glass, but need to "play " first. Any info is good info, so at your leisure......
Cheers
Chris
|
|
|
|
Post by Surf Tragic on Nov 12, 2009 3:11:01 GMT 10
Hi chev51
What design wooden boat are you building,? I have built GlenL designs, am up to the fibreglassing of a hull now & keep walking away from it, a bit daunting. I look foreward with great interest in what you plan to do
Surf Tragic
|
|
|
|
Post by chev51 on Nov 15, 2009 13:04:55 GMT 10
Hi chev51 What design wooden boat are you building,? I have built GlenL designs, am up to the fibreglassing of a hull now & keep walking away from it, a bit daunting. I look foreward with great interest in what you plan to do Surf Tragic Hi mate, playing with two... The first one I bought I think is a lewis but no ID or anything to be sure. That one is on hold as it was a bigger project. I bought another on Ebay just to get the trailer. As it turned out the trailer was crap but the boat is good. We have given that one a quick cleanup and a new deck to use it for a while until the other one is done. Both run Y blocks, I have made up a manifold to fit a wade supercharger to one. The plan is to run it for a bit until I know it all works then fit it up to the engine ;D Here is the engine nearly ready to go 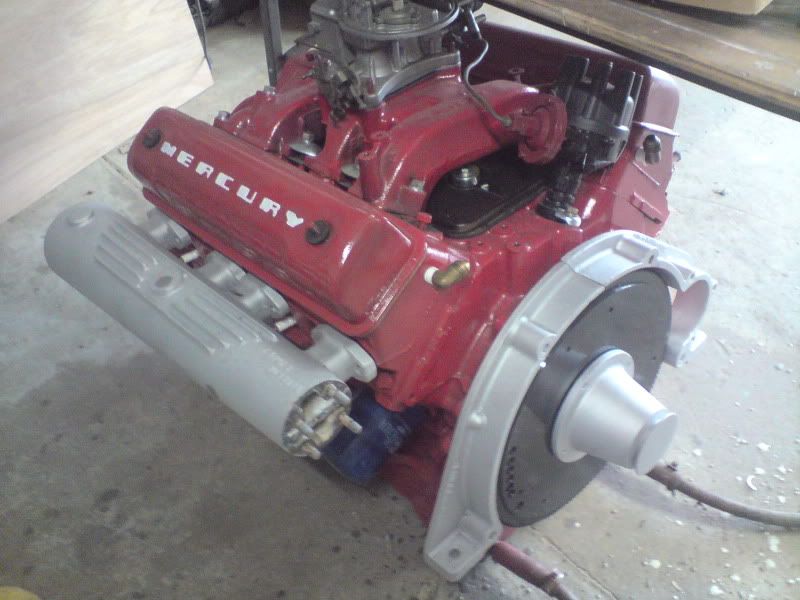 I will find some pics of the boats, cheers |
|
|
|
Post by Surf Tragic on Nov 26, 2009 14:15:58 GMT 10
G'day chev51 Maybe we should have a boat section here too   The boat I built in 1963 had a 21 stud head '38 mercury V8,( I say that with confidence since kaybee ID'd the motor for me  coupled to a V-drive which I made, an engineer said the jack shaft wouldn't work that I had cut ready to weld, I had asked him to just weld & balance it, it was cut ready to go, but it all worked fine. I made my own watercooled manifolds from scratch, steering, electrical, trailer, it was all working well 18 years later. We ran it on the Noosa river. Pity we didnt use cameras much those days, the only photos we have of it in the water are ones mum took on launch day at Tin Can Bay down from Gympie Only the joints along the chines were fibreglassed, but want to do the whole hull on one similar which is 1/2 finished now, & am ready to go. I have thought of doing the roof only of the Don caravans I have, pretty sure it would be a good thing over new ply. Surf Tragic |
|
|
|
Post by chev51 on Nov 26, 2009 20:25:35 GMT 10
G'day chev51 Maybe we should have a boat section here too The boat I built in 1963 has a bit written about it here, www.glen-l.com/picboards/picboard13/pic690a.html , On this boat I had a 21 stud head '38 mercury V8,( Isay that with confidence since kaybee ID'd the motor for me coupled to a V-drive which I made, an engineer said the jack shaft wouldn't work that I had cut ready to weld, I had asked him to just weld & balance it, it was cut ready to go, but it all worked fine. I made my own watercooled manifolds from scratch, steering, electrical, trailer, it was all working well 18 years later. We ran it on the Noosa river. Pity we didnt use cameras much those days, the only photos we have of it in the water are ones mum took on launch day at Tin Can Bay down from Gympie Only the joints along the chines were fibreglassed, but want to do the whole hull on one similar, & am ready to go. I have thought of doing the roof only of the Don caravans I have, pretty sure it would be a good thing over new ply. Surf Tragic Well they could fit in here.. they are wood with 2 wheels, could sleep in them if needed ;D ;D Love the shape of your boat, thats very cool I have cheated, I wanted the timber look but like the idea of hopefully not leaking with glass over the timber.. so I gave wood graining a shot and think it turned out Ok. The instructions I read said start small, I guess a boat is sort of small ;D 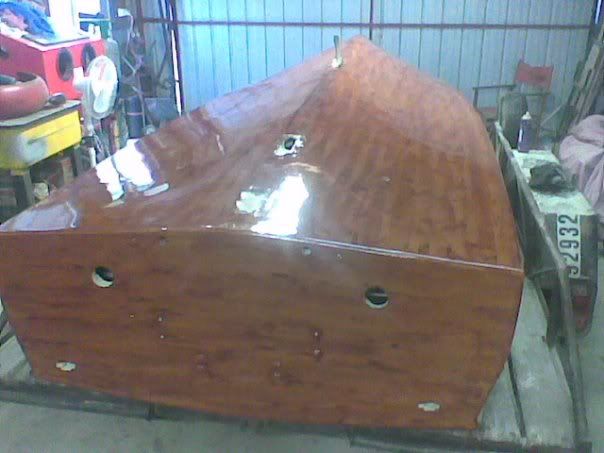 |
|
|
|
Post by Surf Tragic on Nov 27, 2009 8:15:09 GMT 10
Well there ya go, you've already done it, ok, I've just gotta do it, what weight F/G did you use? its for protection not strength I know. Have plans for a Mahogony boat with strip veneering to cope with both convex & concave shapes like on the barrel back 'gentlemans' boat with 2 cockpits. I really think this would work on the  bondwood vans roofs bondwood vans roofs  ;D & take all the pain out of continual maintenance, & same as the boat, the rot factor. I will be soaking the inside with epoxy resin also, to get full encapsulation, so why couldn't you do it on a wooden van?. The finish is extra good when painted, & superb when left clear like your boat. Surf Tragic |
|
|
|
Post by atouchofglass on Apr 24, 2012 19:47:16 GMT 10
Little bit of extra info. Thought a small repair I did recently as last night and today ;D might be of interest to those wanting to fibreglass. So here goes. When working with fibreglass resin it is advisable to wear gloves as it is messy and sticky. A pack of a hundred gloves will cost around $10 Cheap investment for the amount of time you would spend clean up your hands in acetone otherwise. Oh and by the way.... try not to clean your hands in acetone.... nasty stuff. I had a problem with water damage to the entrance to the caravan Broke out and chiseled out the offending rot. 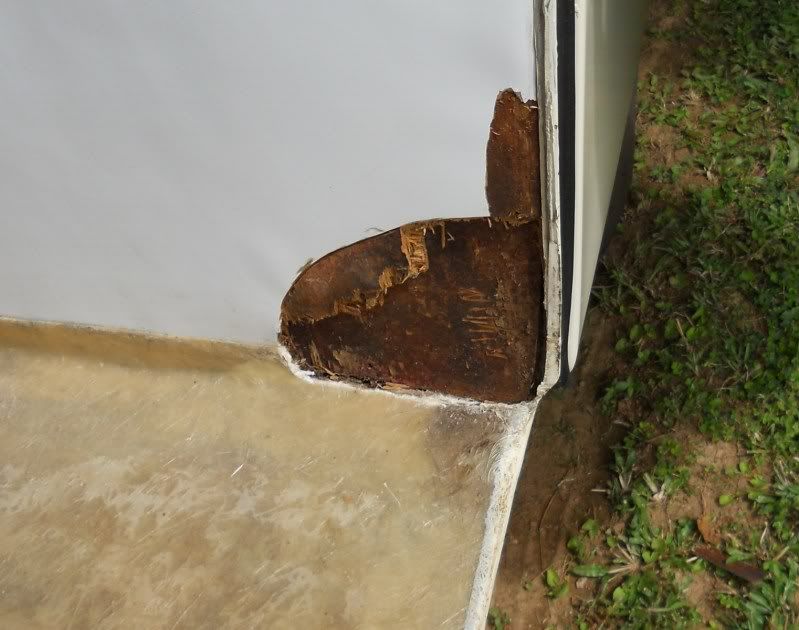 Removed all the wet ply and laminex. Leaving the fibreglass backing. Gave it a few sunny days to dry out.... Then sanded this so the new resin would stick to it. Got my supplies ready. 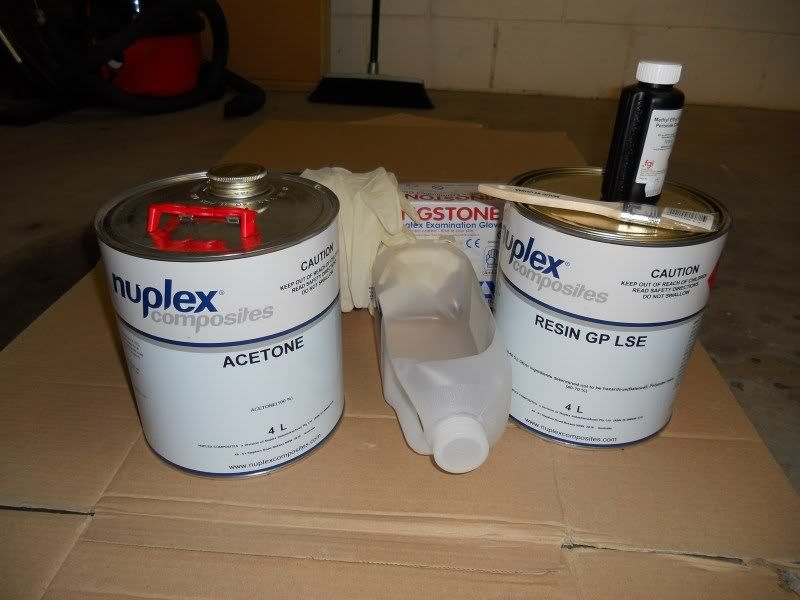 Poured a small amount of resin in the real expensive plastic container. 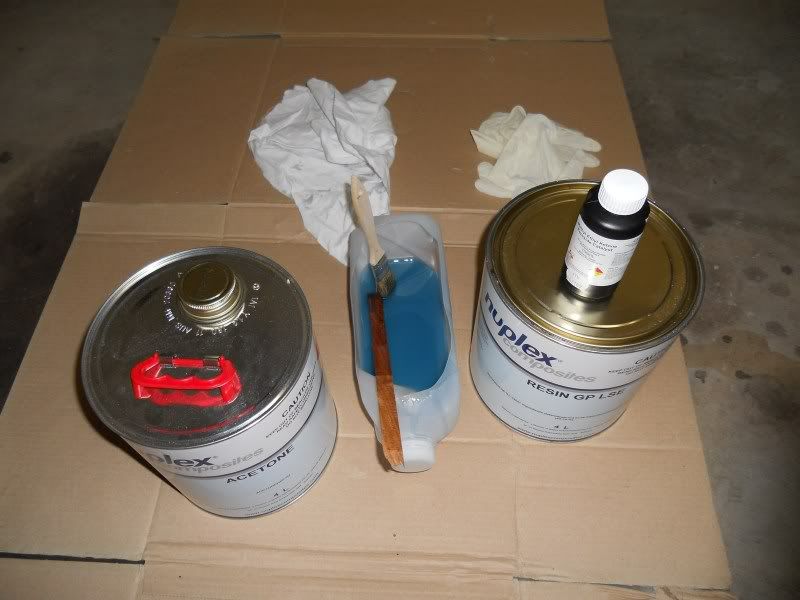 Then added approx 3% Catalyst to the resin in the cut up milk bottle. Stir and this is how the colour will change almost immediately. 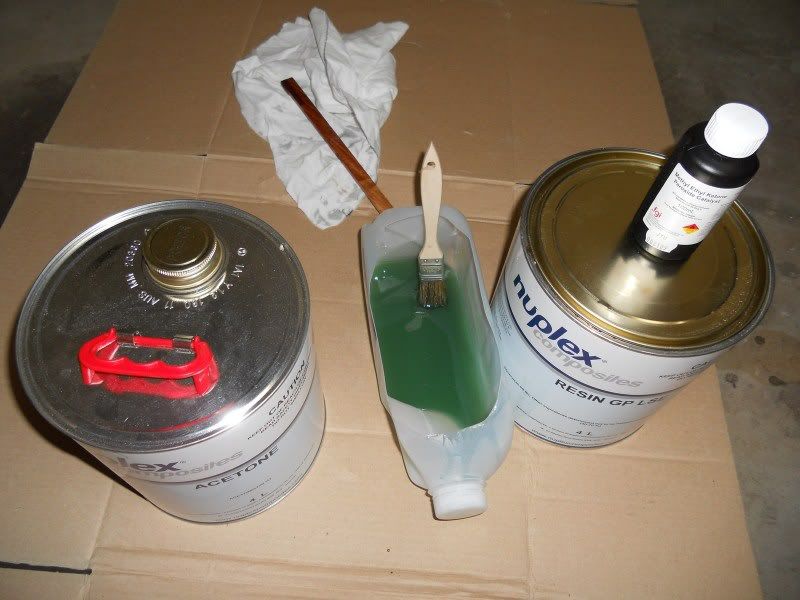 The reason for 3% catalyst instead of 1, is that wood retards the resin going off.... no pun intended. Coated the ply and backing fibreglass before adding tissue glass. Tissue glass is so fine it gets into the real fine areas instead of leaving voids between the glass and the ply. 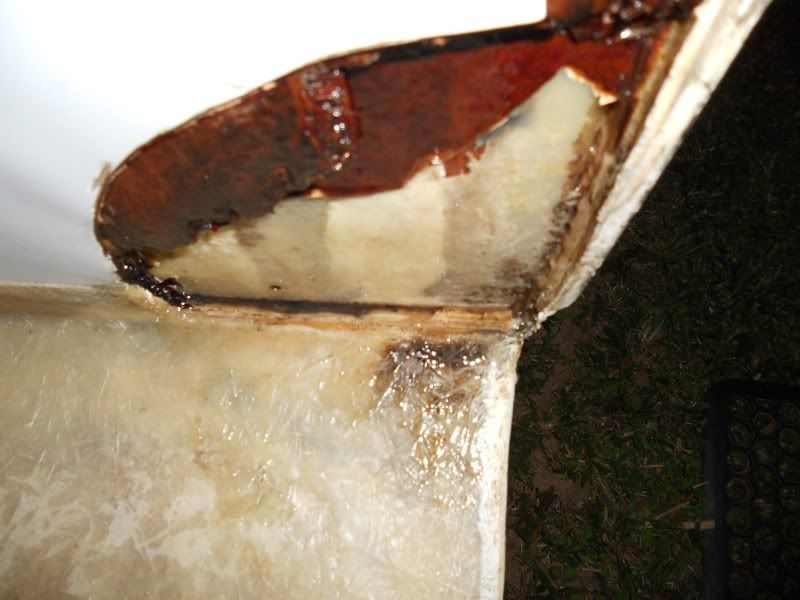 As the resin goes off it will change colour and gradually become jelly like. When it starts to go jelly it is no longer useable. Even though it has changed to a straw colour it is still usable, so long as it is not starting to go lumpy or stiffen up. 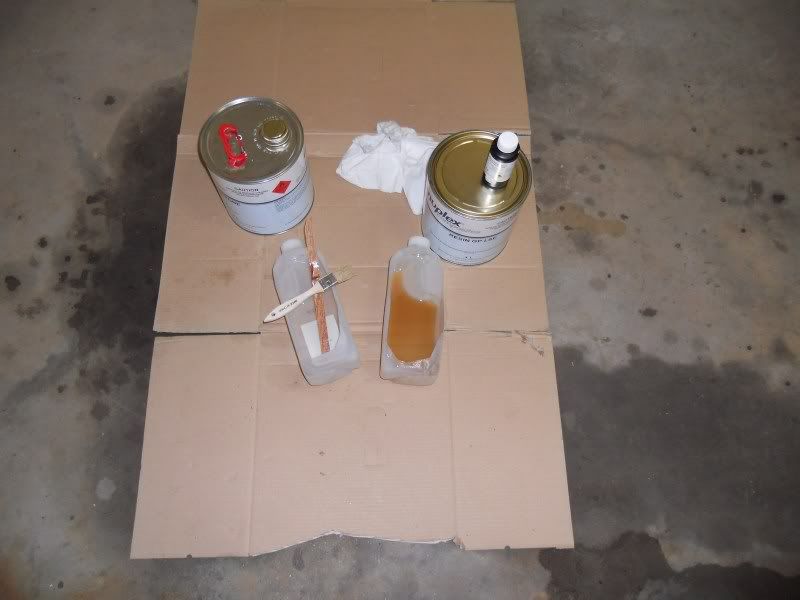 Tissue glass 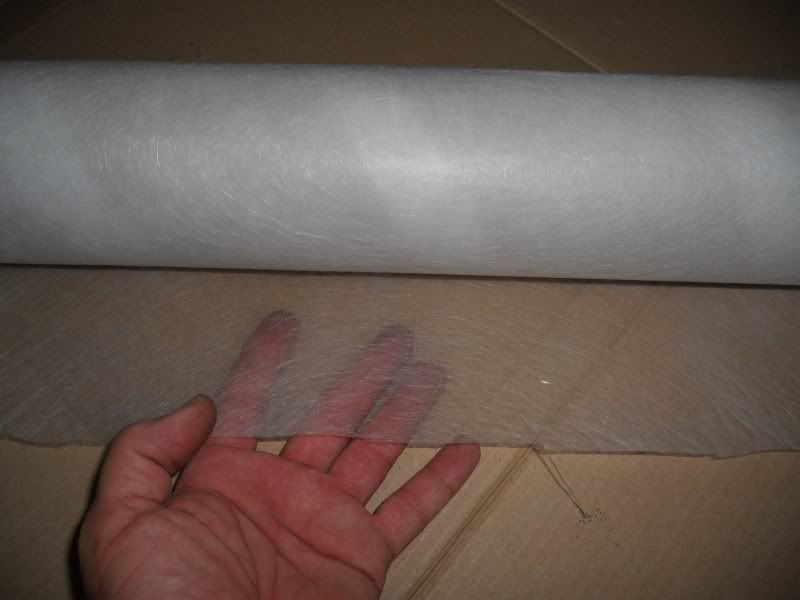 |
|
|
|
Post by atouchofglass on Apr 24, 2012 20:11:01 GMT 10
Resin coat the area first When fibreglassing timber or ply it is best to let the resin go off before adding any fibreglass. The wood or ply can cause bubbles under the fibreglass as it breathes or allows air under it. Then put the tissue glass in place, dabbing it with the brush soaked in resin. This wets the glass and it will almost disappear, it is that thin. In the photo there are at least six thicknesses of tissue glass on the repair. 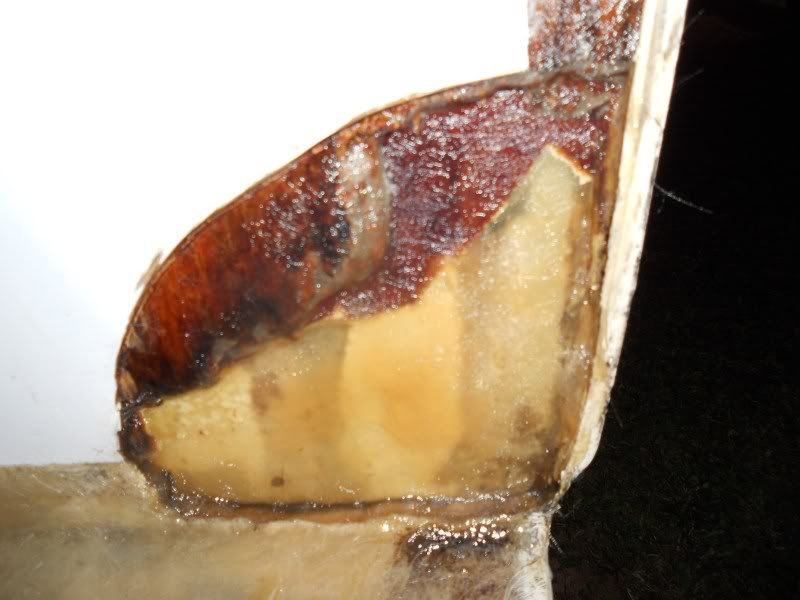 This is the resin after it has gone off. 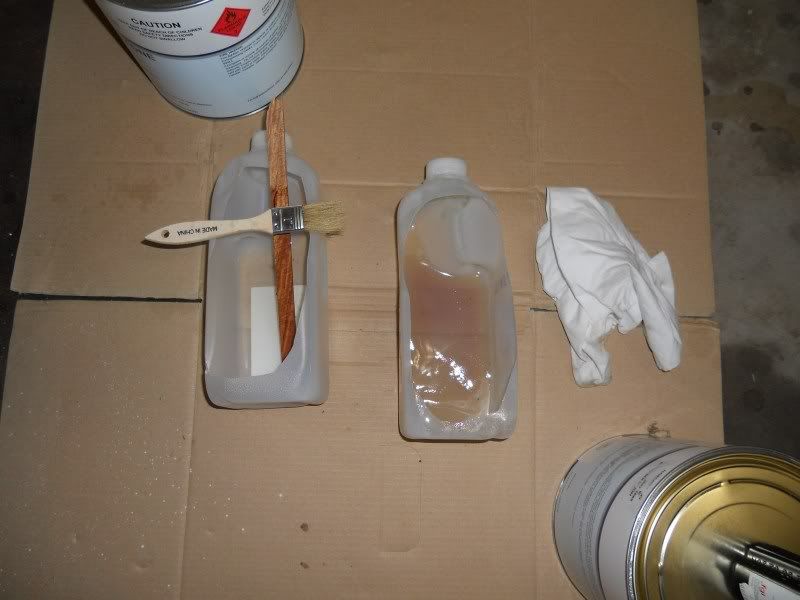 At this stage it is quite hot and can be removed from the container in one piece. Leaving the container to be used again.... milk cartons are hard to get.  This is 225 chopped strand matt. 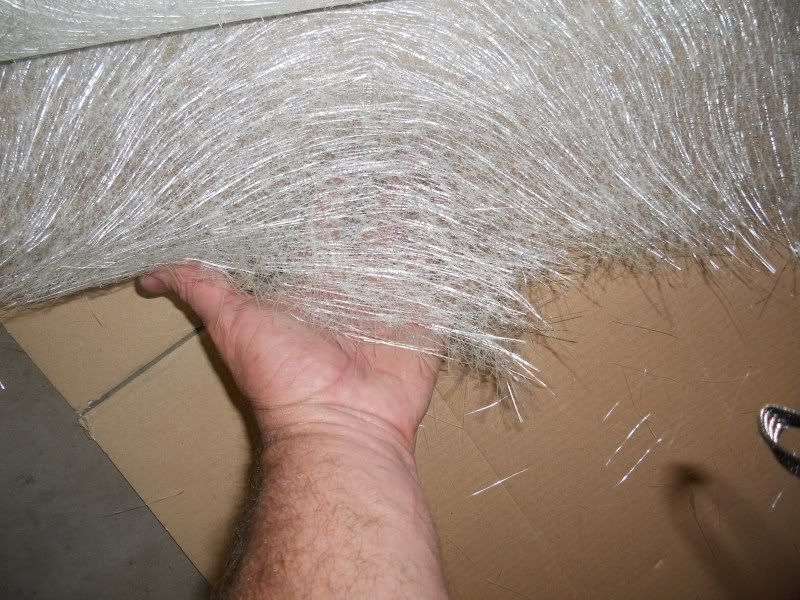 225 means that it weighs about 225grams per metre. This is what is put on the repair next. Try to add this next layer as soon as the first has gone off, as it will bond better.Take your time and add torn pieces to the repair. As each piece is added wet it out with resin using the brush. Dabbing the resin on the fibreglass until it goes from white to clear. Tearing the pieces leaves strands to matt with previous and following pieces of fibreglass. Allow the resin to set before adding any more fibreglass. What can happen if you go too fast is the fibreglass matt will sag and pull itself off the repair. Once the resin has gone off, mix up a new batch and continue with the next lot of glass. If the resin isn't going off fast enough on the repairGet your hot gun paint stripper and gently heat the area up. Not too close to the repair. If you can't hold your hand in front of the repair the hot gun is too close. The heat speeds up the reaction. This is after adding more fibreglass to the repair. 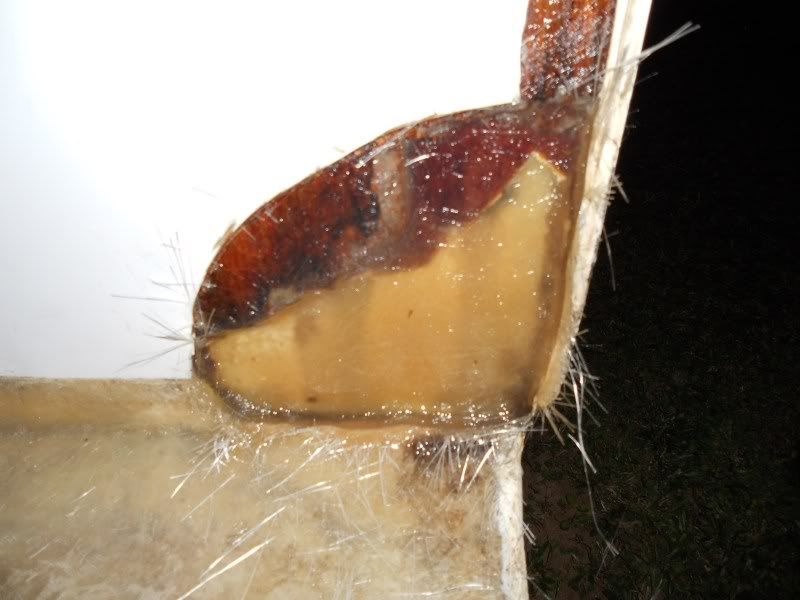 Now you get the idea. Then I used 600 chopped strand. This can be divided up so it is less thick... IE two lots of 300 grams per metre. Remember to tear not cut the fibreglass. After adding multiple layers of 600 and extending it out past the repair. 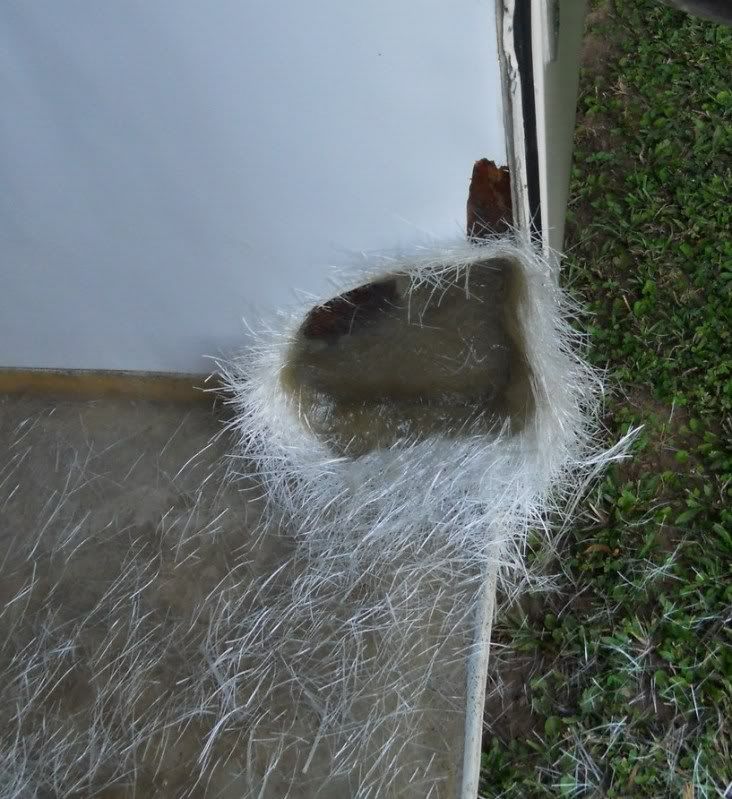 The resin on this last lot can be trimmed with a sharp Stanley knife while the resin is still "Green" That means it is stiff and quite solid but hot and gives a little. It is no longer liquid but not yet rock hard. Using the Stanley knife now means you do far less grinding. 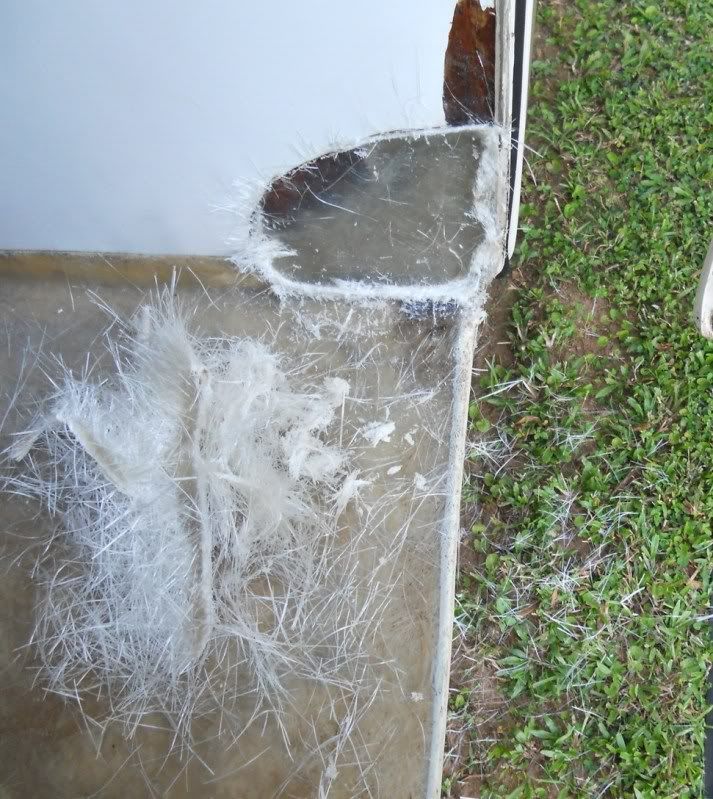 When you cut make sure you cut toward a hard surface. That way it will not tear the glass off the new repair. If there is more than 24hrs between layers you will need to scuff the surface up with coarse sand paper or a grinder.
Otherwise the layers may not bond to each other.
GrindingNow you will need to let the resin harden so it can be ground off. The trick to not getting itchy is preperation.Get a vacuum cleaner as well as a grinder ready. When grinding, the vacuum nozzle is held right next to the disc. As the dust is coming off the disc it is sucked straight into the vacuum and not allowed to spread all over the place. This is the only time I had to grind the fibreglass and it took less than five minutes. 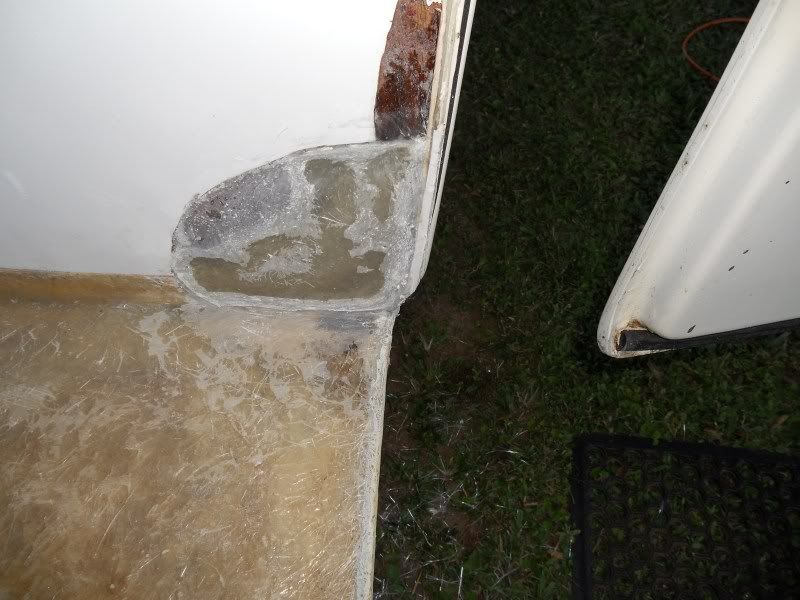 If you are in an open area put a fan behind you so any dust that does escape the vacuum blows away from you. That way you get next to no itch. |
|
|
|
Post by atouchofglass on Apr 24, 2012 20:21:26 GMT 10
The repair is now plenty strong enough but a little ugly. So Time to bog it upCar bog is used next to level up the repair. Most of you will know how to use it so no need to go on about that. 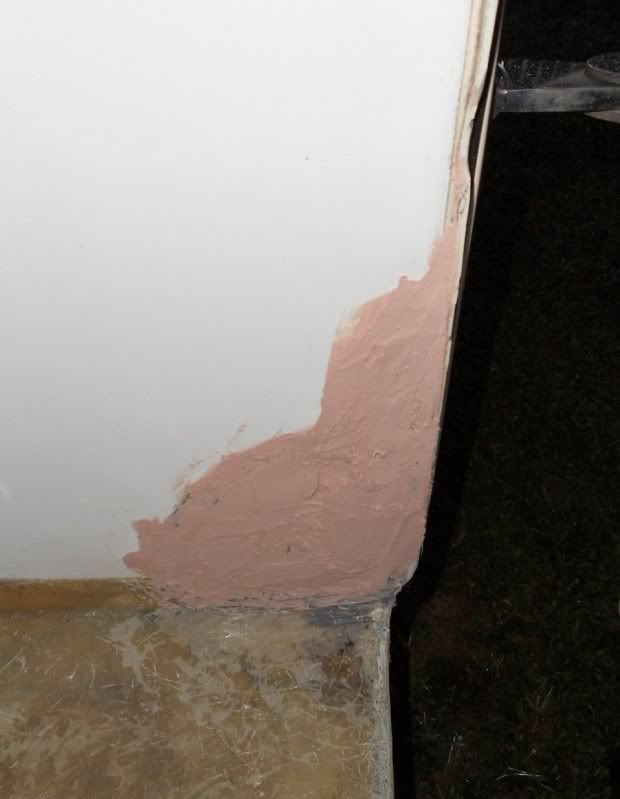 Like the fibreglass I tend to start working the car bog before it has totally gone off. So while it is still green I use a rasp to cut away most of the excess. Then a coarse sanding disc to level it with the repair surface. 28 to 32 grid is just fine. 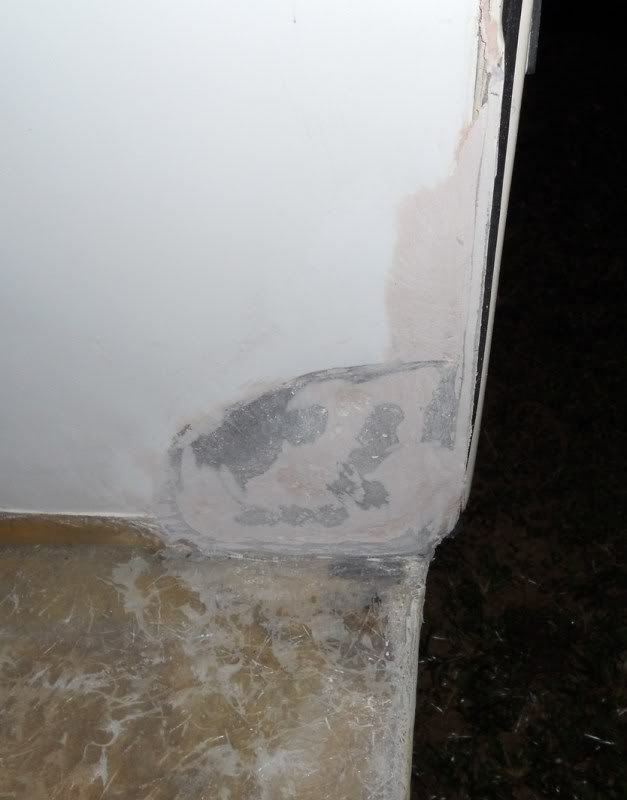 Tomorrow I'll look at the final finishing. All the work was done last night and this afternoon. A total of about .... three maybe four hours. So here is the finished product.  All covered up neatly with a stainless steel plate. Cheers Atog |
|
|
|
Post by hilldweller on Apr 25, 2012 9:37:22 GMT 10
Thanks Atog - another very helpful post |
|
|
|
Post by atouchofglass on Oct 21, 2012 11:05:42 GMT 10
If you look at the first reply on the previous page you will see a very basic mould I made. Wasn't really happy with it for a couple of reasons. 1 It wasn't a good copy of what I needed. 2 Not being tooling gel I was having difficulty with getting product out of it. 3 Not shiney enough ;D So a few months back I grabbed a piece of PVC pipe left over from the first mould attempt and had another go. This time I put sides on it and got a mate to spray paint it with black two pack. Took a mould from this and found more issues. 1 I didn't have enough taper on the sides, so the product didn't come out of the mould cleanly. 2The surface was too rough and needed extra sanding to smooth it out better. 3 Not shiney enough ;D Here is the original plug (black two pack paint), The mould I made using red tooling gel and the product in white gel coat.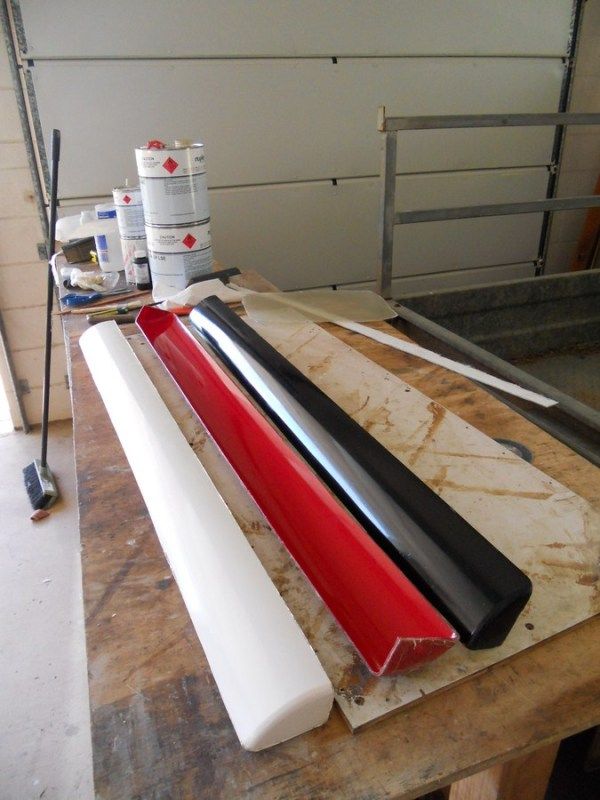 |
|
|
|
Post by atouchofglass on Oct 21, 2012 11:19:15 GMT 10
So I made a second product and broke the ends off to put a taper on them. Reinforced the back to stiffen and straighten it up. Then sanded it smooth with 1200 grit wet and dry on a block.... used wet. It was sort of shiny.... just not enough for me.  Polished it with an el cheapo buff and G6 rapid cut polishing compound. Much shinier.  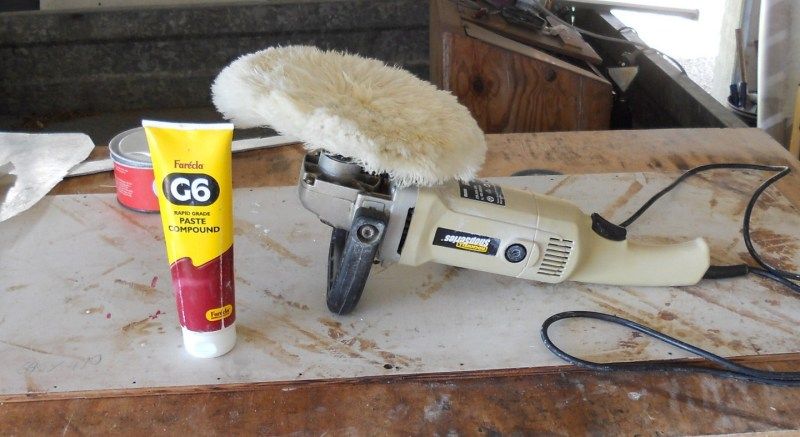 Use it sparingly with some water on the buff. Just moisten the buff or it flicks everywhere. Not a lot of speed is needed and the cutting compound does the job real quick. 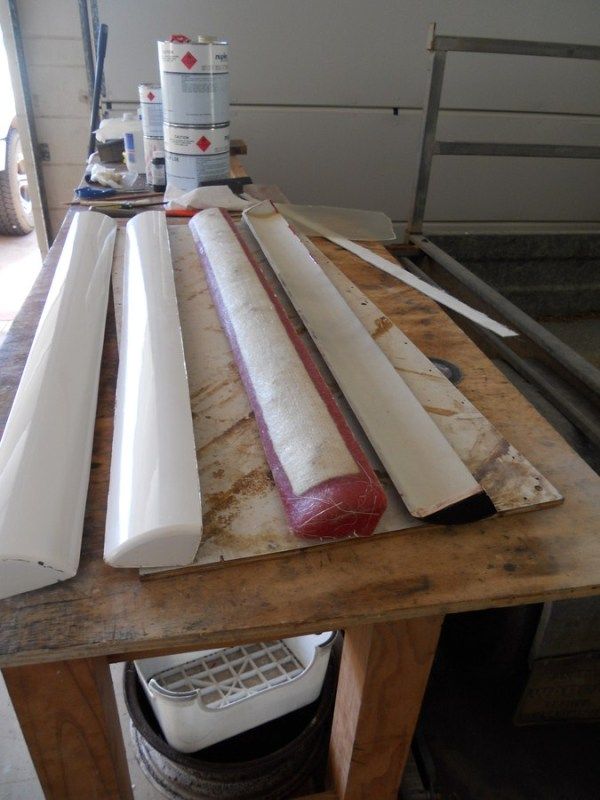 Sadly the photo doesn't show just how smooth and shine the new plug is. It's the one in the photo on the far left with the dark bits at the corner. It is smooth over those bits, just not gelcoated to make it pretty looking. Currently putting a coat of wax on the new plug every half hour. Needs at least six and up to ten coats of wax before letting it sit for a day. 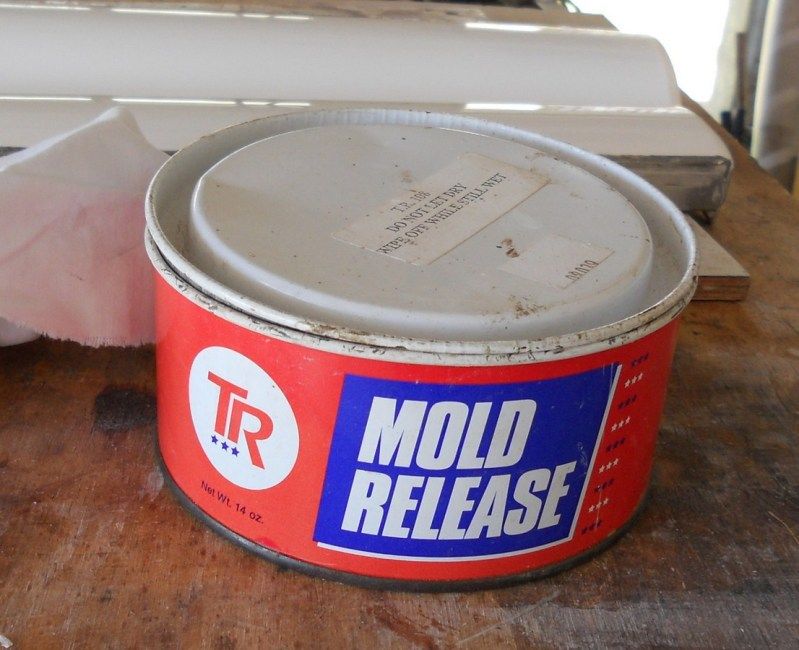 Then I will be able to make a new mould. Hopefully this one will be easier to remove the product.... and ..... it will be much shinier. ;D New mould in the making  Atog |
|
foss
New Member

Posts: 12
|
Post by foss on Oct 29, 2012 15:04:07 GMT 10
ATOG
This thread is great, really useful.
keep the good work going
Gary
|
|
|
|
Post by atouchofglass on Oct 29, 2012 19:55:40 GMT 10
Hey Gary Been a bit busy with finishing the mould and making some product over the past week and weekend. The first mould didn't have a lip on it like the second. The lip was simply formed by putting masking tape around the plug edges. Then painting the tooling gel over both the plug and the masking tape. Followed of course by the fibreglass. The excess fibreglass (in the photo in previous post) was cut off with a cutting disc in the grinder. 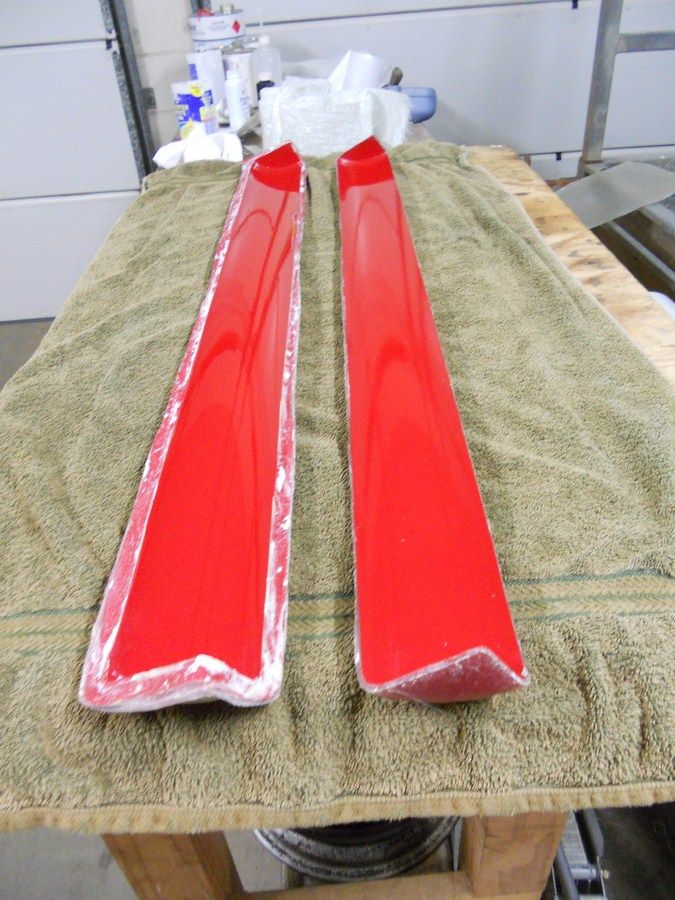 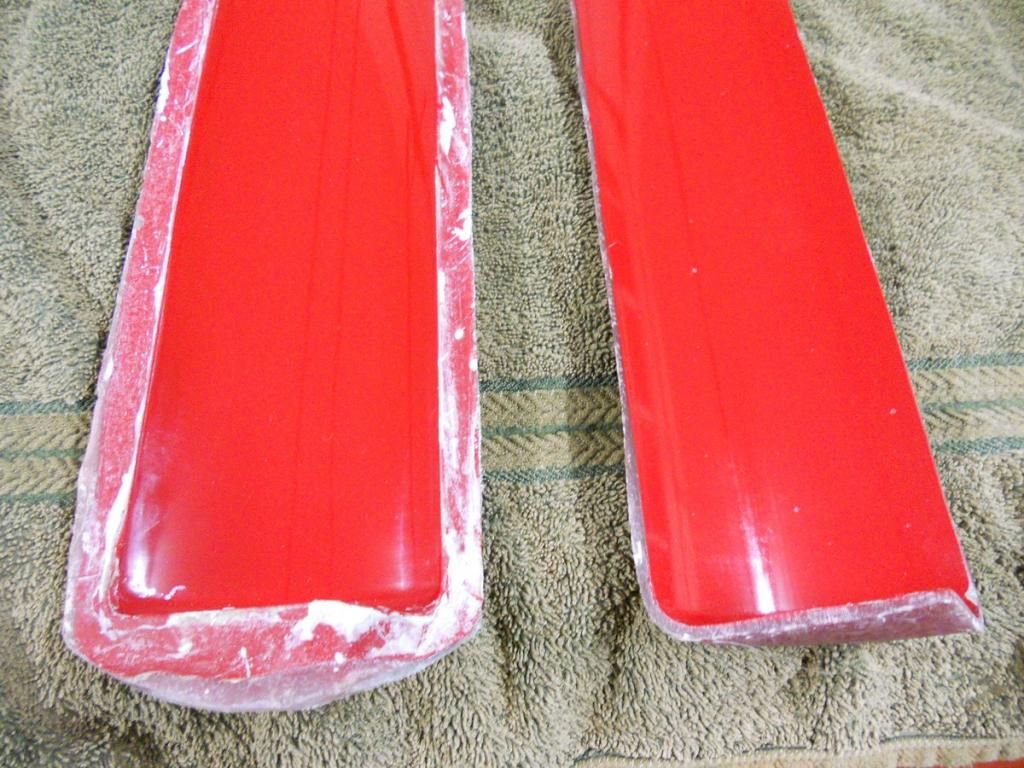 The photo below shows the progression of the work done. 1To the right is the first product done using white gelcoat, uncoloured resin and fibreglass 2 Product made using white gelcoat, resin coloured with flowcoat and fibreglass, that way there is no colour difference inside or out. 3 Strip piece made for the inside, again flowcoat in the resin and fibreglass to keep the colour white. No gelcoat used as it is on the inside and not seen. 4 The strip has been fibreglassed onto the awning. 5 Cleaned up and ready to fit to the caravan  Up close of the above. 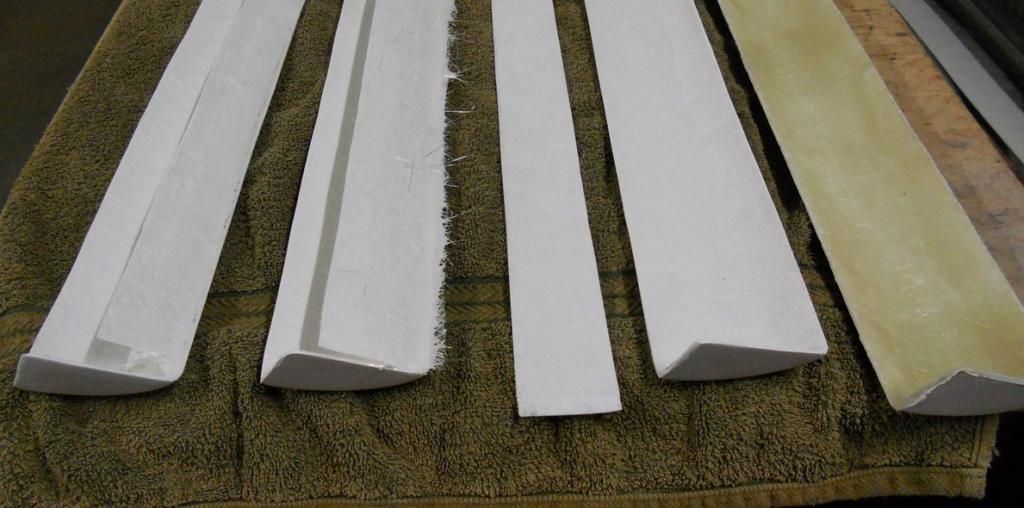 The finished awning weighs just 480 grams...... according to the kitchen scales ;D ;D Oh .... and it's a lot more shiney that the first one ;D ;D ;D ;D ;D Each time the mould is used it needs three coats of wax before using it again.
Allow at least half and hour between each coat of wax.Cheers Atog |
|
|
|
Post by atouchofglass on Dec 7, 2012 17:37:54 GMT 10
Sooooo What if you have made a mould and you need to adjust/change just a bit? There are some simple ways of adjusting your mould if you just want to try something. Example: you have a mould of a door and you want a recess for a lock or recesses for the hinges etc. By making the bits you want to change and just putting them in place in the original mould, you can make a one off and see how it would look. No need to change the original mould. If all goes well you could make a new mould using the one off product as a plug. For me, I needed an awning for my kitchen window and it is shorter than those used over the other windows. Sooooo, this is what I did. Using the original mould I made an end and put it in place using plasticine. 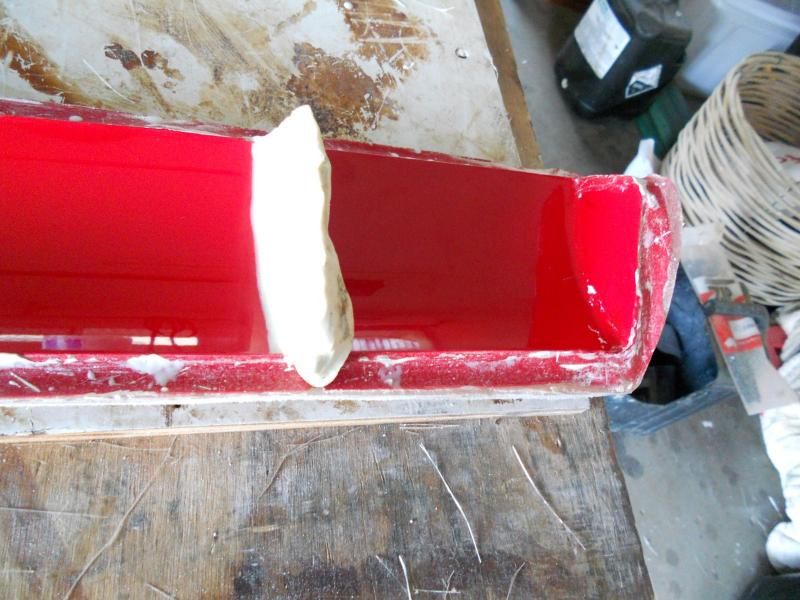  So no need to change the original mould at all. Waxed it like usual. Gelcoated right over the new end 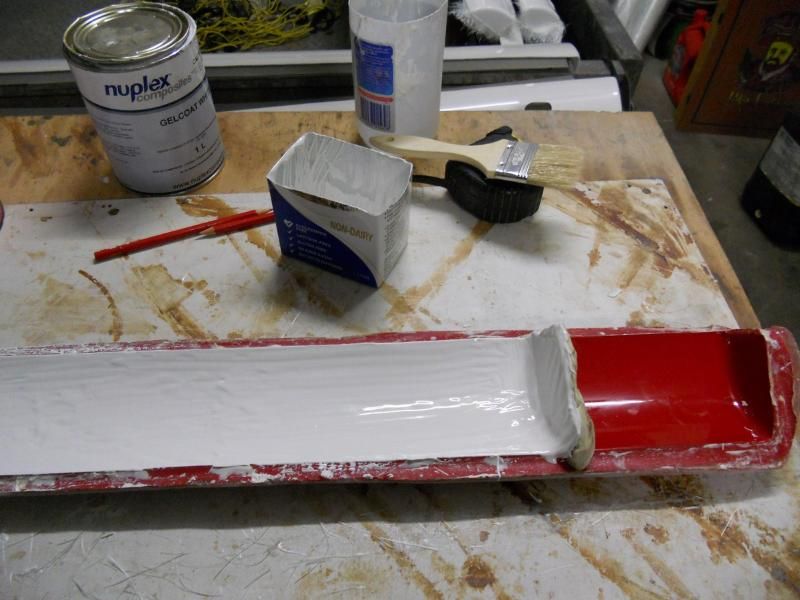 Then a couple of layers of fibreglass and resin..... remember to add flowcoat to the resin to keep the colour white. 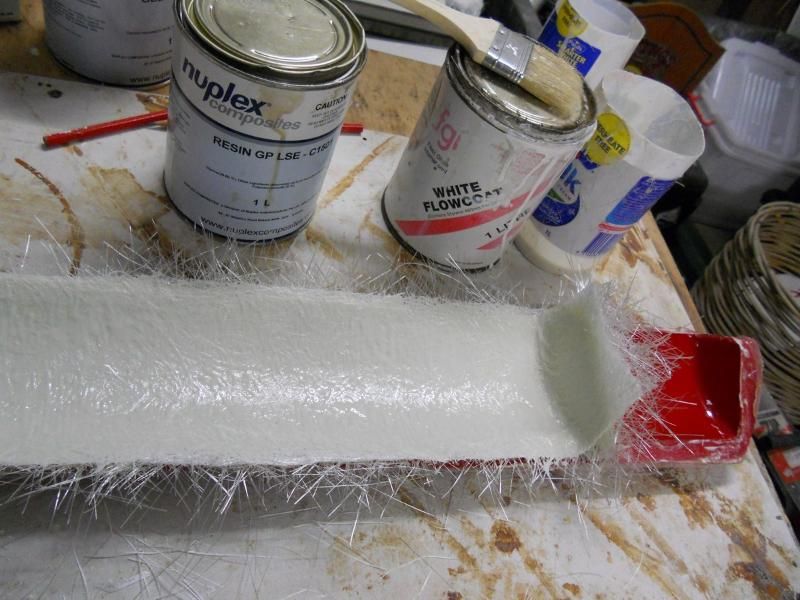 Did it work? Judge for yourself ;D ;D ;D ;D  Cheers Atog |
|
|
|
Post by 1954homemade on Dec 8, 2012 12:47:42 GMT 10
Wow
Thanks ATOG and Chev51 - that is absolutely fantastic. What great info and written in such a way that even I can follow it ;D ;D ;D
I have a little project that I need to do some fibreglassing on, so this will help big time.
Regards
Di
|
|
|
|
Post by hilldweller on Dec 8, 2012 13:32:43 GMT 10
Those look great! The Caravelle has something similar, also in fibreglass. I think that was one of the changes to the original Franklin moulds, presumably in acknowledgement of our somewhat wetter climate. They appear to have worked very well over the years - the only water damage to the window framing in my van was where a window was broken. So yours should last forever |
|
|
|
Post by atouchofglass on Apr 17, 2014 14:19:16 GMT 10
Just a small update.
If you are working overhead with fibreglass.
Preparation is the key.
Make sure the area being fibre-glassed is the exact shape you want it to be, as it will remain that way forever.
Apply a thin layer of resin to the area with a brush.
Then thin chopped strand matt is rolled onto it .
Using a roller like the aluminium one shown in some of the older photos and possibly using the natural hair brush as well.
Always use a thin chopped strand... otherwise the weight of the matt and resin may cause it to fall off.... gravity being what it is.
The idea is to use the minimum amount of resin possible, just enough to wet the matt so there are no dry spots.
That way it won't want to sag.
Don't be in a hurry to get lots of layers on, take your time and it will work out.
Cheers Atog
|
|
|
|
Post by atefooterz on Oct 12, 2014 17:12:04 GMT 10
Hiya, This is in response to Atog suggesting i aLso post this here...i am after anyone around the Sydney ish 300klm+ or - area, who has a fibreglass van or components that need repairing or maybe you are thinking of making someting custom? Looking at the great information in the sister site VV GRP thread i can see some issues that would be best seen and understood better via a series of video shorts, that can be linked to this site without bandwidth penalty. Things to look at are doing one off projects/repairs using existing structures or temporary male molds rather than going the whole 100 yards & create more landfill with time consuming female molds! ( If your fairing skills are up to making a female mold then why not just apply that TLC to the finished object?) Older glass gets floppy and starts to crack & craze however any tub structures can be reinforced reasonably easily & cheaply with the right materials. Topics covered will be the all important prep and especially safety for lungs & skin. My cost will be parking & being around for a day or2, you just pay for materials, your option is to be a star in these DIY vids or hide haha, choice is yours. Contact via ditzygypsy.proboards.com/thread/2919/fibreglass-repairs-modifications#ixzz3FucQeR00or CC PM for more deets. I will try & check this thread also but do not guarantee as fast reply lolz! |
|
|
|
Post by atefooterz on Oct 30, 2014 13:09:46 GMT 10
Okie dokes, offer finished now. Back to my regular gig & standard consulting rate of $148.00ph for composite structure advice. |
|


 The boat I built in 1963 had a 21 stud head '38 mercury V8,( I say that with confidence since kaybee ID'd the motor for me
  coupled to a V-drive which I made, an engineer said the jack shaft wouldn't work that I had cut ready to weld, I had asked him to just weld & balance it, it was cut ready to go, but it all worked fine. I made my own watercooled manifolds from scratch, steering, electrical, trailer, it was all working well 18 years later. We ran it on the Noosa river. Pity we didnt use cameras much those days, the only photos we have of it in the water are ones mum took on launch day at Tin Can Bay down from Gympie
 bondwood vans roofs
  ;D & take all the pain out of continual maintenance, & same as the boat, the rot factor. I will be soaking the inside with epoxy resin also, to get full encapsulation, so why couldn't you do it on a wooden van?. The finish is extra good when painted, & superb when left clear like your boat.


