roofless
New Member
 Stay at home Dad...
Posts: 9
|
Post by roofless on Jan 22, 2013 7:18:23 GMT 10
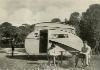
Hi all, We are now the proud owners of a much used and abused 15ft Travel Home Caravan. After joining Caravaners forum and then the Classic forum thinking our van would fit the criteria, I have found out our project is actually a late 60's Van. Making her much older than I am!!! I have given myself till Easter to finish this project so my Wife "Melissa" and I "Dean" can take our son around the east coast for a few weeks before he starts school.. She is in need of a LOT of work and was bought from gumtree for the princely sum of $450. Well worth it in my opinion as the chassis and drawbar are in very good condition for her age. Being so cheap I expected to find quite a few things wrong and it didn't take long to find evidence of dodgy leak repairs, rotting timber and a semi collapsed roof structure. My plan is to re use the original cladding and modernize her with all new innards, a full 12v only power system with solar panels, Upgrading to electric brakes, etc, all while keeping her trim figure intact.... This thread will be a chronicle of her restoration and my mistakes along the way.  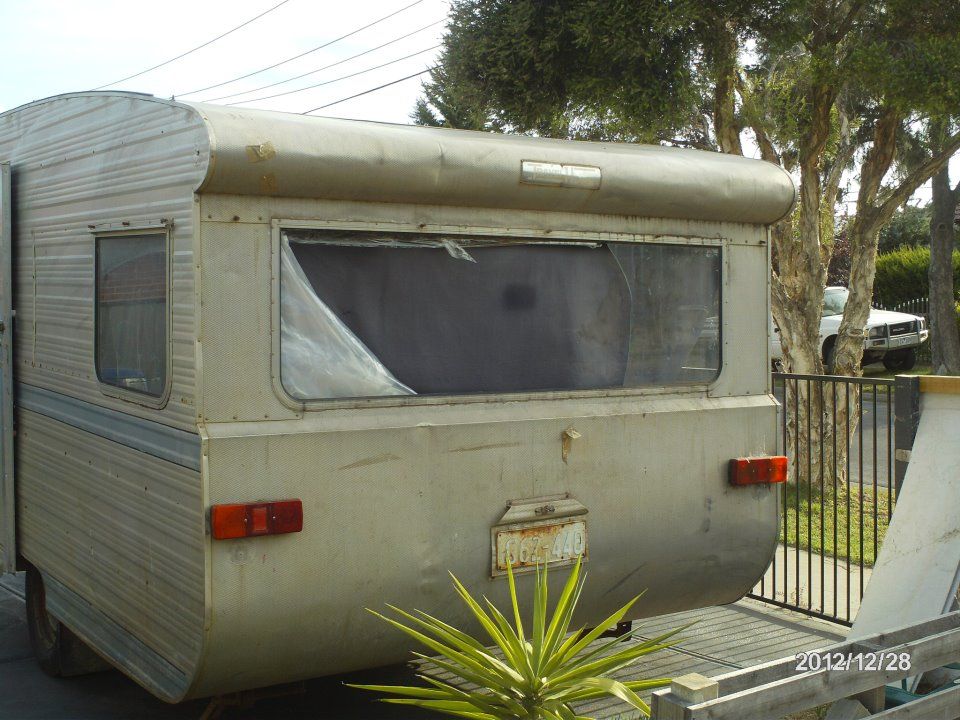 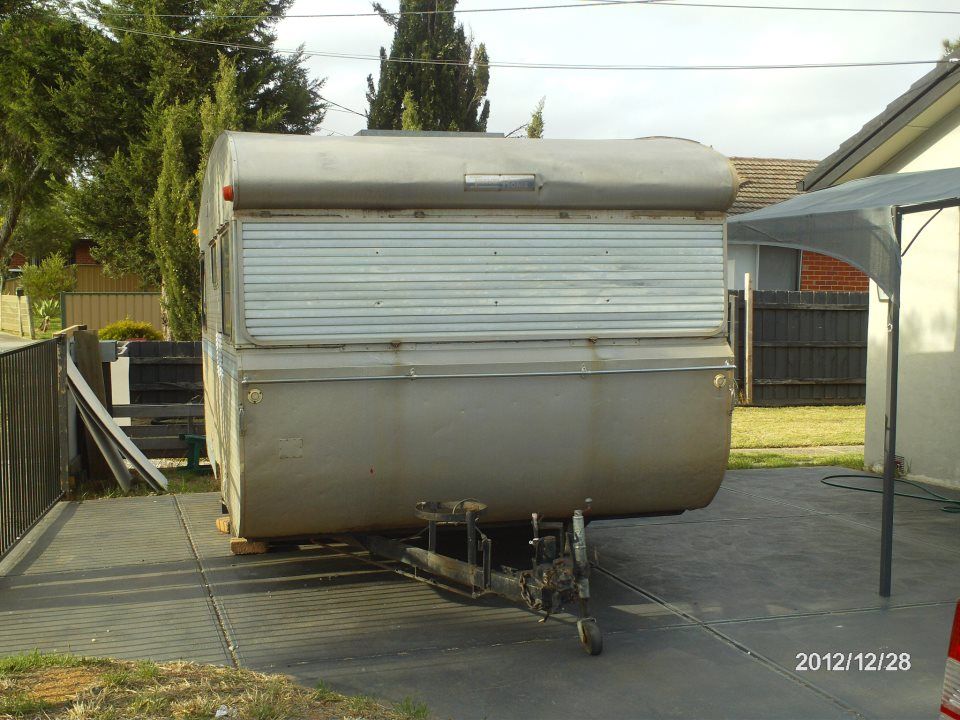 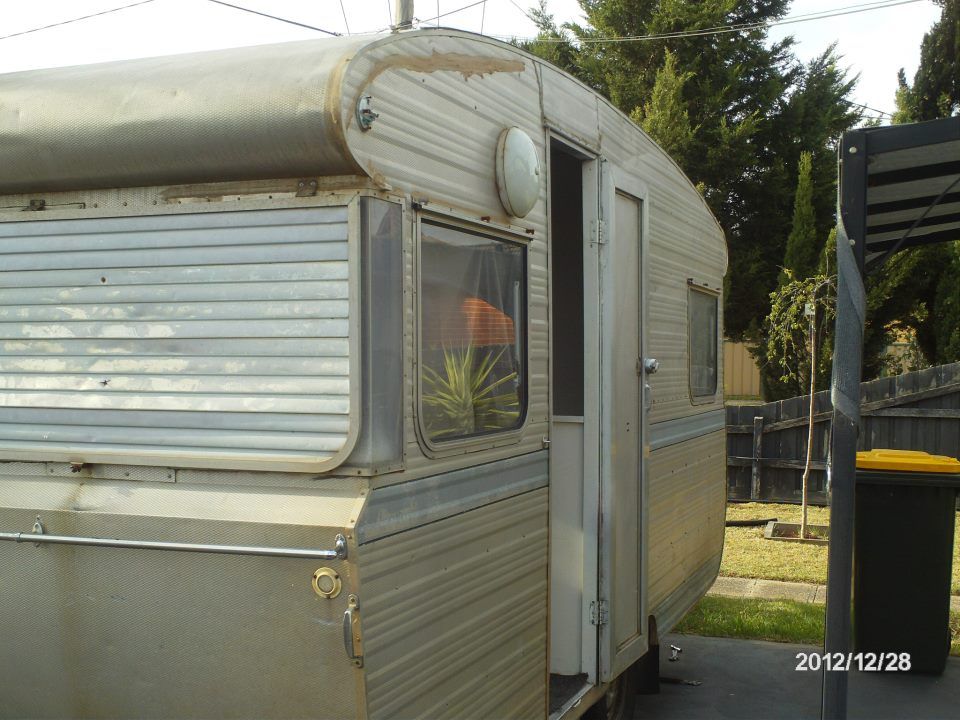 On pulling the interior out I started noticing quite a few smallish issues. AND plenty of damp, mould and rot. As well as a dodgy roof repair. 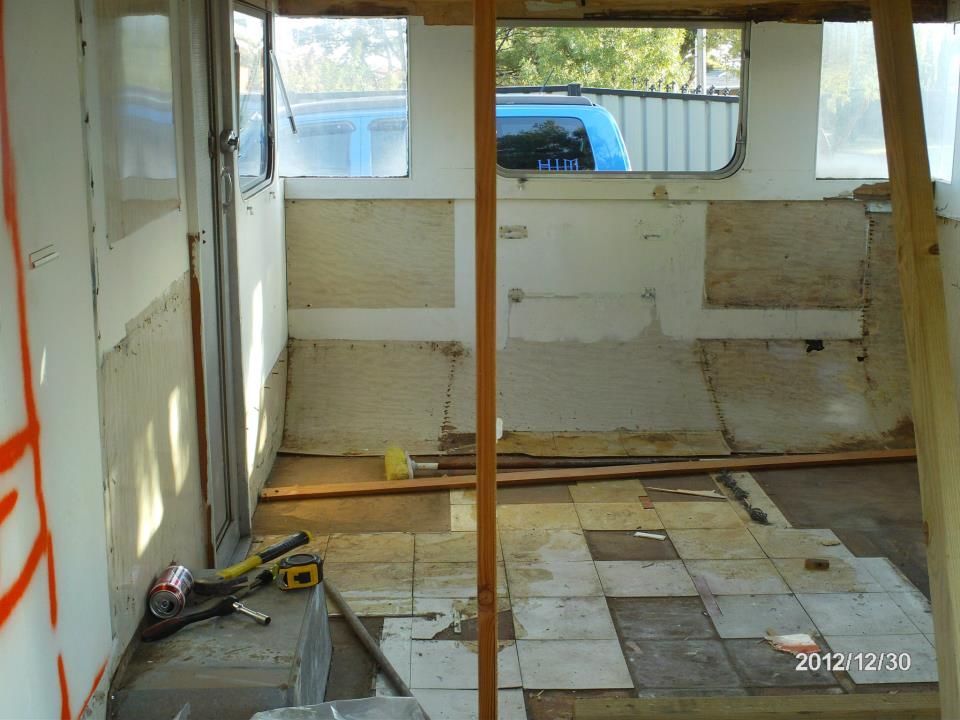 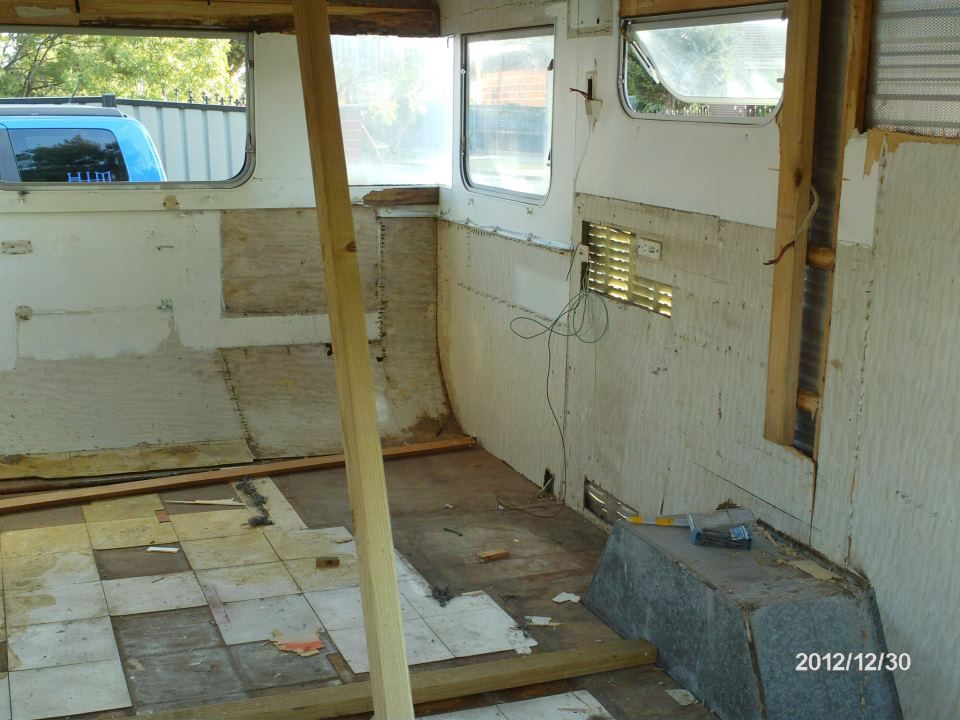 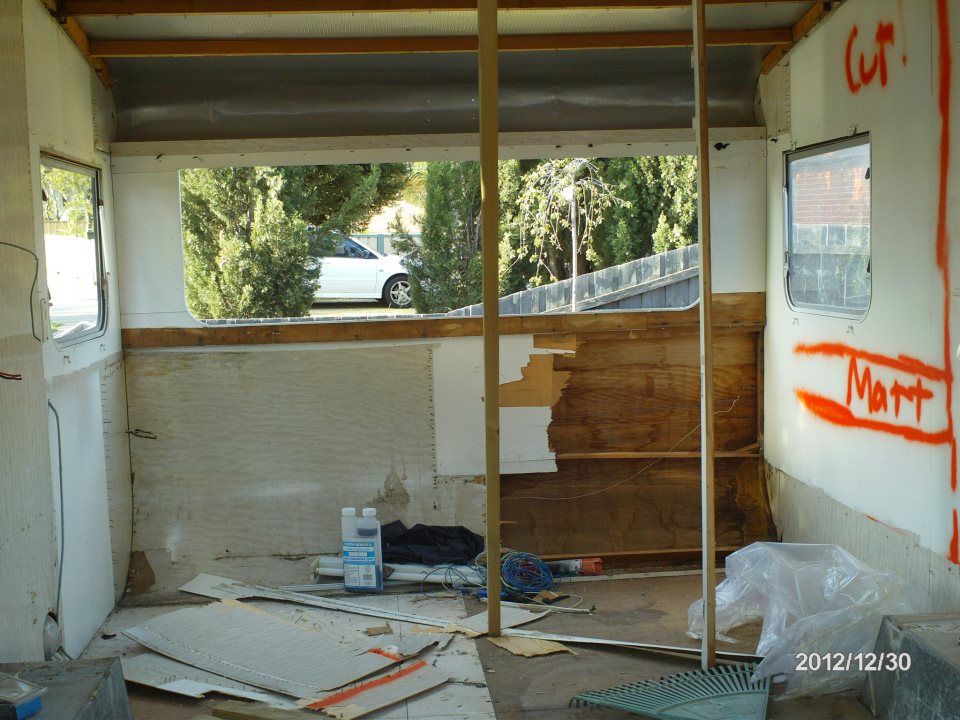  As you can see this will take some time to get finished but being a "Jack of all trades, Master of none" and having a background in all things auto electrical and mechanical, It should be relatively straightforward... Famous last words possibly, but I'll do my best. ;D ;D ;D ;D Also, Information on these is very thin on the ground and I would love to know any info regarding tare and gross weights, features, etc. I assume by the build code that they weren't made in large numbers??? Thanks for reading, Dean and Mel. |
|
|
|
Post by humpyboy on Jan 22, 2013 7:46:09 GMT 10
Welcome Dean & Melissa, looks like you have a big job ahead of you there, I hope it all goes smoothly, you will get lots of advice here if you strike any problems.
|
|
|
|
Post by shesgotthelook on Jan 22, 2013 7:52:51 GMT 10
|
|
|
|
Post by Jennison on Jan 22, 2013 10:42:16 GMT 10
If you need any particular fittings/windows etc for the travelhome let me know as there is a T/home just like it on a property a few hundred yards from my place. Checked it out last year ....the owner is the local trash pack man and more of it comes home to his place than to the tip I reckon  . On top of that, the whole family are like straight out of the movie Deliverance!! Where are you located regionally? jenno |
|
roofless
New Member
Stay at home Dad...
Posts: 9
|
Post by roofless on Jan 22, 2013 12:01:45 GMT 10
Thanks everyone, It's going to take a bit of work to fit into our "schedule" but if I manage to spend enough time on her, I may just make our Easter deadline... SGTL, Looks like quite a project the boy has there... You may have to pitch in..  Thanks for the offer Jennison. I may have to take you up on that, if this mob in Campbellfield doesn't pull through. I am chasing window struts and the plastic locking pins for them but I can possibly get those from a supplier here in Campbellfield. All other parts are either on their way or already here or have to be custom made by me. Except for the electric brakes.. Still trying to work out how they got HZ drums onto HT hubs?  ? Just a case of me pulling my finger out and rebuilding the framework. one wall at a time. I will be attaching the original cladding back on though. With a few minor repairs... |
|
|
|
Post by Don Ricardo on Jan 25, 2013 21:48:38 GMT 10
G'day Roofless, Great to hear about the plans you have for your caravan and your travels. Nothing we enjoy more on the forum than a good restoration saga, so we look forward to reading about the work on your Travel Home, and then reading about your travels.  I'm pretty sure your van is the first vintage (ie pre-1970) Travel Home we've seen on this forum. Most of the Travel Homes that are around seem to be Classic era, and there are a few photos of 70's Travel Homes on our sister Classic Caravans forum. I saw this one in South Australia last year, but by the design and livery it is pretty clearly a classic, not vintage: 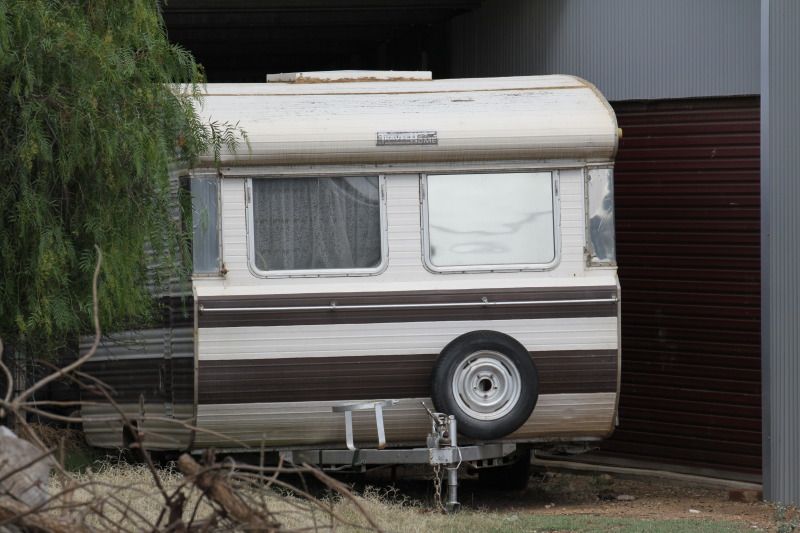 In honour of your van - and the fact that it indicates that Travel Home was around before 1970 - I will start a Travel Home thread in the Down History Lane section, and will borrow a couple of the pics of your van. Hope that's OK? Having a thread in the DHL section hopefully will encourage people to add info about the history and pics of other Travel Home vans if they have them. Don Ricardo |
|
roofless
New Member
Stay at home Dad...
Posts: 9
|
Post by roofless on Jan 26, 2013 19:17:40 GMT 10
I appreciate that Don, more than happy to contribute to it where I can...
I assumed from the chassis number that it had to be rather old as most Travel Homes I've seen had 4 numbers not 3...
|
|
roofless
New Member
Stay at home Dad...
Posts: 9
|
Post by roofless on Jan 31, 2013 14:54:10 GMT 10
Hi All, As some of you may be aware, I'm rebuilding a mid 60's Travelhome and would like to run an idea past those "in the know". Out of curiosity, is it worth strengthening the roof beams along the length of the van? ie, crossbracing the roof truss's to distribute weight... I have laminated the wall to wall roof beams with ally angle 32x20x3 in the hope that it wont sag over time, BUT seeing as this is my first rebuild I'd like to get other opinions before I put the ceiling sheets in... Thanks in advance, Dean. |
|
|
|
Post by Roehm3108 on Jan 31, 2013 16:04:59 GMT 10
Hi Dean
I think it would be better if you didn't start a new thread about each point you want to raise. If you keep it under the original thread, it keeps it all together and we can scroll up to the pics as needed. Would also be a better way to keep the historical dramas together as you go along and it will read as a complete story.
Regarding your question. If you were to put longitudinal battens in, then you would have to mortise them and create a curve in line with the front to back curve. Personally, once you reinforce the cross framing, I see no benefit in going beyond that. They obviously thought that way when they built the van, so I reckon that what you're doing should be sufficient.
Ray
|
|
|
|
Post by Franklin1 on Jan 31, 2013 16:23:39 GMT 10
G'day Dean, This is a long-winded version of what Ray has just told you, but since I'd almost typed it out by the time he posted, I'll post it all anyway... The curvature of a caravan roof from front to back will stop the roof sagging from front to back, so additional bracing won't make much difference to that aspect. Roof sagging occurs across the width, and usually around the hatch area, because of the combined weight of the hatch framework plus the "outrigger timber beams" that span only from the wall to the hatch sideframe. My own observations of sagging hatches tends to point towards the timber framework around the hatch having got wet and rotted out, thereby significantly reducing the strength of the supporting timbers. I've copied a photo from your thread about your van, to illustrate a couple of things... 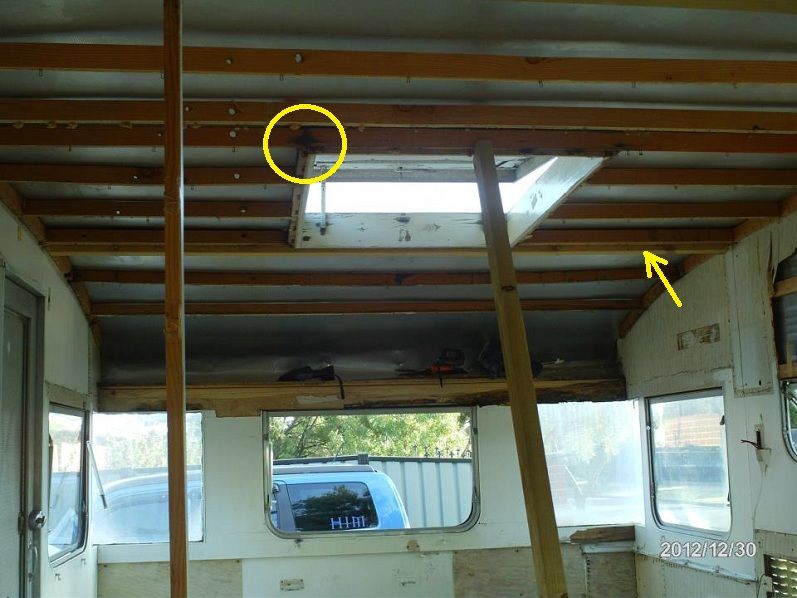 1: The circled area shows dark staining which suggests the timber has got wet and is perhaps showing signs of rot. Ultimately this sort of thing is likely to end up as cracked timber and a sagging roof. Making sure the hatch area is completely waterproof is a critical part of any restoration, I feel. 2: The arrow points to what looks like an additional support timber at the rear of the hatch frame. I've always been of the opinion that the standard framework either end of the hatch opening is too "light on" for the total weight it has to support, and that there should be two cross members at both the front and the back of the hatch frame. 3. Internal fixtures in the van can help to support the framework near the hatch. For example, a full-height wardrobe on one side of the van will support the roof timbers to within about 3-400mm of the side of the hatch opening. Cupboards above the sink are generally not anchored down to floor level, so they in fact add to the weight pulling down on the roof in the hatch area. I would encourage you to think about the framework around the hatch, and explore ways of reinforcing what's already there to ensure it can cope with the weight. But the bottom line is that the ultimate prevention against roof sagging is to make the hatch area absolutely 100% waterproof. cheers, Al. |
|
roofless
New Member
Stay at home Dad...
Posts: 9
|
Post by roofless on Jan 31, 2013 18:55:22 GMT 10
Thanks for that Roehm3108 and Franklin1. I was in 2 minds about about adding this to the build thread or technical?? Any possibility of having it moved??
Franklin1, That extra beam you highlighted is what I originally did to support the 45kg roof hatch!! It's 75x35 structural pine and surprisingly, it actually worked to help straighten the roof out till I could laminate the good beams then replace the not so good ones.
This has since been removed as I'm changing the size and type of roof hatch. I have had some acrylic cut for a new "much lighter" hatch and am just finalizing bracketry to suit. Total weight including brackets 13kg!!!
Also the other reason for strengthening is to allow the fitment of 2 180w solar panels... Long term goal anyway.. But it seems as though doing it that way will be sufficiant and now I can concentrate on fitting a ceiling... WoooHooo....
Thanks again, Dean.
ETA... Thanks Conti for combining the thread....
|
|
Deleted
Deleted Member
Posts: 0
|
Post by Deleted on Jan 31, 2013 20:33:27 GMT 10
I was in 2 minds about about adding this to the build thread or technical?? Any possibility of having it moved?? hi dean the sagging roof thread has been merged into your original thread in members photo album. conti |
|
|
|
Post by Roehm3108 on Feb 1, 2013 8:41:58 GMT 10
You're a nice man Mr Conti - as nice as your alto ego ;D ;D ;D
|
|
roofless
New Member
Stay at home Dad...
Posts: 9
|
Post by roofless on Feb 5, 2013 19:11:09 GMT 10
Yet another question for "Those in the know"...
Has anyone ever vinyl wrapped a caravan before??? For those who don't know, think of it as a giant uv stabilized sticker in place of paint....
I started thinking about this as I cant find the original Ally cladding, can't get it looking clean enough to look good and thought it would also be a good way to add a little extra waterproofing..... ie, cover screw heads, seams, etc...
I've seen it done cars, trucks, bikes, etc many times and I do realise the issues involved in not having a dead flat surface to stick to and the fact it will last no more than 10 years but the bonus will be having the Van match the tow car.....
The tow car is a bright pacific blue metalic with grey wheel arches... I think "Homer" will look good like that.
|
|
|
|
Post by tracey on Nov 23, 2019 14:41:24 GMT 10
I have a ‘67 Travel home Deluxe in beautiful original condition, how do I post pictures?
|
|
|
|
Post by nickd15 on Nov 23, 2019 15:35:25 GMT 10
Hi Tracey,
If you go to the Home part of this forum, the second item is a how to of posting photos. It appears complicated at first but is quite easy once you get used to it.
Welcome and good luck. Nick.
|
|
|
|
Post by Don Ricardo on Dec 5, 2019 22:19:27 GMT 10
I have a ‘67 Travel home Deluxe in beautiful original condition, how do I post pictures? Hi Tracey, If you’re having trouble posting photos of your van, you’re welcome to email the pics to me and I’ll post them for you. You can email them to caravanhistory@gmail.com Don Ricardo
Footnote: Sorry, Tracey. I misspelled my email address. I’ve corrected it now. It’s caravanhistory@gmail.com Thanks to Roehm3108 for letting me know about the error. |
|


 ?
?


